This article covers 3 simple ways to sign documents in Gmail. Signing digital documents received in emails can be troublesome if you don’t have a simple method to sign them without the need for printing, signing, and then scanning. There are many ways to avoid all this trouble, like generating digital signature and then using document readers to sign documents with your digital signature.
In this article, I’ll cover even simpler methods to sign documents within Gmail. I’ll tell you about 3 free extensions that let you sign documents digitally within a few clicks. Out of 3, 2 are the Gmail extensions which you can get from the GSuite Marketplace and one is a regular Chrome extension from the Chrome Web Store.
These extensions let you save your signatures and initials either by typing (fonts), drawing or uploading. Whenever you get a document to sign in Gmail, you can simply use these extensions to sign that using your saved signature. Once signed, you get options to save, reply, and forward the signed document for further ease. Apart from that, you can also ask others to sign documents and get the signed documents in a similar manner. With that said, let’s check out these extensions in details.
Also read: Free PDF Reader With Digital Signature, Password Protection, Tabbed UI
3 Ways to Sign Documents in Gmail:
EverSign
The first method to sign documents in Gmail is using EverSign. It is a Gmail add-on which you can install to your Gmail inbox from the GSuite Marketplace (link below). When you install this add-on, it sits in your inbox on the add-on panel present on the right side. It only activates when you open an email; it doesn’t show you anything when you are in the main inbox.
Set Up:
For the first time, you have to set up your account on EverSign and save your signature there. The signup is easy and only takes a minute. After signup, it takes you to the EverSign web app where you can save your signatures either by drawing, uploading an image, or typing in handwriting fonts. Upon this initial set up, you can use EverSign to sign documents within Gmail.
Procedure:
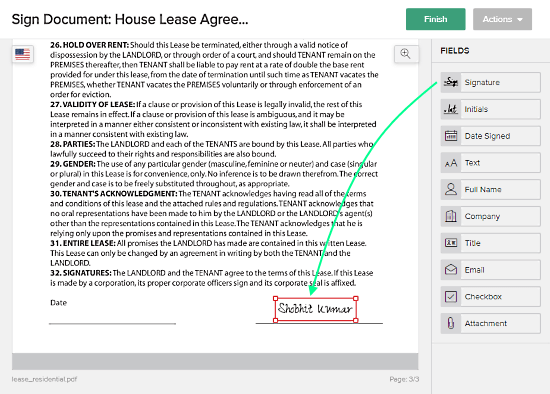
When you tap this extension within an email. it shows you a screen similar to one attached below. From there, you can select where you want to add your signature. You can add a sign to attached documents or in the email message body. Below that, it asks you who’s signing. Select Me option to sign the document or go with other option if you need someone else to sign.

In the next step, EverSign opens the document in a new tab where you can drag and place your signature in the document. Apart from the signature, you also get options to add other information such as Date Signed. Text, Full Name, Company Name, Attachment, etc. Once done, click the Finish button from the top and it takes you back to Gmail along with the signed document. Now, you can find your signed document in the recently signed section of this extension. From there, you can send the signed document in the reply, in a separate email, or download it.
And, if you send the document to someone else, they get an email with a link to EverSign. That link takes the users to EverSign web app where they can sign the document in the same way without the need of signing up.
Get EverSign for Gmail here.
SignEasy
SignEasy is another free Gmail add-on that lets you sign documents within Gmail. This add-on works almost the same as EverSign. It sits on the add-on panel in the Gmail inbox and you have to create an account and add signatures in the initial set up. After that, you can use it to sign attached documents in the emails.
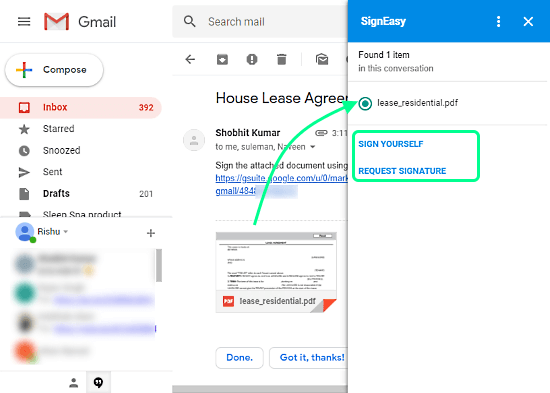
When you open an email with some document attachments, this add-on automatically fetches the attachments and asks you t choose which document you want to sign. Unlike EverSign, you can not add your signature to email message body with SignEasy.

In the next step, the selected document opens in SignEasy web app with several annotation options. From there, you can drag and drop your signature anywhere in the documents. Once done, click the Finish button which takes you back to Gmail and gives you options to reply to that email with the signed document. From there, you can also download a copy of the signed document for yourself. The free-tier of this add-on limits the user to 3 signature request per month but there is no limit on self document-signing.
Get SignEasy for Gmail here.
DocuSign
The third way to sign documents within Gmail uses a Chrome extension DocuSign. This Chrome extension also works very similarly to above mentioned Gmail add-ons. In order to use this extension, you have to create an account first and save your signatures.

Once set up, it adds an icon to the documents attached in emails. Clicking that icon opens the document in a popup where you can drag and drop your signature on the document. You can resize and rotate the signature to make a perfect it. Along with the signature, it also gives you options to add name, company, date signed, etc. to the document.
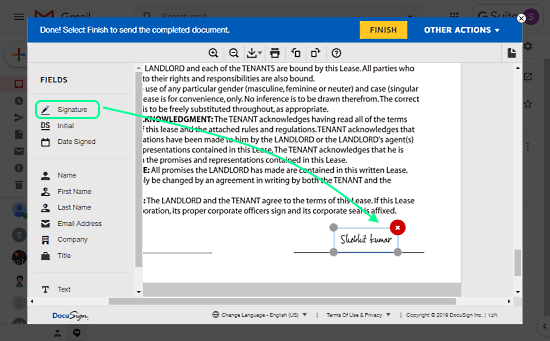
After signing the document, click the Finish button to go back to the mail and reply with the signed document. The free-tier of DocuSign lets you sign unlimited documents along with three signed requests.
Get DocuSign for Chrome here.
Closing Words:
These are some easy ways to sign documents in Gmail without leaving your desk. With these ways, you can securely save your signature online and instantly sign any document digitally. The feature to ask others to sign the document is very handy. Give them all a try and share your thoughts with us in the comments.