This tutorial talks about how to change time synchronization interval in Windows 10. At the end of this tutorial, you’ll be able to change the time synchronization interval in your Windows 10 PC.
By default, the system time gets synchronized once a week (exactly in 604800 seconds) in Windows 10 PC and there in no native option to set a custom time interval for time synchronization. But, what if you would want to change the time interval manually? Well, this what the tutorial is all about.
In this tutorial, I will explain how to change the time synchronization interval in Windows 10 manually and with ease. Actually, this can be achieved with a simple registry hack where you’ve to change the default time synchronization interval i.e. “604800 seconds” into the time interval you want. After that, the system time will start synchronizing in the time interval assigned by you.
How to Change Time Synchronization Interval in Windows 10:
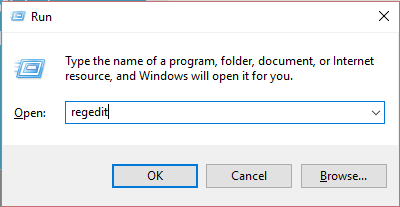
Step 1: First, press “Windows Key + R” to launch the “Run” program, then type “regedit” in the input field and hit Enter to open up the registry editor.
Step 2: When the registry editor opens up, simply navigate to the following registry key location:
HKEY_LOCAL_MACHINE\SYSTEM\ControlSet001\services\W32Time\TimeProviders\NtpClient
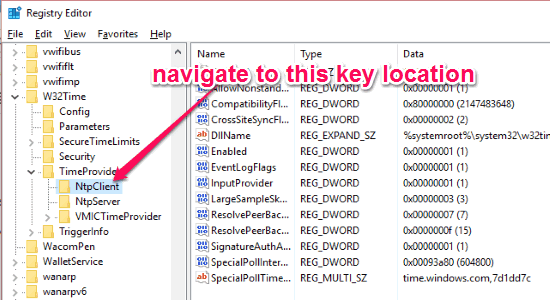
Step 3: After you browse the above key location and click on “NtpClient“, you’ll be able to see various key values on the right panel. Here, you need to right-click on the value named, “SpecialPollInterval” and then select the “Modify” option, as shown below.
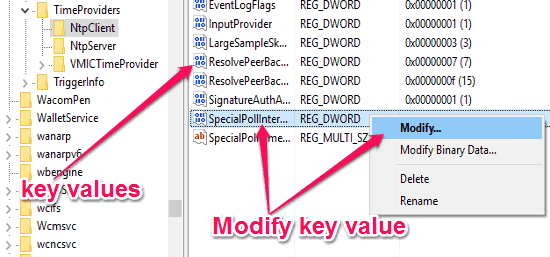
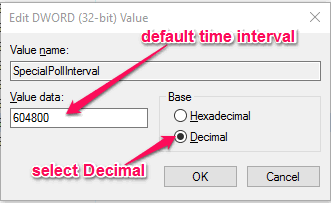
Step 4: As soon as you do that, the key value editor window will appear where you have to select the option “Decimal” under the “Base” section. After that, you’ll be able to see the default time synchronization interval “604800 seconds” in the “Value Data” field.
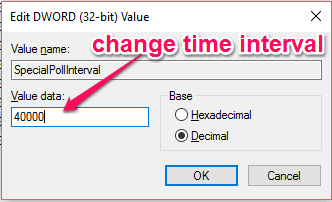
Step 5: Now, you can simply change the default time interval and assign any value (in seconds) you want in the “Value Data” field. After changing the time synchronization interval, simply click “OK” to apply changes and then close the registry editor. From now on, your Windows 10 PC will be synchronized as per the custom time interval assigned by you.
My Final Verdict:
The system time on your PC lets you keep track of the time, but also most of the programs use your system time for functioning properly. So, if you want to keep your system time accurate and frequently updated, then you can change the default time synchronization interval of one week into any custom time interval with a simple registry hack. For this, all you got to do is go through the steps explained in this post and you’ll be able to do the same with ease.
I hope you find this tutorial helpful.