This tutorial talks about how to hide user accounts on Windows 10 login screen. After following the steps mentioned in this tutorial, you’ll be able to easily hide any of the user accounts from the login screen of Windows 10. This can be done with a simple registry hack and also you would not require any third-party software to do so.
Let’s say, you’ve added multiple user accounts on your Windows 10 PC, then by default Windows will display all the user accounts at the bottom-left corner of the login screen. Now, what if you don’t want to display any specific user account on the login screen and keep it invisible from others? Well, this is what this tutorial explains. In this tutorial, I will explain a simple registry hack for hiding any particular account from the login screen of your Windows 10 PC.

How to Hide User Accounts on Windows 10 Login Screen:
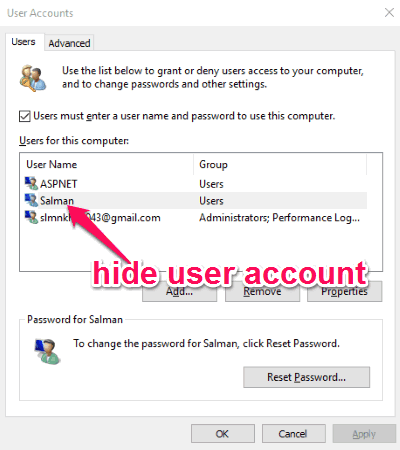
Step 1: Before you get started, you need to find the exact name of the user account which you would like to hide on the login screen. For this, simply press “Windows Key + R” to open the “Run” program and then type “netplwiz” in the input field. After that, hit Enter and it will open up a window named, “User Accounts” where you’ll be able to see all the user accounts added on your PC. Simply note down the exact username which you want to hide.
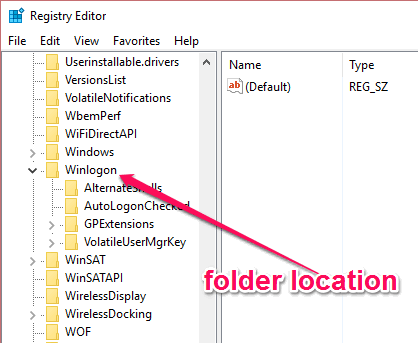
Step 2: When you’re done noting down the user account name, simply press “Windows Key + R” again and type “regedit” to open up the registry editor. Now, in the registry editor, you need to navigate to the following folder location:
"HKEY_LOCAL_MACHINE\SOFTWARE\Microsoft\Windows NT\CurrentVersion\Winlogon"
Step 3: After that, right click on the key folder “Winlogon” and then hit New →Key to create a new registry key under the “Winlogon” key. Then name the new key as “SpecialAccounts” and press Enter to proceed.

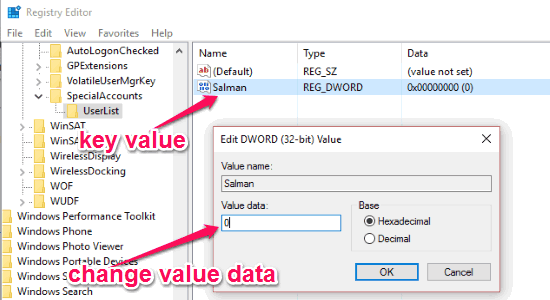
Step 4: Now, you need to create another key, but this time under the “SpecialAccounts” key folder. For this, right click on “Special Accounts” key on the left and then click on New →Key. Here, you need to name the new key as “UserList”. After the “UserList” key is created, simply right click on it and then hit New →DWORD (32-bit) Value to create a new key value.

Step 5: When you’re done creating the key value, simply rename it to the user account name which you’ve noted down in the first step. Then double-click on it and change the value data to “0” and press “OK” to apply the changes.
Step 6: As soon as you do that, simply restart your PC and the user account will be hidden from the login screen. In the same manner, you can hide any specific account you want from the Windows 10 login screen.
My Final Verdict:
If you’ve multiple accounts on your PC and don’t want to see them on the login screen or have a private account which you would like to hide from others, then this tutorial is definitely for you. The steps explained in this tutorial helped me hide an account on my PC with ease and in a flash. No need to use any complex software, as you can achieve the same with a simple registry hack.
Please let me know how you find this tutorial in this comment section below.