This is a definitive guide around how to remove objects from photos. I have taken examples of many common image editing tools and have explained how you can use them to remove objects from your photos (some of the tools are paid, though most are free). I have covered both desktop software as well as online tools that let you easily remove objects from photos.
To do a fair comparison of each of them, I tested them with same two images. Both of them are shown below. In each of the software, I will try to remove same objects from both the images: remove heart from the first image, and remove image of second person from second image. This will help us in seeing which software does a better job.

Remove Objects from Photos using Adobe Photoshop:
Even though Adobe Photoshop is a paid software, and not something that we review on this website, but the fact is that it is still one of the favorite design software used by the designers. So, this definitive guide could not have been complete without talking about it.
Here are steps to remove objects from photos using Adobe Photoshop:
- Step 1: To remove the objects from the photo, open the photo in the Photoshop.
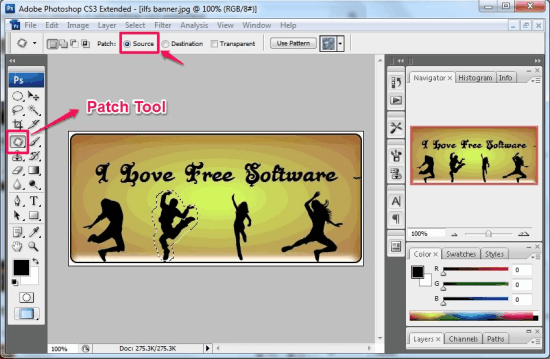
- Step 2: Then with the help of “Patch Tool” present in the tool section, draw an outline around the object that you wish to remove.
- Step 3: Then from the above Patch options, choose “Source” to proceed.
- Step 4: Once done with all the selections, simply drag the selected portion to that portion of the photo, that you want to look similar. In this way you’ll be able to remove the unwanted object from the photo.
Once you’re done, you can save the photo in various image formats.
Below are the results of my test images after removing objects from them:

The final images lacked in the quality as I was using an old Adobe Photoshop CS3 extended version. To make your results more clear, realistic and prominent, you can use Adobe Photoshop CS5 or Adobe Photoshop CS6 version, where it provides you an option “Content Aware” in the edit menu, that give mind blowing results with clarity, checkout the video below:
GIMP: How to Remove Objects From Photos using GIMP
GIMP is a very powerful photo editing tool, that comes with variety of tools, filters, improvements, and a lot more. This free software lets you remove objects from photos, without disturbing the main quality of the image. To remove you just have to install Resynthesizer Plugin, which is available for free.
Soon after downloading the zip file, you can extract the files. Then you can copy all the files to the plugins folder, which is normally available at following path:
c:\Users\username of pc\.gimp-2.8\plug-ins\
Soon after pasting all the files in the Plugins folder, you can begin removing objects from photos, using steps laid out below:

- Step 1: Simply open the photo, from which you wish to remove objects. Then select “Free Selection Tool” to draw a boundary around the object that you want to remove.
- Step 2: Then from the “Filters” option, select “Enhance” and move further to choose “Heal selection”.
- Step 3: As soon as you select heal selection, a new window will appear in front of you, on which you have to enter the pixels. Then in the Sample form you need to select “All around”, while in the Filling order you have to select “Random” as your options.
- Step 4: Once you’re done, you can click the OK button. The object quickly vanishes from the photo, and leaves behind an picture, as if no object ever existed in that place.
I actually find the results even better than Photoshop. See yourself below:

The only drawback of this plugin is that only one object can be removed at once. That means after removing one object, you need to select another object again to remove it from the picture. Another thing where it lacks, is that supports very few image formats: XCF, XCF.BZ2, etc. but not the popular image formats, which is a major drawback. To get over this drawback, you can use GimPhoto, that I have explained in next section.
Click here for detailed review of GIMP.
Here is a video that explains the process in detail:
GimPhoto: A Modified Version of GIMP
GimPhoto is a modified version of GIMP that comes with most of the useful plugins built-in. One of those plugins is Resynthesizer plugin, so you don’t need to separately install it. And the biggest advantage of this is that it actually supports mainstream image formats that Resynthesizer plugin didn’t support in GIMP.

How to Remove Objects from Photos using GIMPhoto:
- Step 1: To remove the objects from the photo, open the photo.
- Step 2: Then select the “Free Select tool”.
- Step 3: Then draw a boundary around the object.
- Step 4: From the Filters, you need to select the “Resynthesizer” option. As soon as you do that, a new window will appear on the screen, where in the “Output” section you need to check the “Fit output to the bordering pixels” option.
- Step 5: Then you need to check the option “Use texture transfer” in the “Texture transfer” section. Apart from all this, you need to slide “Map importance” and “Sensitivity to outliers” towards left indoor to get a better result. The customization of both “Map importance” and “Sensitivity to outliers” will vary from picture to picture.

- Step 6: Once done with all the customization, you can click Ok button to see the object disappear.

As compared to GIMP, this is indeed a better and a convenient way to remove object from photo. But at the same time, GIMP results are far better than GimPhoto. The best part of this software is that it offers you tons of extension: JPG, JPEG, PNG, GIF, BMP, etc. so that you can save the photo in the convenient file format.
Click here for detailed review.
PhotoWipe: Free Windows Software to Remove Objects from photos

PhotoWipe is free Windows software that lets you remove object from photos. It offers you various marking styles, brush sizes, an eraser, along with a navigation window which you can use to zoom in/out, 1:1, etc.
Here are steps to remove objects from photos using PhotoWipe:
- Step 1: All you have to do is simply choose the photo from your folder.
- Step 2: Then choose the style and the brush size with which you want to mark the object.
- Step 3: Mark the entire object that you wish to remove from the photo, with Black marker.
- Step 4: Then click on the Preview button to see the results.
The unwanted object will be removed within few seconds, giving you pretty good results.

You can save the image directly on the clipboard and at the same time you can save the image in JPEG format on your PC.
The trick to use this object removing software is that choose the maximum brush size and cover the entire object with the Black highlight. You don’t have to to be neat while marking the object.
The major disadvantage of this object removing software is that it provides no undo feature. In my opinion, brush color customization should also be present, as it becomes sometimes difficult to highlight the Black objects and find out whether all areas of the object are totally covered or not.
Click here for detailed review.
Retouch Pilot Lite: Another Windows Software To Remove Objects From Photos

Retouch Pilot Lite is another free software, that lets you remove objects from photos. This software offers you some basic editing tools and three different additional features: Scratch Eraser, Concealer, and Text.
- Step 1: To remove any particular object from the photo, all you have to do is, open the photo and then click on the Concealer button.
- Step 2: Then check the Auto mode to pick the color from the image, and soon after picking the color similar to the surrounding, you have to uncheck the Auto mode.
- Step 3: Then adjust the size, opacity, and the hardness of the brush, to attain better results.
- Step 4: Before finalizing the photo, use Scratch Eraser, to remove unwanted marks. Once done, you can save the image in JPEG format on your computer.

This software provides you unlimited Undo/Redo option, that adds convenience throughout the process.
In case you have a very colorful photo, then this method may prove to be time taking, as each time you need to pick different color matching the surrounding of the objects and the background of the image.
This software provides many more features in its paid version.
Paint.Net: Remove Objects Using Clone Stamp Tool

Paint.Net is one of the most popular free image editing software, that rules due to its ease and plethora of features. More importantly, it supports plugins, to enhance its functionality even further. However, we don’t need to use any additional plugin to remove objects from photos and we will use an inbuilt tool called “Clone Stamp Tool”.
How to Remove Objects from Photos using Paint.net:
- Step 1: All you need to do is, simply open the photo in the Paint.Net.
- Step 2: Select the Clone Stamp Tool from the tool box.
- Step 3: Then adjust the size of the brush with the help of drop down button located against the Brush Width.
- Step 4: The next step is to select the color of the area, which you would want to put on the object that you want to remove. So, obviously, you would want to go with the area next to your object. Go to that area and click the Ctrl key to select that. Now your Clone Stamp tool has captured that area. After this, take the tool over the object that you want to remove and just press the mouse key. In this manner, just keep moving the Clone Stamp tool all over the object that you want to be removed.

Because of the way it inherently works, the results are not accurate, especially if there is gradient in the background (which is the case with the test photos I used). However, if the background is more or less solid, this tool can do wonders.
Click here for detailed review.
Lunapic: Online Tool To Remove objects from photos

Lunapic is an online application that lets you remove objects from photos. This online photo editor offers you variety of editing tools, like: crop, cut, text, eraser, paint bucket, and much more.
Remove Objects from Photos Online using Lunapic:
- Step 1: To remove object from photo, all you’ve to do is simply upload the photo from your computer.
- Step 2: Then from the Tools drop down button, you can select the best option from rectangle, circle, or freehand/polygon , etc. to create a boundary around the object that you want to remove from the photo.
- Step 3: Then click on the “Remove & Inpaint” option, provided above the tool.
It’ll quickly remove the object from your picture.

The best part of this online object removing application is that, it offer you unlimited Undo. Not only that, you can directly share your image on various social networks, like Imgur, Facebook, etc. You can also download the image to your PC in JPG, PNG, BMP, etc. formats, which is pretty good.
If you want to remove objects from photos using iPhone, check out the Fixel app.
Conclusion:
If I have to choose my favorite software from this list, I will have to go with GIMP. And for online, Lunapic is a good option.
Which software do you use to remove objects from photos? Let me know in comments below.