This tutorial explains how to bulk encrypt and decrypt files and folders using Windows 10 context menu. This can be done using the built-in feature of Windows 10, known as EFS (Encrypted File System). The encryption done using this method is different than other 3rd party encryption software. By encrypting files and folders using the method, the same user will be able to open that file/folder, email it, copy, and share it anywhere. However, the same encrypted file(s) won’t be accessed/opened by other users of the same PC. They also won’t be able to email those encrypted files, share files using some online service, copy files to USB, etc. However, encrypted files can easily be deleted by you and other users. Still, this feature is quite good when you share your Windows 10 PC with family members or friends and don’t want them to access some important files.
The encrypted files can also be decrypted easily using Windows 10 context menu. All you need to do is make some changes in the Registry. It is very easy to do and I have added all the steps using which you can encrypt files and folders in batch and decrypt them anytime.
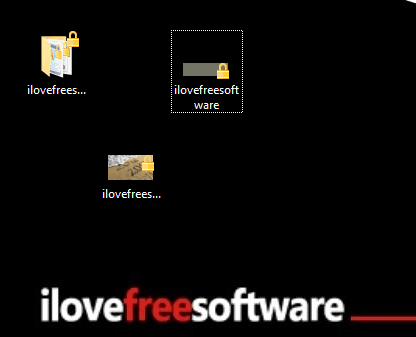
The encrypted items can be recognized easily as a lock icon is visible in the thumbnails of those files and folders. See the screenshot above.
When some other user of the same PC will try to access the encrypted file, he/she will receive an error something similar like visible in the screenshot below.

How To Bulk Encrypt and Decrypt Files and Folders Using Windows 10 Context Menu?
Step 1: Open your Windows 10 Registry. You can use Windows 10 the Search box or type ‘regedit‘ in Run Command to open Windows 10 Registry.
Step 2: Find and access the “Advanced” key available under HKEY_CURRENT_USER root key. Its location is: HKEY_CURRENT_USER→SOFTWARE→Microsoft→Windows→CurrentVersion→Explorer→Advanced.
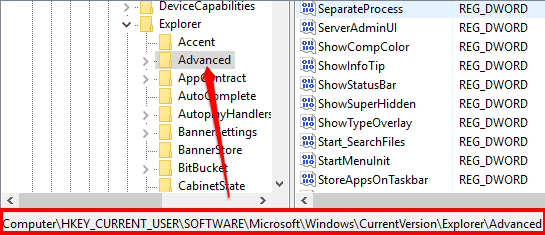
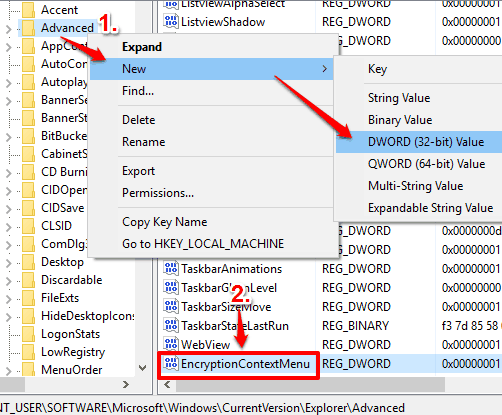
Step 3: Advanced key has different DWORD values. You need to create a new DWORD value under this key and name it as “EncryptionContextMenu“. Right-click on Advanced key→New→DWORD (32-bit) Value. This will create a new DWORD value. After that, rename it, and set the name as EncryptionContextMenu.
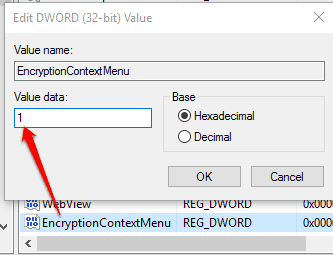
Step 4: In this step, you have to change the value data of EncryptioncontextMenu value from ‘0’ to ‘1’. For this, double-click the value and a new small window will open. In that window, add ‘1’ in Value data field and save changes using OK button.
Step 5: Now select some files and folders and right-click. You will notice that Encrypt option is visible. The Decrypt option is also added to context menu automatically. You don’t have to create it. However, you have to use that option for encrypted files/folders only.
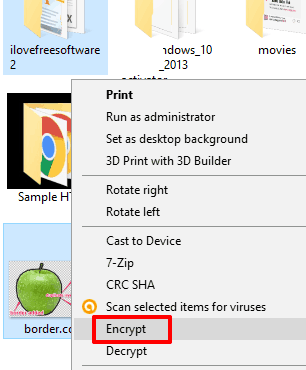
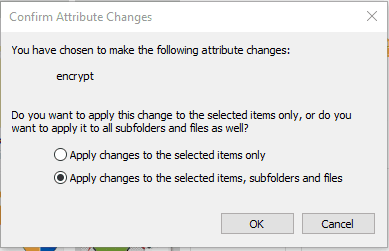
Step 6: Select Encrypt option and a pop-up will open. Here you need to select if you want to add changes to only selected items or selected items including sub-folders and files. Select an option and encrypt the items.
Now when some other user will try to access those files or folders, he/she will get the error.
Step 7: To decrypt the encrypted items, select them, right-click and choose Decrypt option.
After that, other users will be able to access those files and folders.
The Verdict:
Although there are other methods to stop someone from accessing files (using some file locker software or file hider software for Windows 10), but those who prefer built-in options over 3rd party tricks, this is a good option to try. With a simple Registry tweak, you can encrypt any file or folder and stop other users from accessing those files.