Listmonk is a fast, high-performance self hosted newsletter and email list management tool. It allows you to send millions of emails in a couple of hours. It can create multiple threads and can use multiple SMTP servers to send out emails. You can deploy it on any server or even run it locally as it comes packed in a single binary. The web UI of Listmonk is quite intuitive and supports direct database operations through SQL for tasks like auditing subscribers list or query subscriber attributes. It uses PostgreSQL as the data source and there are some other nice features that I will explain later in more details.
Even though there is a long list of email marketing tools out there but when it comes to sending out millions of emails, users usually get into a number of issues mostly related to the performance. On the other hand, importing subscribers list from a database and or a file can be a tedious task and that is where Lismonk comes in. You can process a long CSV or a ZIP archive to import subscribers and even make them as blacklisted or subscriber contacts.
One exciting thing about Listmonk is that it has been in active use at Zerodha for sending important updates to users. In spite of being in alpha stage, it is being used there for quite some time and has sent out tens of millions of emails. And now you can do the same. Listmonk is all ready to be used on production servers, however, it still lacks some options. That being said, features like bounce emails tracking, database migrations, user auth, privacy options for users are still work in progress. And you will most probably find these in the next major updates.
Main Highlights of Listmonk:
- Multiple Email Lists: In Listmonk, you can create multiple public and private email lists. You can add tags to the list and use any one or all of them in any campaign you want.
- Bulk Subscribers Import: The bulk subscriber import of this tool is very fast and on a commodity EC2 instance, it can import 10k records/seconds into the Postgres database.
- Custom Subscriber Attributes: In addition to the subscriber name and email address, Listmonk lets you add some more attributes. You can assign attributes like the city, age, gender to a subscriber in JSON format that will be useful later.
- Subscriber Querying: Listmonk supports direct query execution from the database to retrieve subscribers. The query can be customized and can include user attributes to only retrieve specific subscribers from the database. You will find this functionality in the “Advanced” option on the Lismonk web UI.
- Dynamic Templates: Listmonk supports Go templates and you can either create them from scratch or you can modify the one comes with it or the one mentioned in the official docs. Not only that but apart from HTML templates, you can use RTF for the email body.
- Multi-Threaded and Multiple SMTP Servers: One of the most amazing things Listmonk can do is send out your emails through multiple SMTP servers. Specify all SMTP servers in the configuration file and it will make use of multithreading to send out emails. This option can greatly improve speed when you have a really long mailing list.
- API Access: Listmonk comes with HTTP/REST API which lets you do almost anything that you can do using the web UI. All you have to do is just make simple calls to the predefined endpoints. You can read all about API and endpoints here.
Installing Listmonk locally on a Windows PC:
The main programming language used for Listmonk is Go. There are official binaries available but if you want then you can install this from source or go with the docker installation. For this post, I will be installing and setting this up on Windows PC where a PostgreSQL server is running locally at default host and port. In case, you don’t have PostgreSQL then you can download and install it from here.
You can download the Windows binary of Listmonk from here. After that, extract it and the first thing we have to do is generate the configuration file. You have to run the following command in order to generate a configuration file(config.toml) in the current directory.
listmonk.exe --new-config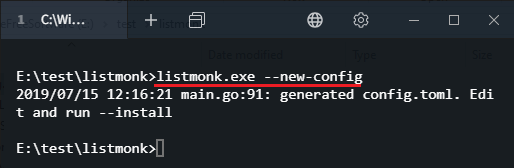
Now, when you have the newly generated “config.toml” file, simply open it up in any text editor. Next, you have to fill the details of your SMTP servers and database credentials. So, specify these details and save changes. Do note that, if you have multiple SMTP servers then you will have to define them in an array like fashion. More you can learn yourself when you look at the structure of the configuration file.

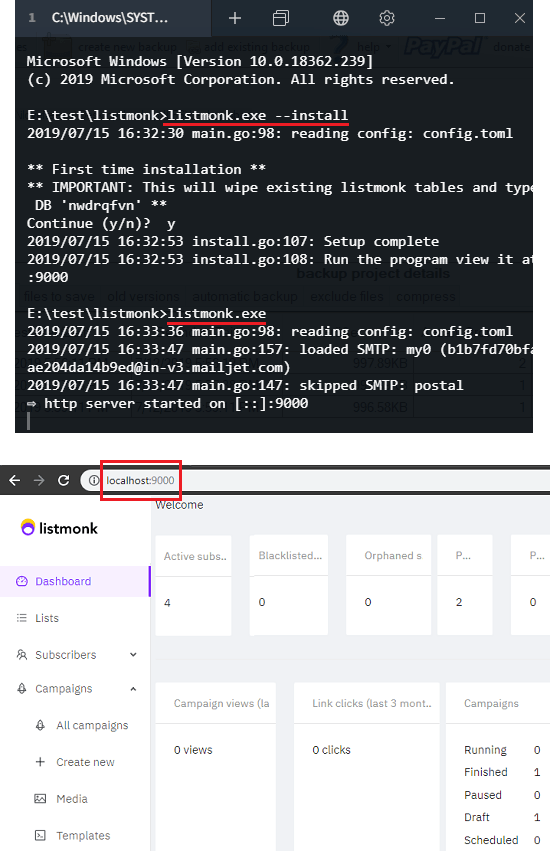
Now, you just run the following commands one after another to configure the database tables. At last, after running the second command, you can access the web UI of Listmonk by entering “localhost:9000” in the address bar of the browser.
listmonk.exe --install

listmonk.exe
Creating an Email Template in Listmonk
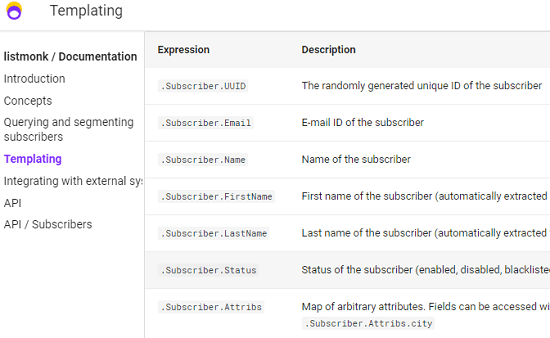
One of the core modules of an email marketing platform is its template builder. There are many email marketing platform switch WYSIWYG email template builders and Lismonk has it too. But the template builder of Lismonk works differently. Here it supports dynamic email templates which work with mail merge like fields. Using the mail merge like fields, you can add conditional logic, username, user email, timestamps, user’s status in the email body. You can learn about templating in Lismonk here.
In the Campaigns section, there is an option to see all the templates and a media gallery. You can upload the digital assets there to include in the email template. To create a template, you have to create that in HTML and then paste it there. You can see the preview of the email template and adjust content and other parameters accordingly. Below is an example of the template.
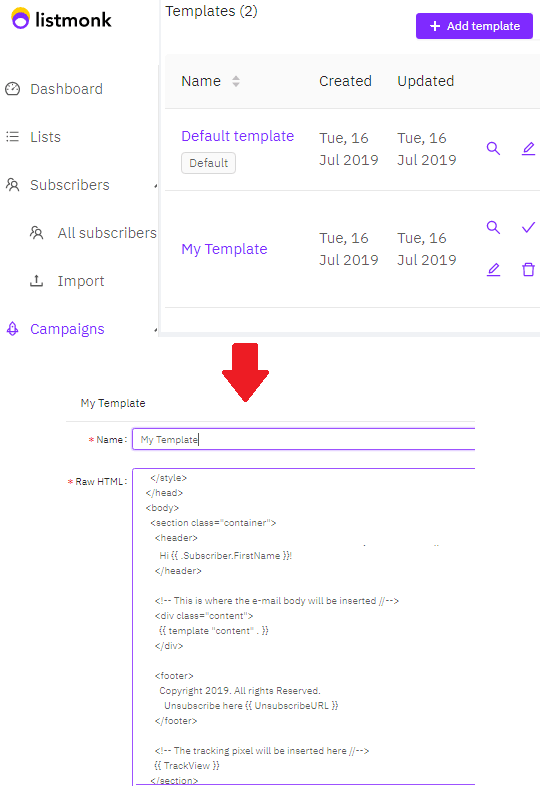
You can get the example template from the official documentation page and edit it a little to use in your own campaigns. All the parameters are given there and you can easily create an email template and use that in your different campaigns. Also, note that you are free to create any number of email templates here.
Sending Out Your First Campaign using Listmonk:
When you are on the main web UI of Listmonk, you can start using it to send out your first campaign. For sending out your first campaign, you will have to create an email list first, add some subscribers in that, and create a template. You can opt to send a campaign right away or you can pick a schedule.
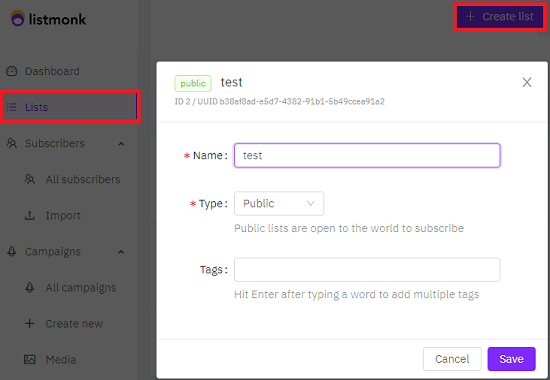
So, create your first email list in the “Lists” section. Give it a name and specify whether it is a private list or public. You are free to create unlimited mailing lists here. Also, if you want to add some tags to any email lists then you can do that.
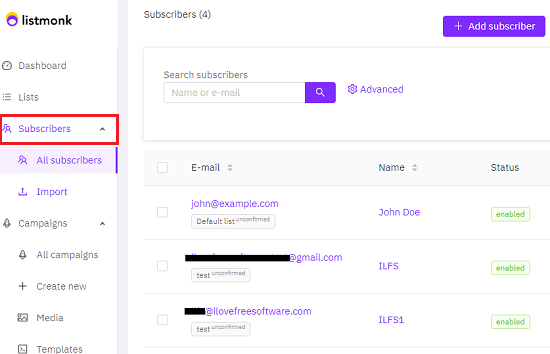
Next thing is to add subscribers. You can import subscribers from a CSV file or you can add them one by one. For that, you can go to the “Subscribers” section and either use CSV import or you can opt to create subscribers there manually. If you use its web UI to add subscribers then you will need to add details like name, email address, and some attributes. The attributes can be anything such as a user’s city, gender, phone number, etc.
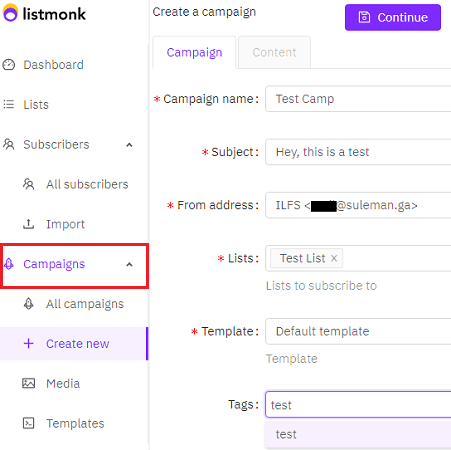
In the end, you now only have to create a campaign and configure it. Go to the Campaigns section and create a new campaign. In the campaign, you have to specify a sender’s email address, email subject, mailing list to use, and an email template. Currently, there is a default template but you can use a custom one easily. If you want to specify a scheduled time to start campaign later then you can specify that here as well.
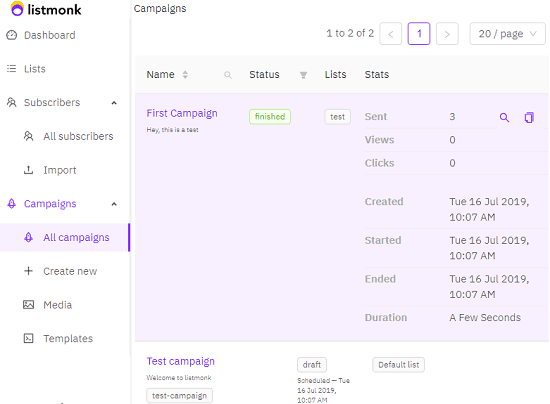
After configuring all the things, you just need to send out the campaign. Or, if you scheduled it earlier then it will automatically send that. You can see the stats of the emails campaign on the main dashboard as well on the campaigns section. You can see sent items, views, and click rate. However, bounce rate is not there but it is intended to be added.
That’s how you will use this simple and powerful newsletter and mailing list manager. If you have a dedicated email server for emails such as Amazon SES then you can use it to send millions of emails in a just a few hours. Its speed and performance can beat some other popular tools of its kind such as PhpList, Sendy, etc.
Wrap up…
Out of all the email marketing or email list management tools I have used. I am simply amazed by its performance and an awesome set of features. This is definitely one of the most powerful open source tools I have even come across. Although some features are still a work in progress but the email list management and sending out campaigns part is operational. For a very small number of emails, you may not feel its speed but if you have more than 500k emails to send then I am sure that you will really like it.