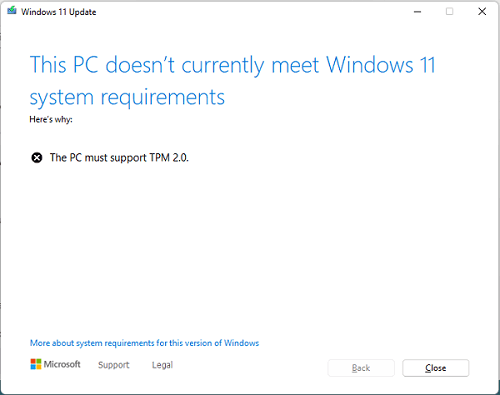
This tutorial explains how to bypass TPM requirements during Windows 11 Insider update. A most common problems that non supported Windows 11 PCs are facing is that they cannot upgrade Windows 11 Insider build from Dev branch. A popup appears that says “The PC must support TPM 2.0” which can be really upsetting.
You can see this error in the screenshot below and sometimes it can appear along with with “The PC must support Secure Boot“.
A simple workaround is to install the Insider build from ISO. But this can be exhausting process as you will have to modify Registry keys or even add new ones during installation. To fix this error, I have found a simple method that I will mention here. You can easily bypass TPM requirement error screen during the Windows upgrade process without modifying Registry keys.
You just have to overwrite a simple file in Windows and then you will be able to upgrade as usual. Even Dev builds will be able to upgrade to the next versions without any problems. Below is the step by step guide to skip TPM check during Windows 11 Insider update.
How to Bypass TPM Requirements During Windows 11 Insider Update?
The following steps are only for non supported Windows 11 PCs which don’t have a TPM chip. If you already have a PC that has TPM module then I will recommend you to use that. You can enable it from the system BIOS. But follow the steps if you have Windows 11 running on an old PC.
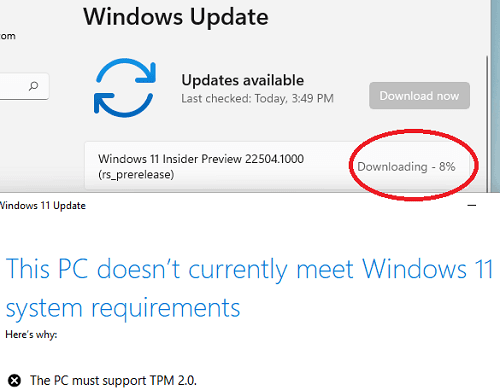
- Step 1: Start the Windows Insider update process from Settings app. It will be halted at around 8% download progress. You will see the “This PC doesn’t currently supports Windows 11 system requirements” screen. Close it, wait for it to disappear, and then go to the step 2.

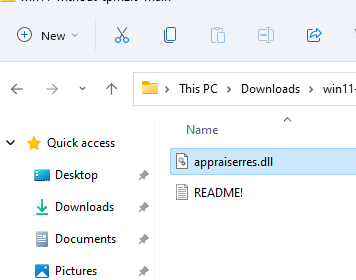
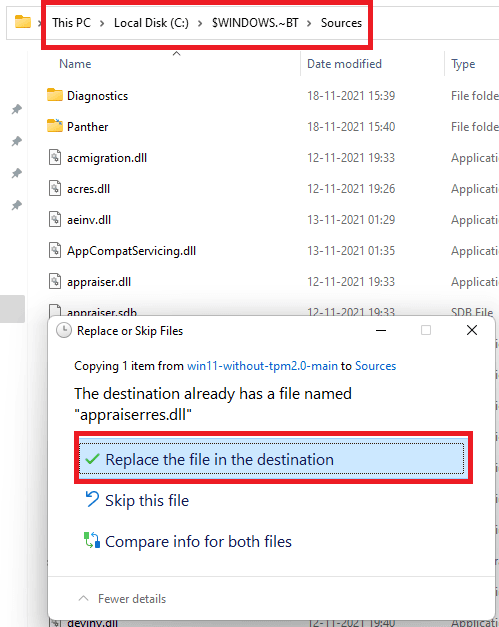
- Step 2: Now, you just download “appraiserres.dll” file from this GitHub repository. Download the ZIP file of the repository and then extract it somewhere.

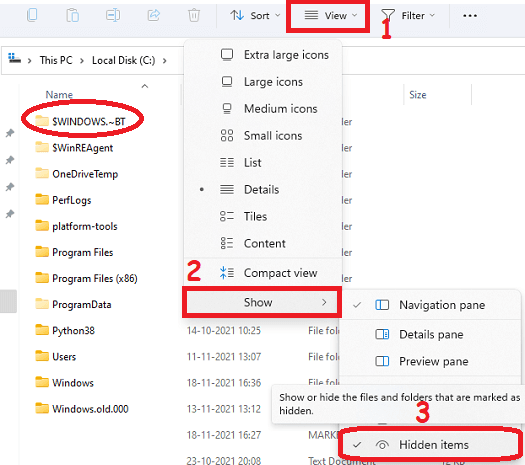
- Step 3: Open Explorer and go to the C drive. Enable Hidden items option from the Explorer to see the hidden “$WINDOWS.~BT” folder.

- Step 4: Copy the “appraiserres.dll” from the ZIP file that you downloaded in Step 2 and paste it inside “C:/$WINDOWS.~BT/Sources” folder. Overwrite the file if Windows raises some warning.

- Step 5: Done.
Now, again start the update process on Windows 11 Insider build by clicking on “Fix” button and this time, you will see the TPM error screen will not appear. It will now show you “Almost ready” screen instead.
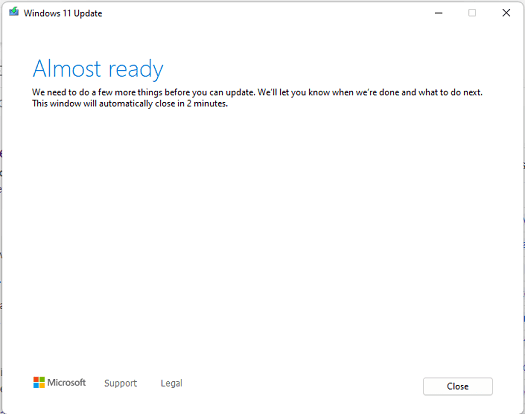
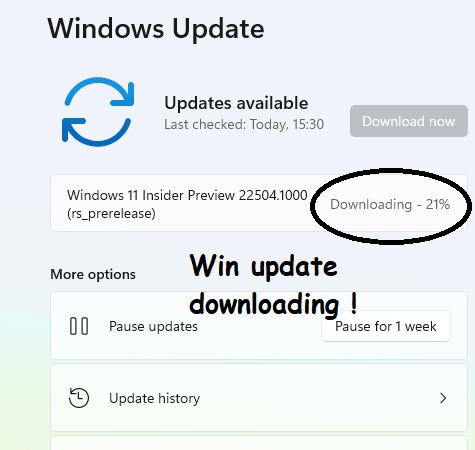
Just close this screen and the download progress will not stop now as it will keep downloading the update. When download finishes, Windows will install the update and will take you to the next Win 11 version.
This is as simple as that. If you are using Windows Insider builds on some unsupported PC then you can upgrade to next version in Dev branch with ease. Just follow the steps above and upgrade Windows without any problems. You will not have to install it via ISO file again manually anymore.
Note: This method can also be used while upgrading to Windows 11 from Windows 10 with TPM module missing.
Wrap up…
If you are having troubles upgrading Windows 11 Insider build in Dev branch then this tutorial will help. However, I will say that this is not the ideal way to deal with the error. Buy the supported hardware to have an uninterrupted Windows 11 experience. But still if you want to run Windows 11 on older hardware then steps above will help.