This article covers a free web app to create interactive coding tutorial to explain code as story. The project documentation is a boring part which most people only refer to when they are stuck somewhere. It’s generally cramped up with information which isn’t always helpful for everyone especially newbies. So, here is a simple method that you can use to turn your GitHub project documentation in an engaging story.
StoryTime is a free web app where you can convert your boring GitHub repo documentation into an interactive story. You can fetch your GitHub repo and select a file which you want to explain with story or tutorial. Doing this opens that file in and editor where you can create debugging-like visuals frame by frame. You can use various annotations for explanation and can also add memes, GIFs, screenshots, etc. Once done, the story runs like a presentation which you can either play or navigate frame by frame. Apart from the documentation, you can use it with your code files and create an interactive coding tutorial to explain the programming process to the users.
Also read: Online Coding Tutorials With Animated Videos, Code Samples: DevelopPHP
How to Create Interactive Coding Tutorials with StoryTime?
To create interactive coding tutorials, visit the StoryTime website and sign up with your GitHub account. After sign up, it gives you a brief intro about the story along with what you can do to make it engaging. From here, you can create a story for your GitHub repo in three simple steps.
Step 1
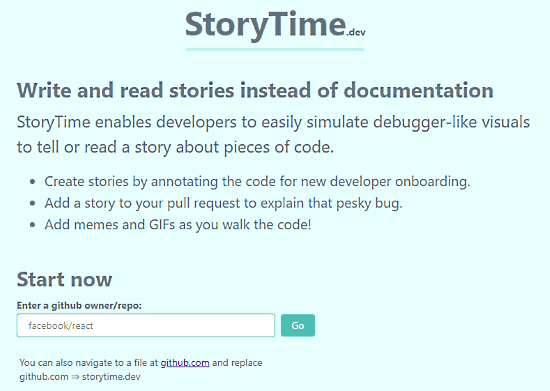
In the first step, you have to enter the GitHub owner/repo to this app. Doing fetches the respective repo from the GitHub and lists all the files from the repo. Alternatively, you can open the repo on GitHub site and simply replace “github.com” with “storytime.dev” in the URL.
Step 2
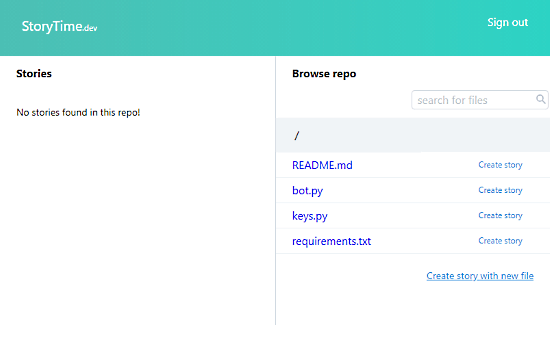
Once the repo is fetched, you get a list of the files from that repo. Each file has a Create Story button alongside its name. Here you have to select the file for which you want to create a story. You can create a story with README.md file and turns the boring documentation into an interactive story or create a story for the code file to explain the coding process. If a single file doesn’t have all the information, you can create a new file and add all the required information while creating the story. And, if a file already has a story in the repo, it gets listed on the left side of the screen.
Step 3
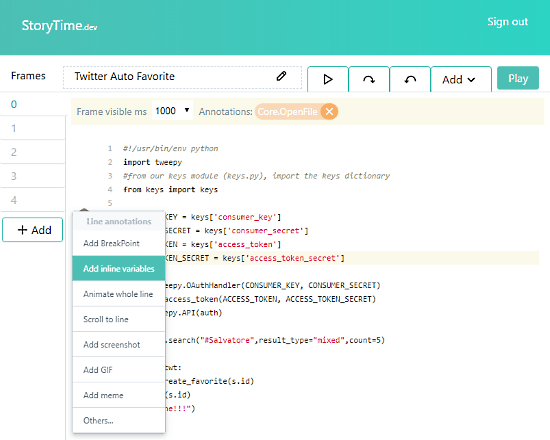
Step three is where the actual work happens. This step opens an editor with your file content in it. From the left-most side, you can add frames to the story. Then, you can distribute the content in the frames and add interactive elements to create a story. Here is a list of all the elements and annotations that you can add to create a story:
- Annotation (Line annotations, Add BreakPoint, Add inline variables, Animate whole line, Scroll to line, etc.)
- Watch expressions
- Call stack
- Screenshots
- Caption
- Meme
- Reaction GIF
- Open another file (Step In)
- Create new file
Once done, add a name for the story and the top and tap Enter to save it.
Preview
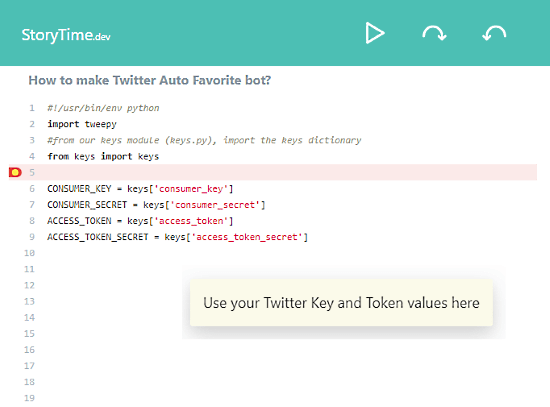
With the Play button from the top right corner, you can preview your story. The story screen has a play/pause button along with frame navigation buttons. Users can either play the story which shows you frames after frames till the end or use the navigation buttons to manually cycle through all the frames.
After creating a story, you can use that instead of using traditional documentation simply by including the story link in your repo.
Create interactive coding story here.
Wrap Up
StoryTime is a nice web app that converts a rather boring documentation into an engaging story. You can use it with your code files and create an interactive coding tutorial to explain the programming process to the users. Give it a try and share your thoughts with us in the comments section.