This tutorial explains how to access OneDrive as PC partition on Windows. After going through this tutorial, you will learn a simple method using which you can map and access OneDrive as a normal PC partition on your Windows PC.
OneDrive comes as a built-in integration when you install Windows 8, Windows 8.1, or Windows 10 on your PC. And if you’re using Windows 7 or older, then you can download the desktop client to use OneDrive. Now, let us assume that you have OneDrive installed on your PC, then you can easily access it under the “Quick Access” section on the left of the File Explorer. However, it doesn’t show up as a PC partition on the File Explorer. So, what if you want to use OneDrive as PC partition such that you can easily access it as you use other hard disk partitions? Well, this is what the tutorial is all about.
In this tutorial, I will use a simple software called “Visual Subst” to map and use OneDrive as a PC partition. Visual Subst lets you map a virtual drive for OneDrive such that it would look like a normal drive in File Explorer. Now, let us get started with the steps required for accessing OneDrive as PC partition.
If you also use Google Drive and want to access it as PC partition, then you can go through our tutorial on how to access Google Drive as PC partition.
How to Access OneDrive as PC Partition on Windows:
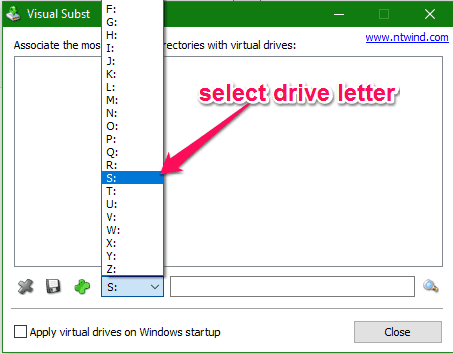
Step 1: First, install Visual Subst on your PC and then open it up. Once the Visual Subst window appears, simply select the drop-down menu and then choose a drive letter for OneDrive. You can select any drive letter you want between “A-Z”, if it is not already assigned to any PC partition.
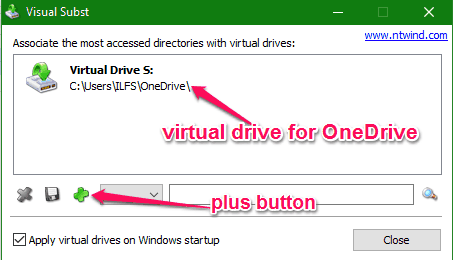
Step 2: After selecting a drive letter, you need to simply find the access directory of OneDrive and copy it. You can find the directory by right-clicking on OneDrive on the left pane and then selecting “Properties”. Generally, the access directory of OneDrive is “C:\Users\[your PC username]\OneDrive“.
Step 3: Now, copy this directory and then paste it in the input field at the bottom of Visual Subst window. You will also need to enable the “Apply Virtual Drives” option to proceed, as shown below.

Step 4: When you’re all set with entering the access directory and enabling the “Apply Virtual Drives” option, simply click on the “Plus” button to create a virtual drive with the drive letter selected by you. Now, the virtual drive created by Visual Subst will map OneDrive and will be visible in File Explorer as a normal PC partition.
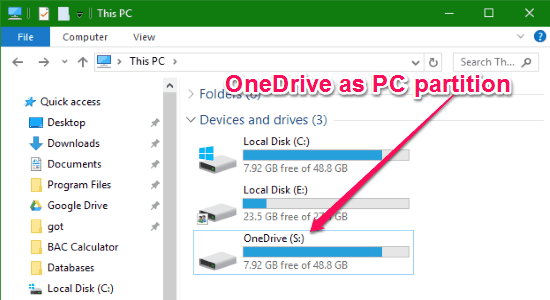
That means you can now open up your File Explorer and access OneDrive as PC partition. To demonstrate this method, I have used the drive letter “S” for OneDrive. You can see in the below screenshot that OneDrive is now accessible in the File Explorer as a separate drive on my PC.
My Final Verdict:
Visual Subst makes it very easy to convert OneDrive to a separate virtual partition on PC. If you know of some other similar software, then do let me know in comments below.