Working with Hidden text in MS Word is a bit different experience. There can be a hidden text in Microsoft Word document. This tutorial will explain you some basic as well as advanced features to handle hidden text in MS Word.
Hiding text in MS Word document is a useful feature and you can use it to hide text that you don’t want to show in the normal view of the document. Also it is helpful to take notes for your reference and hide them in the document. By default, you can’t print hidden text, so your document will be printed as it looks like normal in view. However, there are ways around that.
Go through this tutorial to become a pro in handling hidden text in MS Word.
How to Hide Text in MS Word Document
First type your document as usual and then select the text you want to hide. Now do any of the following method to hide the selected text.
Method 1: The easiest and simplest way to hide the text is just select the text and press Ctrl+Shift+H hotkey from your keyboard to hide it. Your selected text will be hidden now.
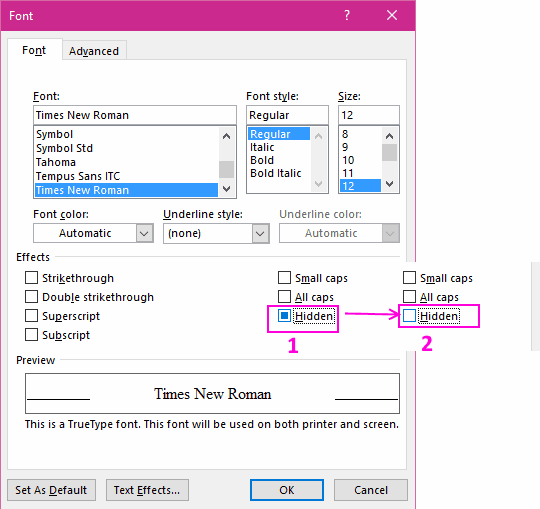
Method 2: Just select the text and right click on it and choose Font from context menu, a new dialog box will open. Now here from the Effects section click Hidden check mark. Your text will be hidden now.

Now you know How to hide text in MS Word. Of course there are other methods too to hide the text by calling the font dialog box in various ways. To keep it short and simple, I am not describing other methods; you can easily try any of the above 2 methods.
How to View the Hidden Text in MS Word
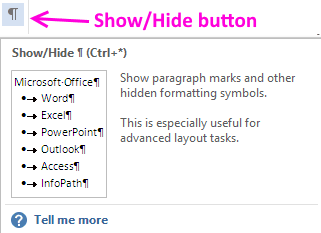
Here I will describe you how to view the hidden text in MS Word. First of all open the Word Document that contains hidden text. Now simply click Show/Hide button as shown in the below screenshot.
The other method is to press a hotkey combination from your keyboard i.e Ctrl+Shift+8 or in other words Ctrl+* (not from numpad).
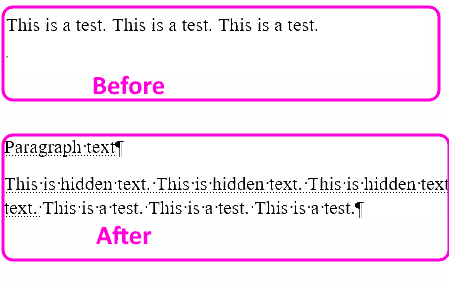
Now all the hidden text will be shown in the document with dotted underline as shown.
Also if you want to unhide the the hidden text permanently, you can do this too by using the following method.
Open the document and press Ctrl+A from your keyboard. Now press Ctrl+D hotkey to open the Font dialog box. Now go to Effects section; here you will see Hidden check box semi checked. Click it twice and make the Hidden checkbox unchecked.
Now all the hidden text in the Word Document will became un-hidden and is now shown as a part of the document.
How to Print Hidden text in MS Word
Here is a complete procedure to Print the MS Word Document with Hidden text. As in the above example “unhide the the hidden text permanently” you can take the printout normally as you do. However, if you don’t want to unhide the text, but want to print the document with hidden text, you can do this too.
To do this, just open the document containing hidden text and give a print command from File menu or by pressing the Ctrl+P from your keyboard. Now click Page Setup on the printer dialog box. Now Page Setup dialog box will open. Here click Print Options and check “Print hidden text” from printing options and click OK button to close this dialog box and again click OK to close the Page Setup dialog box.

Now click the Print icon to start the printing process. Your document will be printed with hidden text now.
How to Remove Hidden Text Permanently from MS Word Document
To remove the hidden text from Microsoft Word Document permanently, there are various methods you can apply. For e.g. you can use Find and Replace method or Inspect Document method to delete the hidden text permanently.
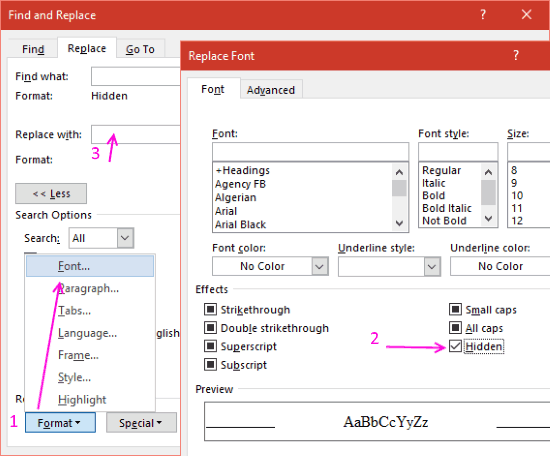
Deleting Hidden Text by using Find and Replace Method: In this method you first have to click the Show/Hide button as shown above. Now press Ctrl+H from your keyboard to open the Find and Replace the dialog box. Now leave the Find what: box blank and move your cursor in it. Now click More >> and select Font from the opening menu. Replace Font dialog box will open and here check the Hidden from the Effects section. Leave the Replace with: box blank and click Replace All to Find and Replace the hidden text from the document.
Deleting Hidden Text by using Inspect Document Feature: In this method you have to click File and then from the Info tab click Check for Issues and choose Inspect Element. Your document must be saved before starting this process. Now uncheck all the boxes except Hidden Text checkbox, as shown in the below screenshot, and click Inspect button.
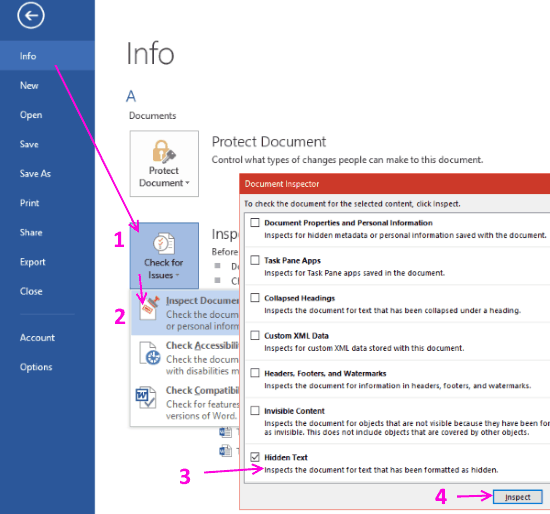
When you click the Inspect button, Click Remove All and close the Document Inspector. All the hidden text in your document will be removed in one go. This method is bit tricky but works fast.
Final Words
As you know that Microsoft Word is a feature rich Word Processing software. There are various methods to do the same task in various ways, like using command menus, by using keyboard shortcuts etc. In the above tutorial you can now easily handle the Hidden Text in MS Word Documents easily in case of inserting hidden text, viewing hidden text, printing hidden text, or deleting hidden text.