This tutorial talks about the built-in Windows 10 search, and how you can use it like a pro. I’ve always maintained that efficient search capability is one of those core key features that determine the overall quality of an Operating System (and this includes not just mobile OS’ as well). That’s because there is no point in having a uber advanced Operating System if you have to wade through a labyrinth of folders and sub-folders, just to find the file that you’re looking for.
Being the future-oriented Operating System that it is, it’s hardly surprising that Windows 10 packs in a whole array of features and enhancements to help you effortlessly power through even the most challenging of tasks. One of them, is its excellent search functionality. Powered by strong file and folder indexing (read more about it here), the built-in Windows 10 search lets you find your favorite file(s) in a matter of seconds.
However, there is a lot more to that search box sitting at the right corner of Windows Explorer than meets the eye. Let’s find out how you can master the built-in Windows 10 search.

How To Use The Built-in Windows 10 Search?
Basically, there isn’t much to know when it comes to “using” the Windows 10 search. In fact, if you’ve regularly used the search functionality in previous Windows versions, you should be just fine. All you have to do is type what you want to find in the Windows Explorer search box, and the OS will take it from there. But there are quite a number of search options that you can tweak around, to make finding your stuff even more fun. Here’s a step by step walkthrough, explaining what those search options are, and how you can put them to use:
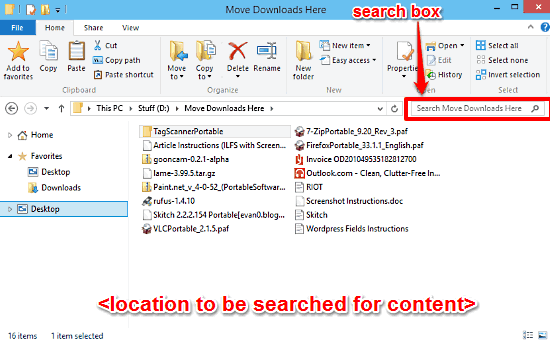
Step 1: Open up Windows Explorer, and navigate to the location where you want to search for content. It can be a disk partition, a folder having tons of sub-folders or anything else. Once there, expand the Ribbon Menu (use the Ctrl+F1 hotkey combination), because that’s where all the action is.

Step 2: As you probably already know, all you have to do to initiate a file search operation in the currently selected location is start typing in the search box (the one that’s to the right of address bar). Click on the search box, and a context sensitive Search tab, marked with the words Search Tools will come up. It consists of a number of options that you can tinker with for even better searching. Let’s take a look:

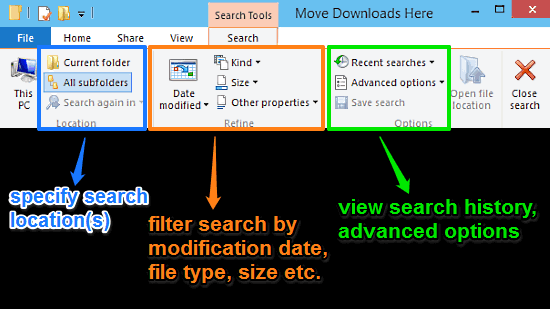
As illustrated by the above screenshot, the Search tab consists of three vertical sub-sections, each having a couple of options that you can use to modify the search. Most of these options have further sub-options, accessible via their drop down menus. These are briefly explained below:
- Search Options (enclosed in Blue box): Here, you can select whether you want to search only the currently selected folder or include all sub-folders that it might be having in the search as well.
- Search Filters (enclosed in Orange box): These options let you granularly specify search parameters, so that only the files meeting those parameters are returned in the search results. You can filter the search results by file type, size, and even last modification date.
- Advanced Options (enclosed in Green box): As the name suggests, this is the advanced stuff. Using these options, you can revisit your search history, configure searching in non-indexed locations, and things like that. You can even save your current search.
Step 3: Now that you know all about the plethora of search options that the native search of Windows 10 provides you with, you can configure them to make your file search even faster and more efficient. And when done, simply enter the search string in the Search box, and Windows 10 will instantly return the results that are in accordance with the specified search parameters.
Related: How To Delete And Rebuild Search Index In Windows 10?
Concluding Thoughts
Efficient and lightning fast search capability is one of those core strengths of Windows 10, that make it the powerhouse of an Operating System that it is. Backed by robust file indexing, the little search box lets you easily find that important file or folder of yours, in mere microseconds. And the fact that you can customize nearly every parameter related to a search query, now that’s like icing on the cake. So give it a shot and let me know your findings (forgive the pun) in the comments below.