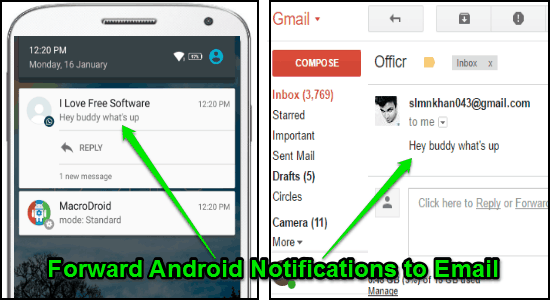
This tutorial demonstrates how to forward Android notifications to email. At the end of this tutorial, you will be able forward notifications of all downloaded as well as pre-installed Android apps to your email. You can also choose the apps for which you want to forward notifications to email, and also choose to forward notifications with specific content only.
Sometimes, you might want to store notifications of any important Android app in email, then there is actually no direct option in Android which can be used to do so. But, I have found a way using which you can now forward and store your important Android notifications right on your Gmail account.
Actually, there is a free automated task app for Android which allows you to automatically forward Android notifications to email. You can use this app to forward notifications from all the apps or choose specific apps for which you want to forward the notification to email. Not only that, this app also allows you to specify notification content such that you can forward them if they contain, matches, or exclude any specific keyword.
The app which I will use in this tutorial to forward Android notifications to email is called “MacroDroid“. Similar to other device automation apps for Android, this one can also be used to perform various automated tasks and one of them is you can automatically forward Android notifications to email.
Now, let me walk you through the steps required to forward Android notifications to email.
How to Forward Android Notifications to Email:
Step 1: Simply, install and open up MacroDroid on your Android phone. After that, you would need to create an automated task or Macro (as they call it in the app) by defining a trigger and an action in response.
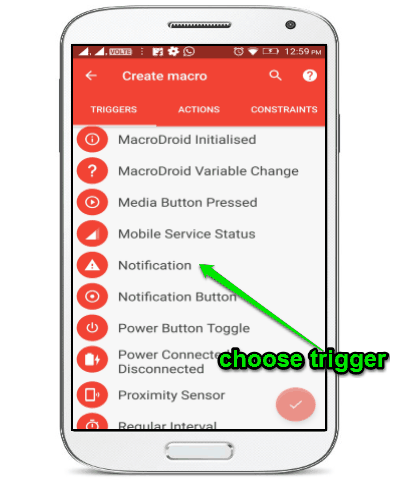
Step 2: To create a new Macro, simply tap on the “Add Macro” button and then it will ask you to choose a trigger and an action. On the “Triggers” tab, simply scroll down and select the “Notification” trigger. After that, a popup dialog will appear where you need to choose the “Notification Received” option.
Step 3: As soon as you do that, it will ask you to choose apps for which you want to forward the notifications. You can either choose all the apps or select specific apps. While selecting specific apps, you can either include or exclude the selected apps, as shown below.
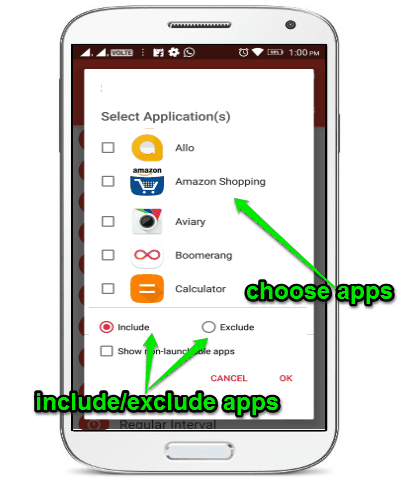
For example, let’s say you want to forward notifications from Facebook, Instagram, and WhatsApp to email, then select these apps from the list and then tap on the “Include” option. And if you don’t want to forward notifications of these apps, then chose the “Exclude” option.
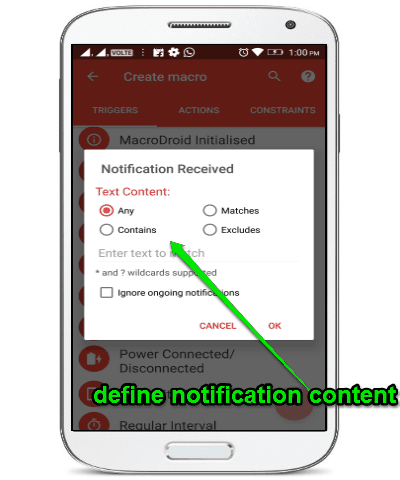
Step 4: When you’re done selecting apps, it will ask to specify the notification content before forwarding them to email. You can either choose the entire content of the notification or specify the text content as per your requirement. It lets you choose the following options for specifying the notification content:
- Any: Selecting this option will forward every Android notification (from the selected apps) to email.
- Contains: If a notification contains any specific keyword then forward to email.
- Matches: If the notification matches with any specific keyword then forward it to email.
- Excludes: If the notifications exclude a specific keyword then forward it to your email account.
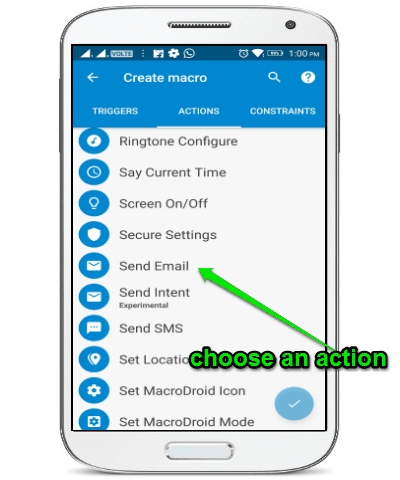
Step 5: Once you’ve selected a trigger, apps, and notification content, simply go to the “Actions” tab to select an action in response to the trigger. Here, you need to find the “Send Email” action and then tap on it to proceed.
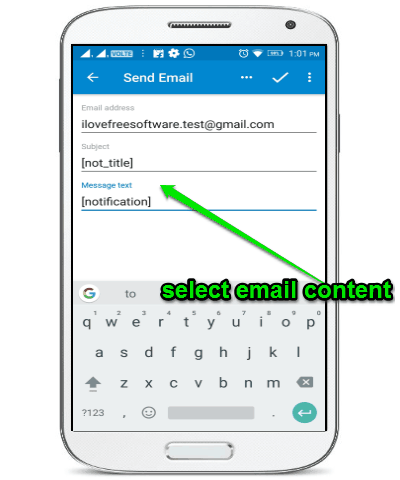
Step 6: As soon as you select the action, it will ask you to define the email content which will be forwarded to your email. You would need to enter the email id where the notifications will be forwarded, email subject, and message text. I would recommend you to put the notification title in the “Subject” field and the notification text in the “Message Text” field. You can select the same by pressing on the “Dotted” icon at the top.
When you’re all set with the email content, simply save the Macro. Now, each time a notification pops up on your Android phone from the selected apps, it will be forwarded to email.
My Final Verdict:
MacroDroid makes it very easy to forward Android notifications to email. Using this app, I was able to forward all the notifications from selected apps to my Gmail account. If you want to do the same, then I have explained all the necessary steps in this tutorial using which you can easily forward notifications from Android apps to your email.