This tutorial explains how to crop video in OpenShot video editor. After going through this tutorial, you will learn how you can crop your videos in OpenShot even though it doesn’t have any direct option or tool to do so. This can actually be done by zooming any specific area of the video and instead of animating the zoomed area, you have to keep it still using the “Scale” feature. You can zoom any specific area of a video in OpenShot by manually adjusting different parameters like Scale X, Scale Y, etc. After that, you can crop the video to that area which you have zoomed. In this tutorial I will explain all the steps to crop video in OpenShot.
There are many video editors like VSDC Free Video Editor, Video Clip QuickTool, etc. that allow you to simply select any area on a video by dragging the frame box and then crop the video. But, when it comes to OpenShot, which is one of the best video editors for beginners, there is no such option to crop videos by dragging the frame box. However, it does comes with the above solution using which you can easily crop your videos to any aspect ratio you want.
Now, let me walk you through the steps required for cropping Videos in OpenShot.
How to Crop Video in OpenShot Video Editor:
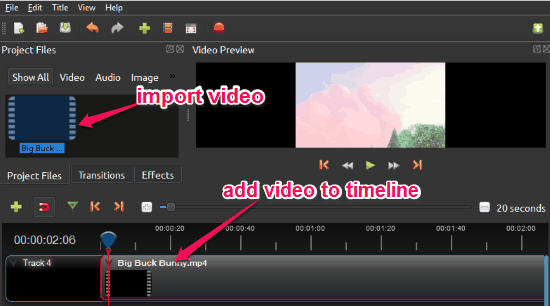
Step 1: To get started, open up “OpenShot” on your PC and then go to the “Project Files” tab on the left. After that, right-click on the blank space and select the “Import Files” option to import the video which you want to crop. When you’re done importing a video, simply drag and drop it on the timeline at the bottom.
Step 2: After that, right-click on the video on the timeline and then select the “Properties” option from the menu. As soon as you do that, a new toolbar named, “Properties” will appear on the left of the editor, as shown below.

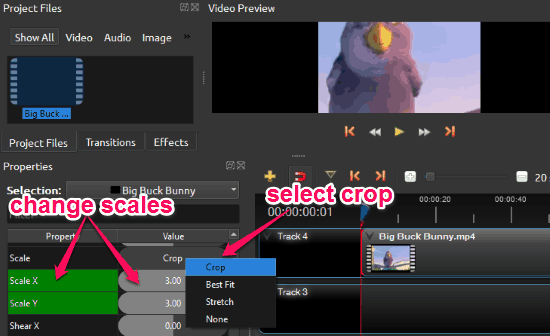
Step 3: Now, simply scroll down on the “Properties” toolbar and stop when you see the “Scale X” and “Scale Y” options. Here, you can change the values of Scale X and Scale Y to zoom the video. For example, if you want to zoom the video by “300%“, then simply enter the value as “3.00” in both Scale X and Scale Y. When you do that, the aspect ratio of the video will zoom and you can see it in the video preview at the top of the editor. After that, right click on the “Scale” option and then set it to “Crop”.
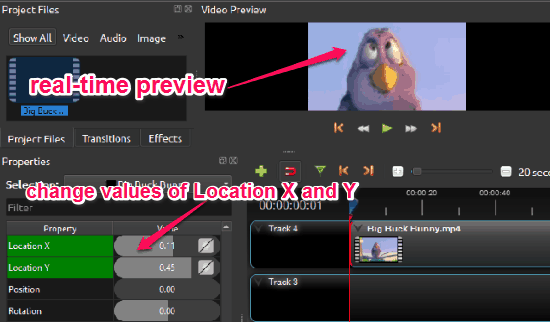
Step 4: Once you’re done zooming the video’s aspect ratio, you can go ahead and change the position of the video frame to select any specific area on the video for cropping. To do this, simply scroll up on the “Properties” toolbar and find the “Location X” and “Location Y” options. After that, you can simply change the values of Location X and Location Y coordinates to choose the target area on the video. When you change the values, you will see the real-time preview of the video area which you’re about to crop.
Step 5: When you’re all set with zooming and selecting a specific area of the video, you can proceed to export your video. For this, click on the “File” menu at the top and select the “Export” option to save the cropped video on your PC.
Also see: 6 Free Video Editors to Zoom Video.
Closing Words:
If you have been looking for a way to crop video in OpenShot video editor, then this tutorial is what you need. The method explained in this tutorial is very simple and can assist you to crop videos with ease. It is more like a trick where you can zoom and change the video frame to any specific area to crop a video. I hope it helps.
If you don’t have OpenShot, then get it from here.