This tutorial explains how to upload videos to Vine from PC using Google Chrome.
Vine is a popular service that lets you explore and share short videos (around 6 seconds in length known as ‘vines’). Unfortunately, its official web app doesn’t let you upload any video to your vine account. Its smartphone app is needed to upload videos using your phone. However, there is a Google Chrome extension available, named VineClient, that lets you upload as well as download videos from Vine right from your PC.
Apart from this, you can also browse and explore vines in a better way than web version. Moreover, it also lets you download any video as animated GIF.
Update (5th March 2016): This extension is not free anymore.
In above screenshot, you can see a sample video uploaded by me on my Vine account.
We have also reviewed 4 Vine downloaders for Android.
How To Upload Videos To Vine from PC Using This Google Chrome Extension?
Here are the simple steps:
Step 1: Click the link given at the end of this review to open VineClient’s homepage.
Step 2: From its homepage, download its CRX file. After this, open Extensions tab of your Google Chrome browser and drop that CRX file there. It will help to install this extension.
Step 3: After installation, you will see VineClient icon available next to Google Chrome’s address bar. Tap on that icon to open the homepage of VineClient.
Step 4: Sign in with your Vine credentials.
Step 5: Access the Upload option from drop down menu available at top right side. It will open a new page within the same tab.
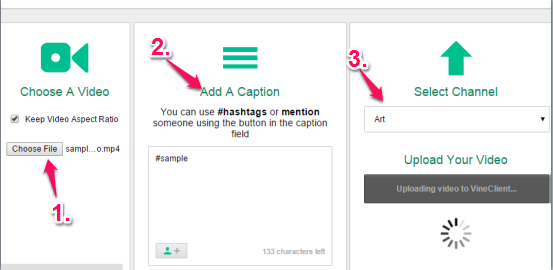
Step 6: In the new page, you will find Choose File button. Use that button to add a video from your PC. You can upload MP4, 3GP, MOV, AVI, FLV, or any other supported video. However, your video file should not be greater than 5 MB in size. After adding the desired video file, you can also mention a person in that video, or simply use a particular hash tag.
Step 8: This is the last step in which you need to select a particular Channel to upload your video. After this, you can click on Start Upload button.
Once the uploading process is finished, you can preview the video.
Other Key Features Present in This Google Chrome extension are:
- With every single post available on Vine, you will find multiple icons. These icons are handy to download a video, share video, revine, like and comment on any video.

- Clicking on Download icon lets you choose whether you want to download that particular vine as video or as animated GIF. You can also select size of GIF using presets.

- It also lets you check your recent activities (new notifications and requests).
Conclusion:
It is a fantastic Google Chrome extension that has made it possible to upload videos to vine as well as download vine videos as animated GIFs from PC. Moreover, you will have a better experience than Vine’s official web app using this Google Chrome extension.


