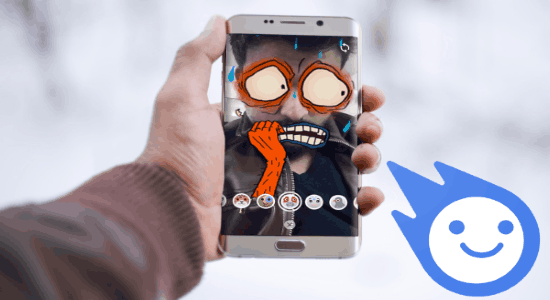
Flash is a free Android app developed by Facebook to send self-destructing photos and videos to your friends as flashes. That means you can use Flash to send photos and videos to anyone and they will automatically disappear after the recipient views it and the self-destructive time runs out. This feature of sending self-destructive photos and videos via Flash is quite similar to that of Snapchat. Not only that, it also lets you add funny face masks to your photos and videos which you record using the built-in camera in the same way as you can do in Snapchat. Some people are already calling it a clone of Snapchat, from Facebook.
The photos and videos which you capture after applying masks are actually called Flashes as per the app. To make your Flashes more interesting you can also draw doodles on them, add meme text, and insert emoji stickers. This app is not limited to sending self-destructive photos and videos only, as you can also use the built-in messenger to have text conversations with your friends, add & show your Flash story to others, and more. In this post, I will talk about all the intriguing and interesting features of Flash (by Facebook) and also show you how to use Flash app so that you can easily become a Pro in using Flash.
How to Use Flash by Facebook on Android:
When you first install and open up this app on your Android phone, it will ask you to sign up for a new account. You can either use your existing Facebook credentials to sign up or create a new account by entering your phone number, name, username, and a password.
Now, let us talk about the features of Flash and see how to use them on your Android phone.
How to Use Camera in Flash
As soon as you sign in, the built-in camera will appear with a big “Round” button at the bottom. This button can be used to capture photos and record videos as Flashes and then send them to others. Apart from that, you will see another button at the top right corner using which you can toggle rear and front camera. Similar to WhatsApp’s built-in camera, you can also double tap on the camera screen to toggle rear and front camera when required.
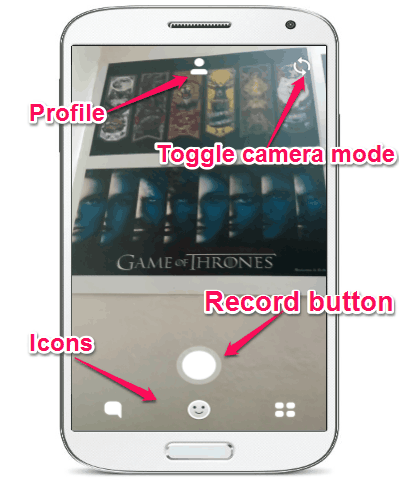
At the bottom of the camera screen, you will see three different icons named, Chat, Mask, and Stories. And at the top of the camera screen, there will be a “Profile” icon using which you can see your profile information, add & see friends information, and also access your profile settings.
Add Masks to Photos in Flash App:
The “Mask” icon lets you add funny face masks while capturing a photo or apply it in real-time while recording a video, like Snapchat does. When you tap on the “Mask” icon at the bottom of the camera screen, all the face masks offered by Flash will appear. Currently, it offers 13 face masks. Some of them are fixed masks and some of them come with animated effects.
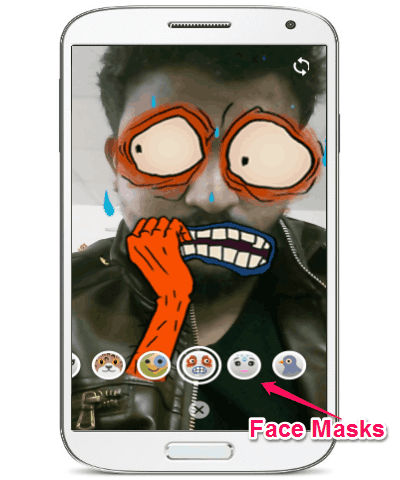
You can now simply tap on any of the masks which you want to add to your photo or video flash. Once you select a mask, it will be applied to your face on the camera. To get a better result, you can move the phone or your face to perfectly place the mask on your face before capturing a photo or recording video. After applying a mask, you can simply tap on the icon of the selected mask to capture a photo or tap and hold to record a video. When you’re done capturing a photo or recording a video with the mask, it will allow you to add doodles, text, stickers, and also set the self-destruction time of the photo or video flash.
Add Stickers, Text, and Doodles in Flash:
Similar to WhatsApp, Flash app allows you to add stickers, doodles, and text to the photos and videos after taking them with the built-in camera. After adding stickers, text, and doodles, you can also save the flashes to your phone gallery by tapping on the “Download” icon on the “Editor” screen.
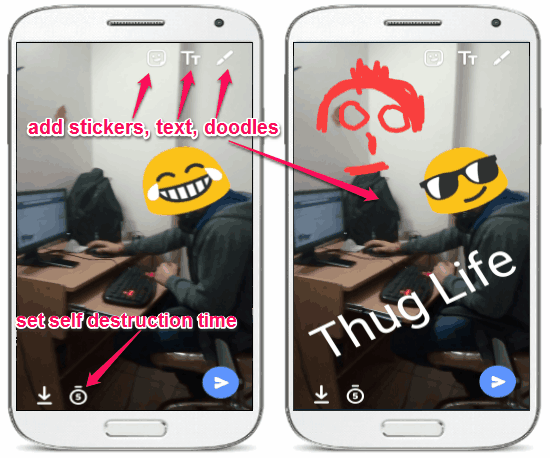
- Add Stickers in Flash: At the top of the “Editor” screen, you can simply tap on the “Stickers” icon to add stickers to the photo or video flash. The stickers are actually the larger version of Facebook emojis and you can add as many stickers as you want to the flashes. After adding a sticker, you can drag it across the screen and also pinch on the screen to rotate and change the size of the sticker.
- Text: Adjacent to the “Stickers” icon, you will see the “text” icon using which you can add a meme text to the photo or video flash. By default, the text color will be white with a decent font and there is no option to change the color or font of the text.
- Doodles: In addition to stickers and text, you can also draw and add doodles on the flashes. For this, simply tap on the “Pencil” icon at the top and start drawing anything on the flash. The drawing tool also offers 7 different brush colors along with an “Undo” option.
Set Self-Destruction Time on Flash App
At the bottom of the “Editor” screen, you will see a “Clock” icon using which you can set the self-destruction time for the photo or video flash. When you tap on the “Clock” icon, it will allow you to select the self-destruction time either as 1 second, 2 seconds, 3 seconds, or up to 10 seconds maximum.
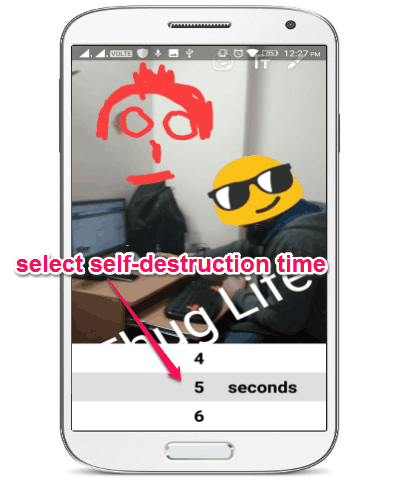
When you’re done with selecting a self-destruction time, you can simply tap on the “Send” button and then choose any of your friends to send the photo or video flash. Once your friend receives the flash, he or she can open and view it until the assigned time runs out. That means if you have set the self-destruction time as 5 seconds, then after viewing your flash for 5 seconds, it will automatically disappear.
Chat with Friends on Flash:
When you select the “Chat” icon at the bottom of the camera screen, it will open the built-in messenger using which you will be able to start text conversations with your friends. On the messenger screen, simply tap on the “+” button at the top to choose any of your friends with whom you want to start a conversation. After that, you can simply chat by sending text messages and emojis, as shown below.
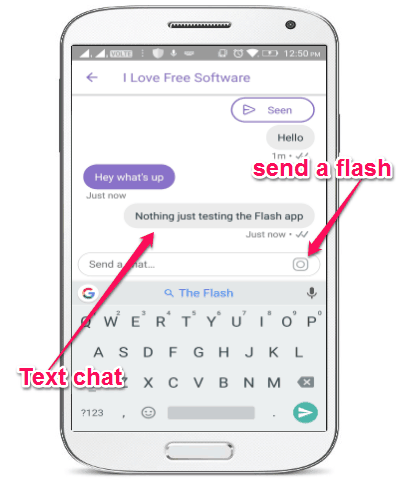
Apart from sending text messages, you can also directly send photo or video flashes by tapping on the “Camera” icon in the messages input field. After you tap on the “Camera” icon, you can create a flash in the same manner as I have explained in the above sections.
One of the unique features of Flash’s built-in messenger is that the text messages will also disappear once you come out of the chat thread. For example, let’s say you’re having a text conversation with a friend and when you come out of the current chat thread all the messages which you have sent or received will automatically disappear. In the same manner, if the user on the other side closes the chat thread then all the messages will vanish from his phone.
Stories Icon:
Another interesting feature of the Flash app is that it lets you add flashes to your story which will be visible to all your friends. This can come handy in case you want to send and show a flash to multiple users without sending them manually to each user. Remember, you can only add a single photo or video flash to your story. The flash added to your story stays for 3 days and then automatically disappears.
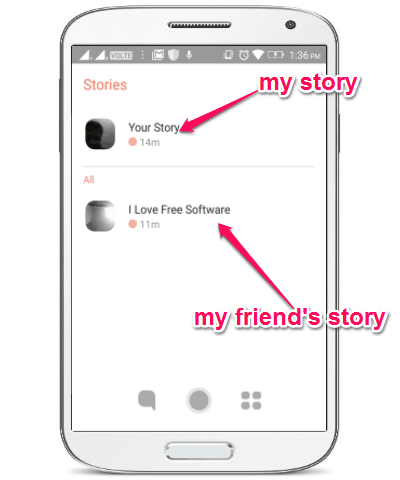
When you create a photo or video flash and tap on the “Send” button to select the recipient, you will also see an “Add” button associated with the “Your Story” option. Tapping on this “Add” button will add the flash to your story. If you want to see the stories of your friends then you would need to add them first to your friend’s list. After that, all the flash stories shared by your friends will be visible on the “Stories” screen. Remember, to see your photo or video flashes and stories, your friends also need to be a Flash user.
I will explain how to add friends in the below section.
How to Add Friends in Flash App:
When you select the “Profile” icon at the top of the camera screen, it will show your profile info along with two different tabs named, “Add Friends” and “Your Friends”. Now, to add friends, go to the “Add Friends” tab and then use the “Search” icon to find global friends by simply entering the name or the username. When you type a keyword in the input field, it will automatically find and suggest all the Flash users from all over the world matching the keyword. After that, simply tap on the “Add” button associated with users to add them to your friend’s list. After you add a friend, the user will be notified that you have added him or her as your friend and will also be able to add you back. But, the user must have the Flash app installed on his or her Android phone to see the notification.
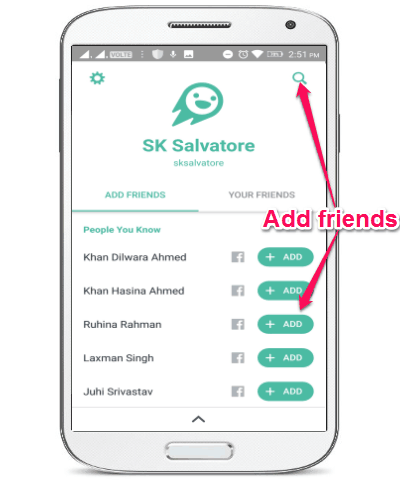
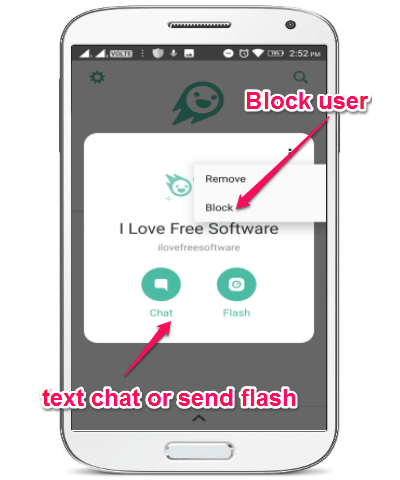
In addition to that, if you have used your Facebook account while signing up, then it will also show all your Facebook friends and let you add them to your friend’s list. All your added friends will be visible on “Your Friends” tab and you can simply tap on any username to start a text chat, send a Flash, remove from the list, or block the user.
Profile Settings:
The “Profile Settings” allows you to change your name, username, password, and more. Some of the important and useful settings which you can modify are as follows:
- Story Settings: This will help you set the privacy of your stories. You can either make your story public to let everyone see it who adds you as a friend or keep it private such that only the users whom you have added back will see your story.
- Blocked Users: This setting will allow you to unblock users whom you have blocked in Flash.
- Sync Contacts: Enabling this setting will keep your Flash and Facebook contacts synced.
- Mobile Data Control: This setting will help you enable or disable preloading of flashes.
My Final Verdict:
Flash by Facebook is a pretty amazing app for Android with interesting features that help you send self-destructing photos and videos as flashes to your friends. Apart from that, this app can also be used to send quick text messages as you normally do with other text messengers. Personally, I think Flash by Facebook is probably going to give a tough time to Snapchat in the coming days.