This tutorial is all about how to disable “Get Windows 10” notification icon on Windows 7 / Windows 8. If you are using Windows 7 or 8, then you might have noticed the notification icon of “Get Windows 10” appear in the Taskbar, along with other system icons. If you wish to continue using Windows 7, then you can easily disable the “Get Windows 10” icon from your taskbar.
Here comes a free tool “GWX Control Panel” to permanently or temporarily disable the “Get Windows 10” icon on your PC. This tool lets you disable as well as enable “Get Windows 10” notification icon with a single click. That means, in case you want to upgrade your PC to Windows 10, then you can re-enable the “Get Windows 10” icon using this tool. So you can easily control and configure this icon on your PC using “GWX Control Panel”.
From the below screenshot, you can see how this tool works.
![]()
The “Get Windows 10” icon will frequently pop up as a reminder to upgrade your PC into Windows 10. You cannot disable this icon easily. Thankfully, this tool makes it pretty easy to get rid of this icon.
How to Disable “Get Windows 10” Icon in Windows 7 or Windows 8:
I will explain the entire procedure of disabling and enabling “Get Windows 10″notification icon step by step.
Download and install “GWX Control Panel”:
You can download this tool from the link provided at the end of this post. It is compatible with both 32-bit and 64-bit Windows.
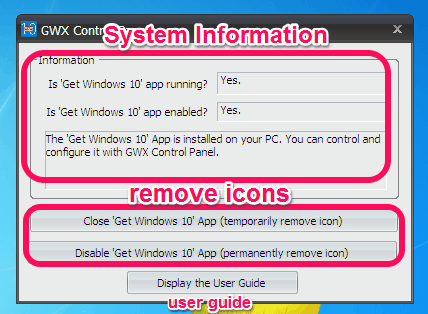
As soon as you open up this tool, you will be able to disable the icon on your PC. It shows some information about your PC, like: “Get Windows 10 App” is running/enabled on your PC or not. You will also be able to see the options for removing “Get Windows 10” app temporarily or permanently. It also has an option to view user guide, which will redirect you to the user manual page of this tool. The following screenshot shows the tool interface with different options.
Disable “Get Windows 10” icon temporarily or permanently:
To temporarily remove the icon from your PC, simply click Close “Get Windows 10” App option (temporarily remove icon). The icon will disappear from the taskbar immediately, but if you restart your PC the icon will pop up again. If you click the above option again then the icon will re-appear in the taskbar.
In case you wish to remove the icon permanently, you can click Disable “Get Windows 10” App (permanently remove icon). This option will prevent the icon from re-enabling even after you restart your PC. If you click again on the above option, the icon will get re-enabled as shown below.
For both cases, you can also re-enable the icon using GWX Control Panel. The following screenshot shows the icon disabled permanently and how to re-enable the icon using this tool.
![]()
We have also reviewed Disable Individual System Icons In Notification Area In Windows 10.
My Final Verdict:
GWX Control Panel is definitely a very useful tool to disable “Get Windows 10” icon temporarily or permanently. This tutorial will surely help you get rid of the “Get Windows 10” icon and unwanted reminders to upgrade your PC.
Get GWX Control Panel from the link here.