This tutorial talks about how to automatically encrypt files before uploading them to Dropbox, Google Drive, OneDrive, and more. Ever wonder how to encrypt your files before you upload them to any of your favorite cloud services? If yes, then this tutorial is definitely for you.
In this tutorial, I am going to use a free software called “Cryptomator” to encrypt files before uploading them to the cloud. Cryptomator allows you to automatically encrypt all your files locally on your PC and keep an encrypted copy of the files on the cloud. For this, all you need to do is create a vault and set a password of your choice.
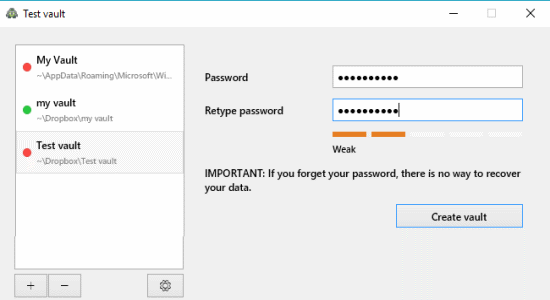
Note: If you forget your vault password, then there is no way to recover your data.
How to Automatically Encrypt Files Before Uploading Them to Dropbox, google Drive, OneDrive, etc:
Step 1: In this post, I am going to use Dropbox to demonstrate how to automatically encrypt your files before uploading them to Dropbox. So, let’s get started. After installing “Cryptomator”, simply open it and it will ask you to create a new vault. Click the “+” button and select the option “Create New Vault” to proceed.

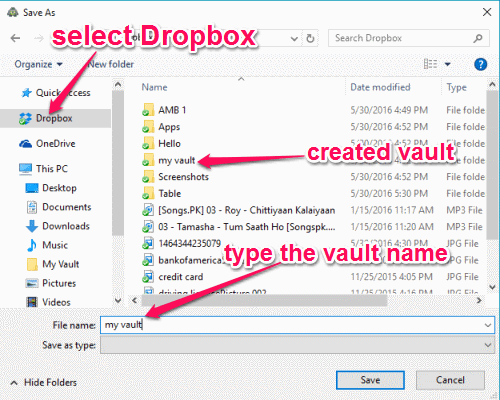
Step 2: Then a popup window will appear where you can choose any of the cloud service folders from the navigation pane. For example, if you’ve installed Dropbox on your PC, then on the navigation pane there will be a folder named “Dropbox”. Click the folder, give the vault a name, and hit the save button. The vault folder will be created instantly and will be synced automatically to your Dropbox account.
Step 3: After that, it will ask you to set up a password for that particular vault. Once you’re done with entering the password, hit the “Create Vault” button to initiate and create the encrypted vault. Then click the “Lock vault” button at the bottom and close Cryptomator.
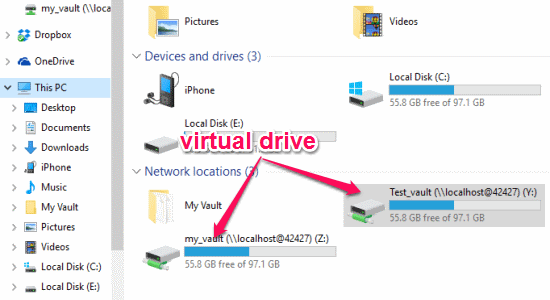
Step 4: When the vault is created, Cryptomator will automatically mount the vault as a virtual drive on your PC. You can view and access the drive in the Windows Explorer as shown below. Remember, before you can see and access the virtual drive, you need to open Cryptomator and enter the password for that particular vault.
Step 5: Now, to automatically encrypt your files before uploading them to Dropbox, simply copy and paste the files in the virtual drive which was created automatically after adding the vault. Whatever files you add in the virtual drive will get automatically encrypted and synced with your Dropbox account. Once you’re done with adding files to the drive, switch back to the Cryptomator and lock the vault. After that, the drive will disappear and no one will ever know that you have a secret vault with your important files on it.
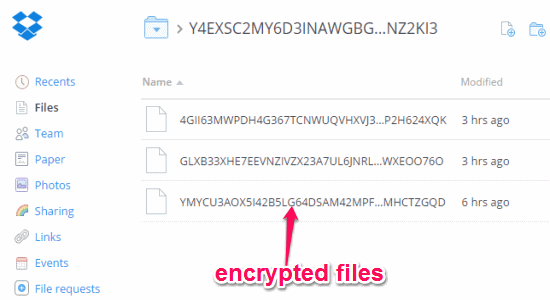
Step 6: To check whether the files are synced and encrypted or not, go to your Dropbox account and open up the vault folder which you’ve created earlier. There you will see all your files, but as an encrypted copy of the original files as shown below.
Step 7: No one including you can access those encrypted files inside the Dropbox or by downloading them. There is only one way to access the files which is open Cryptomator and unlock the vault by entering the password. The virtual drive will appear again where you can view all your encrypted files.
My Final Verdict:
Go through the steps in this tutorial and use Cryptomator to automatically encrypt your images, documents, or any other files before even uploading them to Dropbox, Google Drive, etc. Similar to other useful applications like nCrypted Cloud and Secured Cloud Drive, this software also encrypts your files on the cloud with very reliable AES-encryption. So now you can be more confident about storing your confidential files on the cloud, because they will be encrypted before going online.