This article is a Windows 8 tutorial on “ How To Group And Name Group Of Tiles In Windows 8 ”.
On comparing Windows 8 with earlier versions of Windows, you’ll find it very intuitive and more beautiful. Plus there are other aspects which differentiates Windows 8 with previous versions. One of these aspects includes the Windows 8 Start Screen and the tiles of different apps installed in your system.
Initially, Start Screen got mixed reviews; some said it’s good, some said it’s bad. But as slowly people became familiar with it, the negative reviews have reduced. In fact, Start Screen is very useful, and provides quick access to multiple useful apps with one click. And the other advantage of Start Screen is, it does makes Windows 8 look good.
But there are times, when you have multiple tiles of different apps in Start Screen, each doing different operations; for example: a Facebook client app, then follows a music app, then a to-do app, then again another Facebook or Instagram app etc. The reason behind the random placement of these tiles is, because they get placed as per the first come first serve basis. That is, app which got installed first gets placed first in the Start Screen. And most of the apps installation are random. Because of this random placement of tiles, your start screen starts looking messy, rather than beautiful.
So in such situations, Windows 8 itself comes to rescue. Windows 8 actually allows you to create a group of tiles similar apps, for example a group of all social apps, group of chatting apps, group of movies and music apps etc. You don’t need to download anything extra for grouping apps together. However Windows 8 doesn’t provide any mechanism to name these groups of apps. So, you need to install this simple light weight utility app Grouper from the Productivity Category in Windows Store. You can use the Windows 8 Search Charm to locate the app in Windows Store or click on the download link given at the end of this article. Then follow the steps of this Windows 8 tutorial.
Here’s how you can group and name groups of tiles in Windows 8:
Simply, go to the Windows 8 Start Screen. Select a tile by clicking on it, don’t leave the mouse button and drag the tile towards left, right, up, or down; wherever you want to put it. Windows 8 automatically slides the following tiles one step down as per your placement. Once you are done, do the same with other tiles that you want to put in the same group. This is how you can create groups of tiles in Windows 8 Start Screen.
In order to name these groups, simply launch Grouper app. You’ll get a screen, that looks like the screenshot below:

Simply fill in all the text fields. This Windows 8 app to name groups of tiles, is pretty flexible as it gives options to set a background color of tile, choose a group name from a given name list of categories like: Banking, Games, Entertainment, Cool, Fun, Friends etc., or give your own custom name, change text size, and add border.
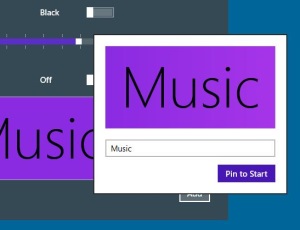
Once you are done with setting the values, click on Add. You’ll get option to pin it to Start Screen. After pinning, simply follow same process of click and drag, and place the group naming tile at beginning of each group.
That’s pretty much it!

Also, if you want to switch back to Windows 7 from Windows 8, then you might find this Windows 8 tutorial to make Windows 8 look and feel like Windows 7 handy.
Conclusion on this Windows 8 Tutorial:
That’s how you can group and name groups of tiles in Windows 8, in few simple and easy steps, and make your Windows 8 Start Screen more useful and organized.
And don’t forget to check this Windows 8 tutorial on How To Pin Folders, Desktop Apps, Websites To Windows 8 Start Screen.
Click here to get Grouper App.