Imgsquash is a free self hosted image compressor with API that you can use as a microservice. It uses Google Cloud platform to run and you can easily deploy it locally and on a VPS and then compress images like a pro. It takes JPG or PNG images up to 10MB in size and then compress them. The best part is that it works as an API as well. You can submit an image via its URL to one of the endpoints and then it will compress the images. And not only a single image but you can use it to compress multiple images in one go.
There are many online image compression tools and APIs that you can use. But if you want to host your own image compressor them imgsquash is what you need. To setup this locally or on a remote server, you need some technical knowledge. And you will also need access to GCP (Google Cloud Platform) console. After you setup this, you can start using it via its pretty interface. It supports two type of compressions; lossy and lossless. Based on your needs, you can choose the compression you need and start compressing images accordingly.
The whole process of setting up this self hosted image compressor is divided into two parts. In the first part, we will configure Google Cloud Platform to create a storage bucket. In the second part, we will configure the server and dependency installation on local machine or VPS. It requires Node.js installed on your PC or server and then you can easily proceed with the installation part. If you have tried GCP and tools in Node.js before then it will hardly take a few minutes to get up and running this image compressor.
Installing and using this Free Self Hosted Bulk Image Compressor:
If you don’t already have Google Cloud Platform account then create one. Next, you can go through the process that I have explains below and I have divided it into parts. In the first part, we will do all the required GCP work. And in the second part, we will install and configure the imgsquash on local machine. For this post, I will be installing this on Windows 10 desktop. Now, follow this guide carefully.
Part 1: Creating Google Cloud Storage Bucket and Getting Service Account File
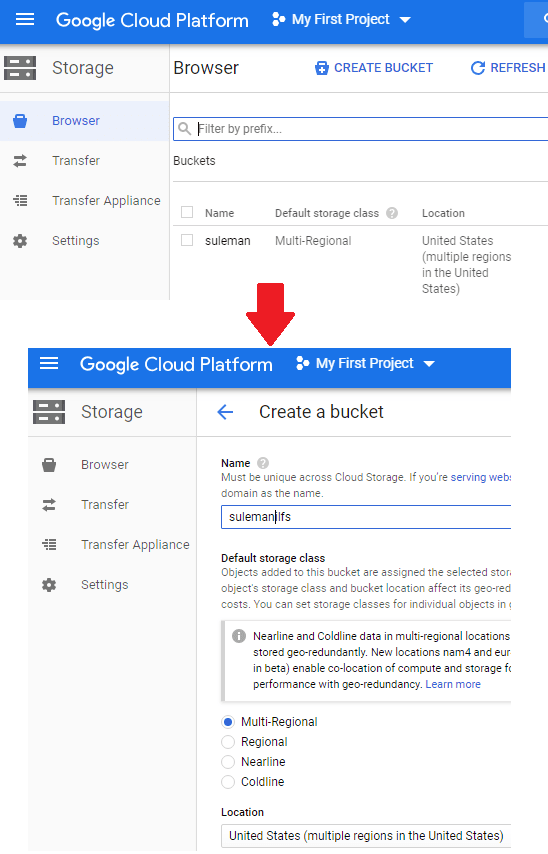
Log in to the GCP dashboard and then create a new project. Now, you have to create a storage bucket and you can use this link to do that. Click on create a New bucket and give your bucket a name and save changes. Along with bucket name, you can specify some other options as well. You can see the screenshot below to see how to create a bucket.
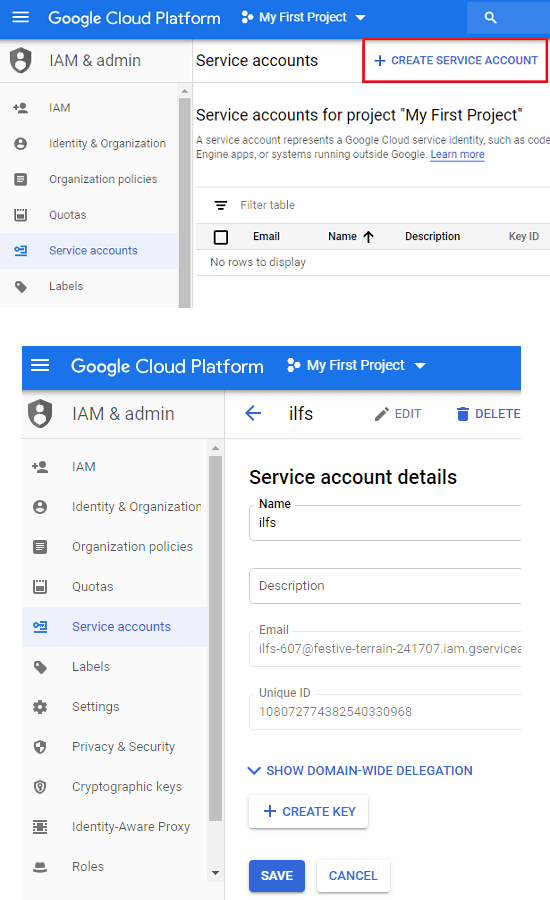
Now, when you have created the storage bucket, its time to configure permissions and get the key file. For that, you have to go to IAM roles using this URL. Here you have to create a service account. For that, you will have to specify any name there and then it will create the service account for you. Next, thing you have to create is the key and you can create that from the same page. The option to create key is on the bottom side. Create JSON key a file will download automatically and you have to keep is somewhere safe.
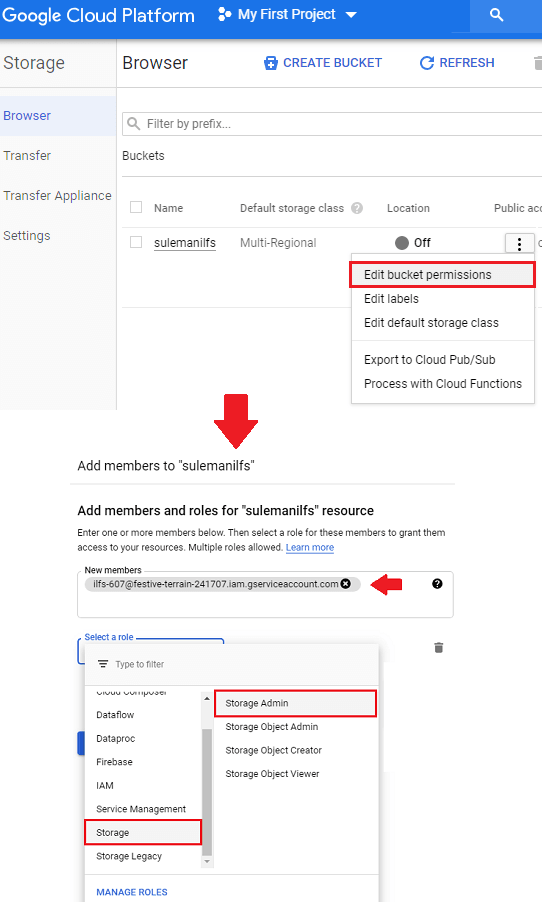
Now, the final thing you have to do is assign services account ton the bucket we created earlier. Go to the Storage section and open the bucket that we already created. Edit the permission setting of the bucket as shown in the following screenshot. Next, you use “Add Members” option and then enter the services account address that we have already created. Set user rights to Storage Admin in the Storage section.
Now, we have a JSON file in which we have the key that will be used for authentication. Also, we have configured the buckets and now the only thing remains is to configure the frontend and API by installing it.
Part 2: Installing and Configuring Imgsquash Locally
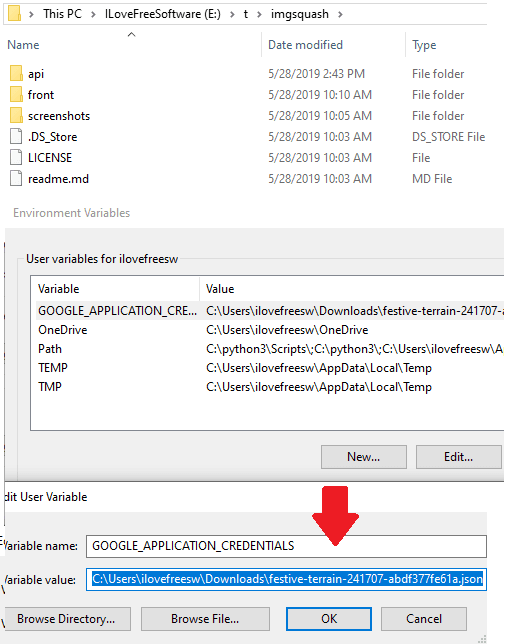
The first thing need to be done is to clone this GitHub repository. The directory structure of the downloaded repository will look like as shows in the screenshot. Another things you have to do is create a new environment variable. You can either use some environment variable editor software which make sit all easy. Give name of the new environment variable to “GOOGLE_APPLICATION_CREDENTIALS“. The value corresponding to this variable is the location of the JSON file that you have downloaded in the part 1.
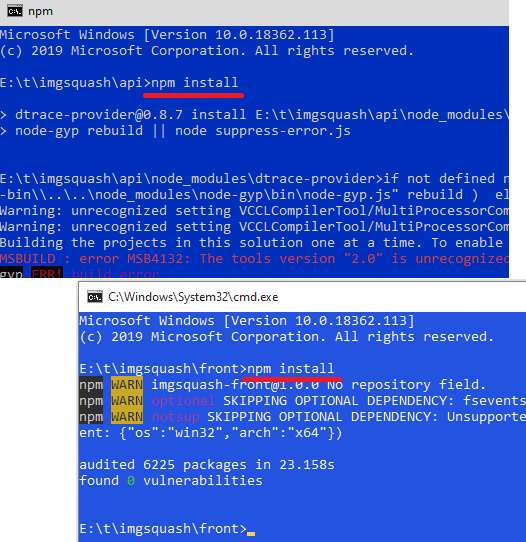
Now, you have to open two command prompts. Open the first command prompt inside “front” folder and the second in the “api” folder. Next, run the following command in both the command prompts and wait for them to finish. If you want then you can run the command one after another.
npm install
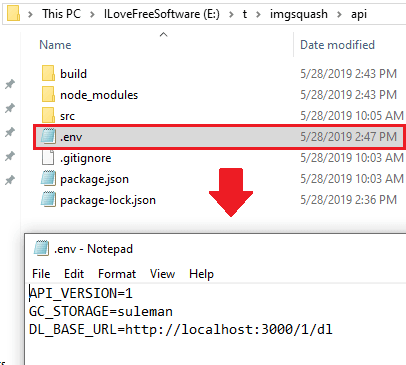
Now, inside the “api” folder, create an .env file with the following data. Basically, you have to specify the API version, name of the storage bucket and then API URL. In the local mode, simply add “localhost:3000” as the base URL for the API as you can see below.
API_VERSION = 1 (default)

GC_STORAGE = your-google-cloud-bucket-name

DL_BASE_URL = [YOUR-API-URL]/1/dl
Now, at this point, you are ready to open it up. Simply, run the following command in the both the command prompts and then point your browser to “localhost:3001“. The UI if the image compressor will open and you can start compressing images.
npm run dev
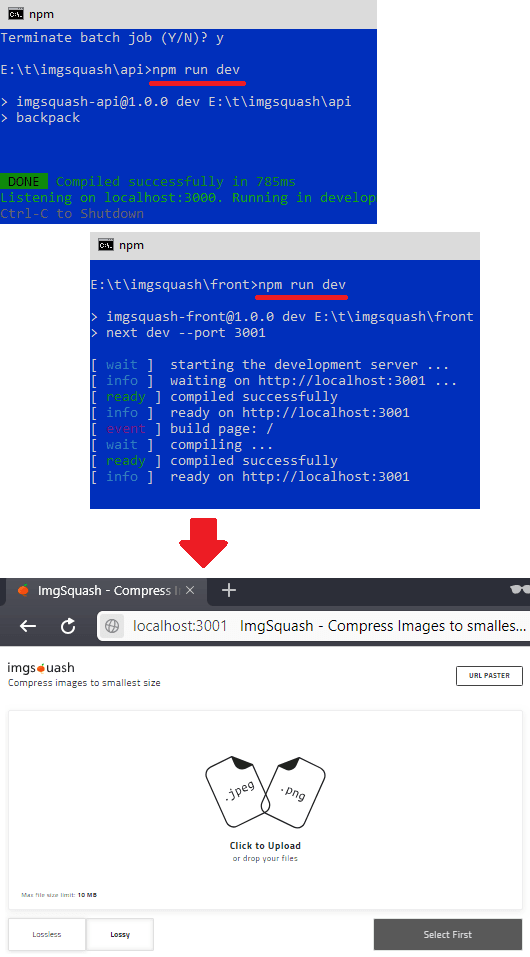
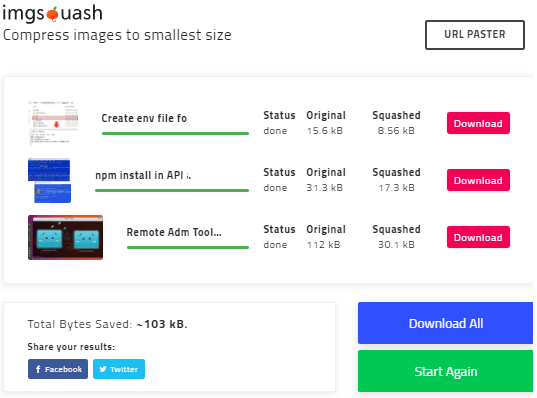
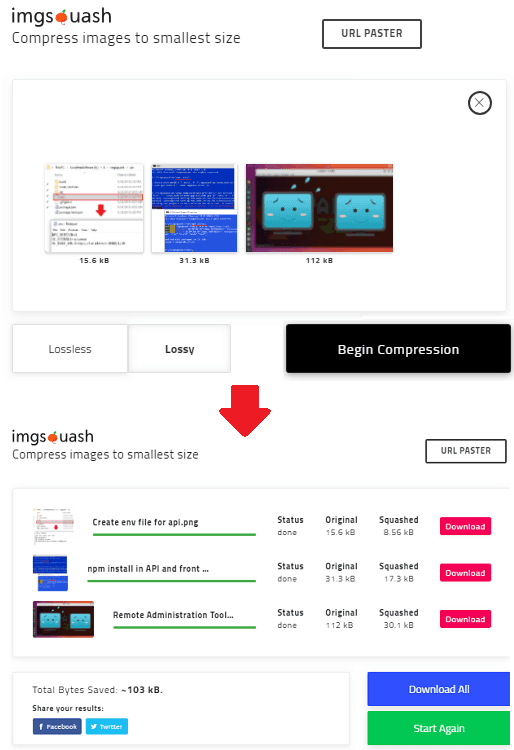
To compress images, you simply drag them on its interface and choose the type of compression. Next, start the compression by clicking on the “Begin Compression” button. You can see status of the compress operation and when it is done, you can download the compressed images.
So, this is the whole process of installing and deploying this image compressor. If you like self hosted tools then you will definitely like this one. You can host a personal image compressor for your team if you don’t want to rely on others. The advantage is that you will own your data and there will be no limitations. it will run for free for a year as GCP offers you a free tier as well.
Final thoughts
The image compression through this self hosted image optimizer is very nice. I really liked this for its simplicity and clutter free user interface. If you are techie person then it won’t take long to setup this tool on your machine. And even if you are not a technical person then this post will be a very good guide to you. Give it a try to bulk compress images for free and let me know that you think about it.