This tutorial will explain how to create slow motion and timelapse videos on YouTube. This can be done using the YouTube’s built-in video editor. The editor actually allows you to upload any video you want and then create a slow motion or timelapse video out of it. Both the options come with some predefined playback speed like 1x, 2x, 4x, etc. which you can choose for your video in order to convert it. No more using complex slow motion video maker or timelapse video maker, as the simple options in YouTube video editor can help you do the same with ease.
After creating a slow motion or timelapse video, you can easily save it to your YouTube account or download it as an MP4 file to your PC for free. Apart from these options, you will also find many other editing tools in YouTube video editor like trim, auto-fix, stabilize, color correction, and so on.
Note: Do note that the slow motion videos, which you create on YouTube, must not exceed 10 minutes in length or else you won’t be able to save or download it.
How to Create Slow Motion and Timelapse Video on YouTube:
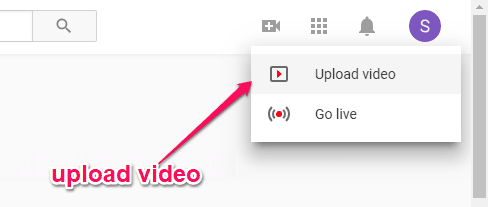
To get started, the first thing you would need to do is open up YouTube and then upload a video. To do that, click on the “Upload” icon at the top and then choose any video you want from your PC.
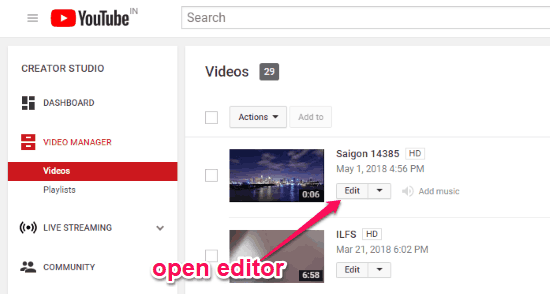
After that, open the “Creator Studio” and select “Videos” under the “Video Manager” tab on the left panel. Then you can see the video you have uploaded and then click on the “Edit” button to proceed.
As soon as you do that, the YouTube video editor will open up and you would need to go to the “Enhancements” tab. After that, you can see the “Slow Motion” and “Timelapse” editing option at the bottom right of the YouTube video editor.

Now, let me show you how to create a slow motion and timelapse video using the original video you have uploaded separately. The original video which I will use is given below.
Create a Slow Motion Video:
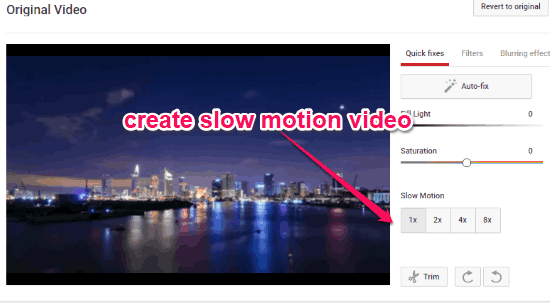
Under the “Slow Motion” option, you can see 4 different predefined speed as 1x, 2x, 4x, and 8x. Now, what you need to do is simply select any speed you want and then the video will be converted into a slow motion video. You can see the preview on the left.
The below video is an example of the slow motion video created by YouTube video editor.
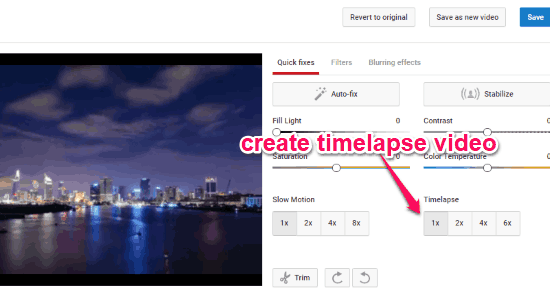
Create a Timelapse Video:
Similar to “Slow Motion” option, you will also see 4 different playback speed under the “timelapse” option including 1x, 2x, 4x, and 8x. Now, to create a timelapse video using the original video, all you gotta do is select any of the speed options. When you do that, the timelapse video will be created and you can preview it using the built-in player.
The below video is an example of Timelapse video created on YouTube.
Once you’re done creating a slow motion or timelapse video, you can save it on YouTube or download it to your PC as an MP4 file from the “Video Manager”.
Closing Words:
So, this is the simple method using which you can create slow motion and timelapse videos on YouTube. If you use YouTube to share your videos with the world, then you can now use the YouTube’s built-in video editor to create and share some amazing slow motion and timelapse videos. What makes this editor perfect for the job is that it is super simple to use.