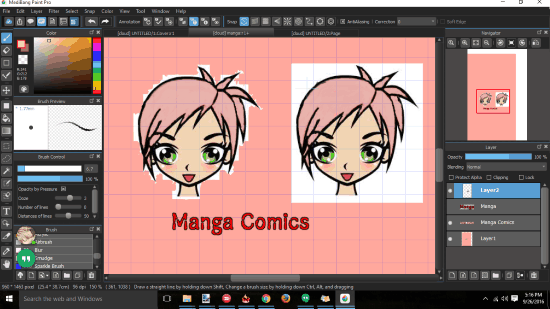
MediBang Paint Pro is a free software to create digital arts and comics. It is basically a paint and drawing tool that focuses on creating manga comics. However, you can also use it create any type of drawing. Despite being a free software, it offers a large range drawing tools like, different customizable brushes, erasers, layers control, pressure sensitivity, etc. It even allows to add different brushes. You can also annotate your creation, once it has been saved to Cloud. It also has other tools like Bucket Tool, Gradient Tool, Lasso Tool, Magic Wand Tool, Text, etc. You can also add an image in a reference window as reference image.
What makes it better is that it is cross platform and can be accessed from devices running Windows, Mac OS , iOS, or Android. And once you have created your MediBang account, you can continue your work with PC, tablet, or even with your smartphone.
Most of the software to create digital arts either don’t have all the right tools or they are paid software. On the other hand, MediBang Paint Pro has so many great tools to create your own digital art and comics, and it comes for free. This makes it a great choice for digital artists.
You guys must take a loot at these cool free Manga downloaders.
How To Create Digital Arts with MediBang Paint Pro:
MediBang Paint Pro is a very useful software to create your own digital art. It not only runs on Windows devices, but it also runs on Mac OS, iOS, and Android. This makes it very much accessible with most of the devices of this era.
Once you have downloaded and installed the software from the link provided at the end, you are good to go. You can start by signing up on MediBang Paint Pro. Then choosing a new page for a standard drawing or a comics. Lets first see how to customize standard image page and then we will see how to customize the comics page.
Standard Drawing:
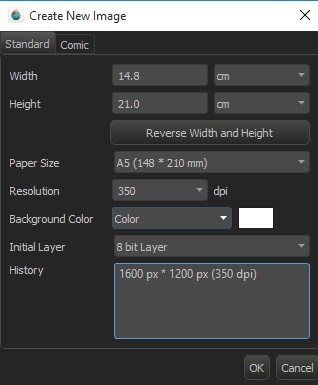
For standard drawing, you need to assign Width and Height of the page first, then you need to select a Paper Size from the dropdown. Some of these sizes are A2, A3, A4, B2, B3, Postcard, MediBang Cover, Twitter Image Size, etc.. Then, you need to set the Resolution to either 350 or 600 dpi. Next, you need to choose a color for background or keep it transparent. Then, you will need to choose either a color layer or a 8 bit layer as Initial Layer. Then click OK to open the page for standard drawing. Then you can use all the tools available on the interface to create your drawing.
Comic Drawing:
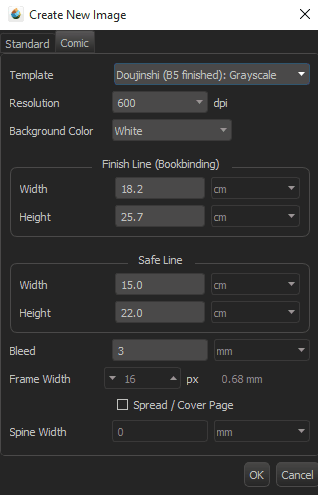
For opening a page for comic drawing, first you need to choose a Template based on Japanese or USA comics. Next, you need to set the Resolution of the page on either 350 or 600 dpi. Here, you can only set the Background Color to either white or transparent. After that you need to set the Finish Line (Bookbinding) Width and Height. And then, Safe Line Width and Height. Then you need to assign Bleed , Spine Width, and Frame Width of the comics.
Manga Comics Drawing:
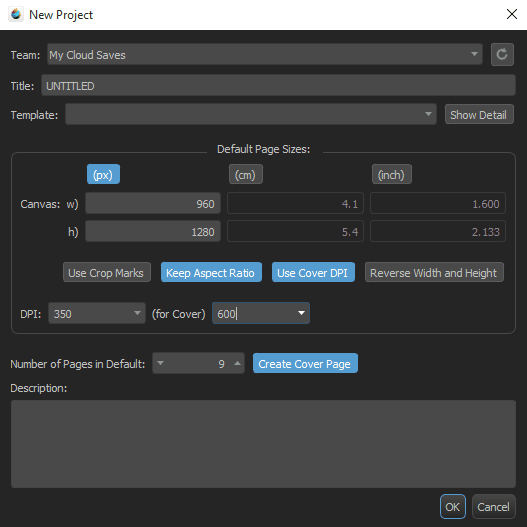
For drawing Manga comics, you specially get an option on your profile (profile appears when you open MediBang), which says Draw Manga. For this, you can set the Title, Template, Default Page Sizes, Number of pages, and Description. You can also set to create a Cover page. While Drawing manga comics you can use Open Project Dialog to switch between manga pages.
Once the settings of new page (Standard Drawing, Comic Drawing, and Manga Drawing) are completed, you can start drawing with all the tools available on the interface. The basic Toolbar of MediBang Paint Pro appears on the left side of interface and consist of the following tools:
- Brush Tool: With brush tool, you get to select among various inbuilt brushes or pen tools like, Pencil, Pen, Mapping pen, Edge pen, Watercolor, Acrylic, Airbrush, Blur, etc. You further get to control Brush Size and Opacity with Brush control sliders. You can also add more brush tools from cloud or by customizing the inbuilt brushes.
- Eraser Tool: As the name suggests, this tool is used to erase and its size and Opacity can also be controlled with sliders.
- Shape Brush Tool: This Tool is used to draw basic geometrical shapes like Line, Polyline, Curve, Rectangle, ellipse, and Polygon.
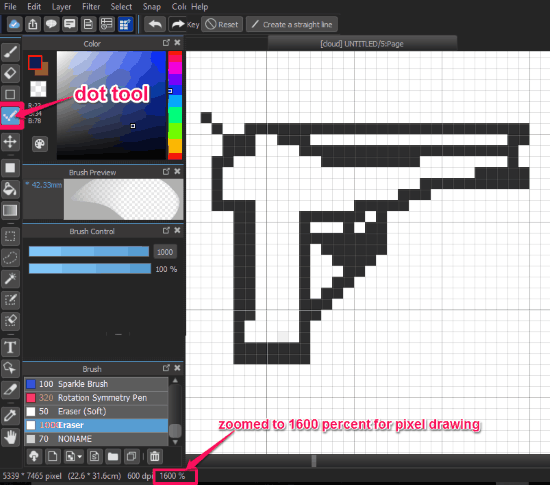
- Dot Tool: Dot tool is basically black brush with maximum size of a pixel, so this can be used to make pixel arts. For making pixel arts you need to first zoom your drawing page to the maximum point, where each pixel can be seen as a square.

- Move Tool: This tool is used for moving drawings of each layer at a time. This can be used to move the the drawings on different layers without switching layers.
- Fill tool: This tool is used to fill colors to geometrical shapes like rectangle, ellipse, and polygons, drawn on the pages. The color can be chosen from Color Window.
- Bucket Tool: This tool is also used to fill color in any chosen shape or area on the page.
- Gradient Tool: This tool is used to change the color of area under gradient line from darker to lighter shade.
- Select Tool: This is used to select a rectangular area on the page.
- Lasso Tool: This is used to select any select any irregular enclosed area on the page.
- Magic Wand Tool: This is used to select pixels or area on the page based on tone and color.
- SelectPen Tool: This tool is used to select an area which has been drawn using pen tool with various sizes.
- Select Eraser Tool: This tool is used to select an area which has been erased using eraser tool of varying sizes.
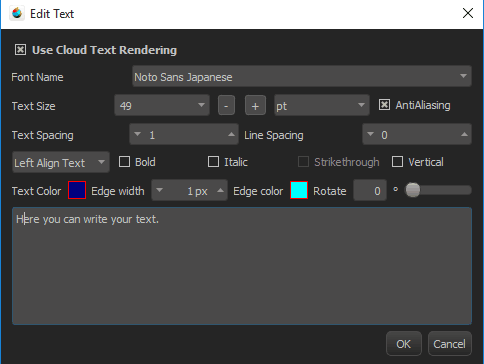
- Text Tool: This is used to enter text on your drawing. You can edit Text Fonts, Text Size, Text Spacing Line Spacing, Sentence Alignment, Text Color, Edge Width, Edge Color, and Rotate Text.

- Divide Tool: It is used to divide the page horizontally, vertically and diagonally.
- EyeDropper Tool: This tool is used to select any already used color on the drawing.
- Hand Tool: This is used to drag the whole page on the interface.
Other than this, MediBang also allows you to use different filters like: Input and Output Levels, Hue, Saturation, Brightness, Inverse, Gaussian Blur, Mosaic size, and Extracting Lines. All these are listed under Filter Tab.
Layer Tab on the other hand has all the settings regarding use of different layers in the drawing. It has the option to add simple Layer, Duplicate Layer, Add/8bit, Add/1bit, Add/Halftone layer. You can also convert one layer into other types of layer with Convert Layer.
With Snap Tab, you can use Parallel, Crisscross, Vanishing Point, radial, Circle, Curve, and Ellipse Snap to draw according to these shapes only.
Tool Tab contains all the same tools found in the toolbar. While Windows Tab can be used to show and hide window of Color, Palette, Brush Preview, Brush Control, Brush, Navigator, layer, Reference, keyboard Support, and Status Bar.
You also get Annotation Mode to annotate images, which can be used only when a cloud saved image is open.
Pros: It is for free and has many useful tools to create digital arts.
Cons: All the tools are not arranged intuitively and has a cluttered interface.
Verdict:
MediBang Paint Pro is a free software to create digital arts including Manga Comics. Its interface is a bit cluttered, I hope its developers are trying to sort it out soon. However it works just fine and offers a lot of tools to create digital arts.
