Here is a list of 5 best free auto form filler extensions for Google Chrome. Using these extensions, you’ll be able to fill out online forms automatically without any need to enter the information of repetitious form fields manually. That means you can use these extensions to automatically fill out various form field elements like username, first name, last name, email, phone, address, gender, and so on. Filling out forms online can be a very time-consuming and irritating task, but these extensions can help you get rid of these problems permanently. For this, all you got to do is enter and save your form field details only once, and then these extensions will do the rest for you.
Google Chrome comes with a predefined autofill feature, however, it doesn’t support all kind of form fields. This is where these extensions can come handy as they support almost all the standard input fields like text boxes, radio buttons, drop down items, checkboxes, etc.
To ease up things a little for you, I have dug up 5 of the best free form filler Chrome extension such as Autofill, AutoFill Forms, RoboForm, etc. to auto-fill form fields. Let us take a look at the extensions and how to use them.
How to Auto Fill Forms Using Autofill Chrome Extension:
Autofill is probably one of the best form filler Chrome extensions that let you auto-fill forms with ease. It lets you create custom form fields by simply entering the field type, field name, field value, and site (optional) which it will use to auto-fill forms. One of the unique features of this extension is that it automatically fills up form fields with the information added by you. That means when you open up any web page with form fields, you don’t have to tell the extension to fill up the fields.
Now, let us take a look at the steps required to setup this extension.
Step 1: To get started, the first thing you need to do is install the extension and then you’ll see an extension icon on the toolbar of the browser. Simply right-click on the extension icon and select “Options” to open up the Settings page.
![]()
Step 2: On the Settings page, you’ll see a tab named, “Form Fields” where you can create your own custom form field values. For this, simply click on the “+” button at the bottom and then a new blank field will be added at the top. The field is divided into 4 sections, named: Type, Name, Value, and Site.
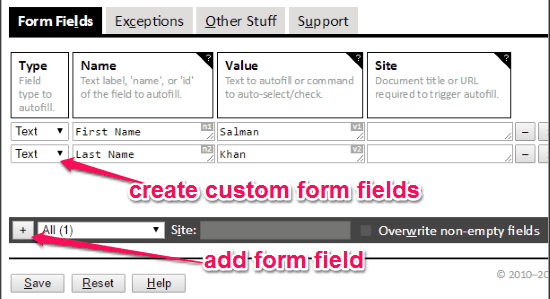
Step 3: Let’s say you want to create a form field for your first name, then click on the drop-down menu under the “Type” section and select the field type as “Text”. After that, on the “Name” section simply type “First Name” and then enter your first name under the “Value” section. As soon as you do that, click on the “Save” button to make the created form field active. The “Site” section is optional and it can be used if you want to assign the custom form fields to any specific site only.
Step 4: Now, whenever you visit any website with form fields, this extension will automatically fill out the information without the need to enter them manually.
How to Auto Fill Forms with AutoFill Forms Extension on Chrome:
AutoFill Forms is another amazing auto form filler extension for Chrome. It lets you easily fill out forms with custom profiles which you’ve created by determining the input for each form fields and with just a click. It works with almost all the valid form fields like checkboxes, input fields, radio button, text areas, etc. The best part about this extension is that if any form field doesn’t match automatically with the custom profiles, then you can use the context menu option to fill out the fields.
Let us see how to use this extension to auto-fill forms.
Step 1: Install the extension on your Chrome browser, and right click on the extension icon to select “Options”. After that, the extension “Settings” page will pop up where you can create custom profiles by selecting the rule name and rule value for different form fields.

Step 2: By default, it offers 30 rule names for the form fields like username, first-name, last-name, gender, full name, and so on. For each of these rule names, you can enter a custom value which you want to fill out automatically while browsing websites. Apart from the predefined rule names, you can also add your own under the “Add/Edit a Value” section.
Step 3: Once you’re done entering the values for the required rule names, the extension can start filling out forms automatically. However, unlike the “Autofill”extension, you do have to click on the extension icon to fill all the form fields at once.
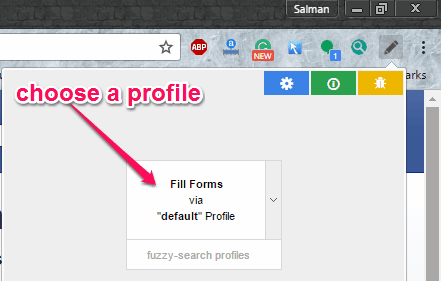
When you click on the extension icon, it will pop up a small dialog where it will ask you to choose the custom profile which you’ve created earlier to fill out the fields.
How to Use RoboForm Chrome Extension to Auto Fill Forms:
RoboForm is another simple and effective Chrome extension that can also automatically fill out form fields in no time. To use this extension for auto-filling form fields, you need to first create a contact and then enter the personal information like title, first name, middle name, last name, phone number, email id, etc. which will be saved within your RoboForm account. Similar to the extension “AutoFill Forms”, you need to click on the extension icon to fill out the form fields of any website at once.
Let me explain you the steps required to use this extension.
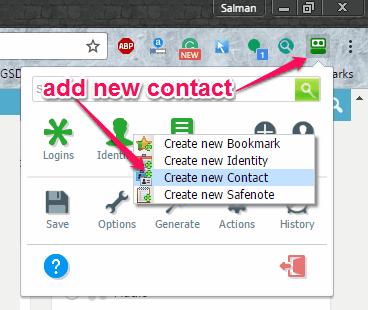
Step 1: First, you need to install the extension and then click on the extension icon. After that, select the option to create a new RoboForm account. Once you do that, you can go ahead and start adding contacts. To add a new contact, click the extension icon and select the “Add → Create New Contact”
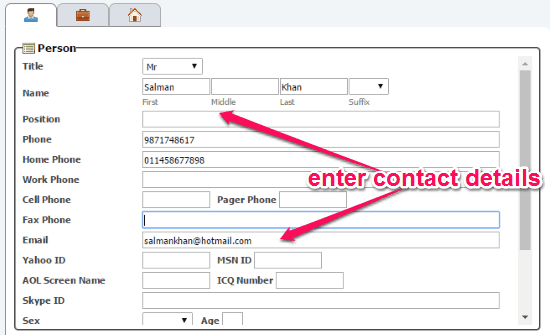
Step 2: After you’re done adding a new contact, click on the contact name to enter the required information which will be used by this extension to fill out forms. You will see the input fields for title, name, position, phone, address, email, and more for the added contact. Simply fill the details and hit “OK” to save them.
Step 3: Once you’re done saving the contact information, you can now browse any website you want and click on the extension icon to fill out the form fields automatically. Remember, you can add as many contacts as you want with different contact details.
How to Use Formbot Extension on Chrome to Auto Fill Forms:
FormBot is one of the simplest auto form filler Chrome extensions which lets you fill out forms instantly. It actually comes with some predefined form field elements such as username, password, email, phone, card number, and more in which you can enter custom values. These values will be used by this extension for filling out forms automatically. This extension also works like AutoFill Forms and RoboForm, as you need to click on the extension icon once to fill out the fields on a web page.
Simply, follow the steps below to use this extension for auto-filling forms.
Step 1: After installing the extension, you need to right-click on the extension icon and select “Options” to open up the “Settings” page.
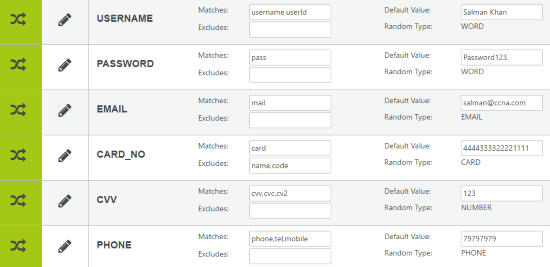
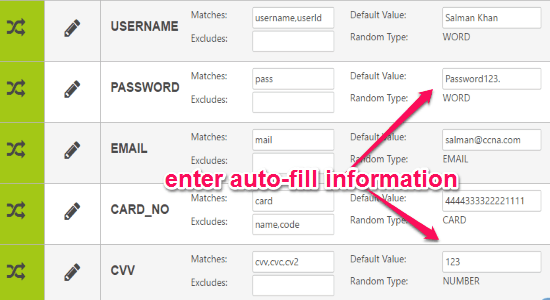
Step 2: On the “Settings” page, you’ll see all the predefined form field elements like username, password, email, card number, etc. For each element, you can enter anything you like which will be used by this extension while auto-filling forms. To enter a custom value for any form field element, you need to type in the input field associated with the “Default Value” option. Remember, there is no option to add custom form field elements on this extension.
Step 3: Once you’re done entering the information, you can start using this extension for filling form fields automatically. For this, all you got to do is click on the extension icon when browsing a web page and it will automatically fill the fields with the default values entered by you.
How to Use a Password Manager to Auto Fill Forms on Chrome:
There are lots of password managers out there, and many of them come with option to fill forms as well, in addition to filling passwords. They are not as feature rich as the dedicated form filler extensions I have mentioned above, but they are suitable for filling basic form fields.
I will walk you through two of the popular password managers (LastPass and Dashlane) to demonstrate how to fill forms using a password manager. If your password manager supports form filling, then the process will more or less remain the same.
LastPass:
LastPass is one of the best password managers which comes with an additional auto-form filling feature. Here, I will only talk about the auto-form filling feature of LastPass and how to use it to do the same. But, if you would like to know more about it, then go ahead and read the full review here.
Let us get straight to the steps required to fill out form fields automatically using LastPass.
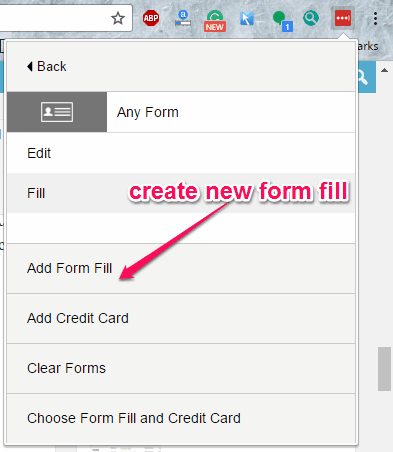
Step 1: To get started, install LastPass extension in your browser and click on the extension icon to login. If you don’t have a LastPass account, then you need to create one to proceed. Once you’re in, go to the “Form Fills” section and click on “Add Form Fill”.
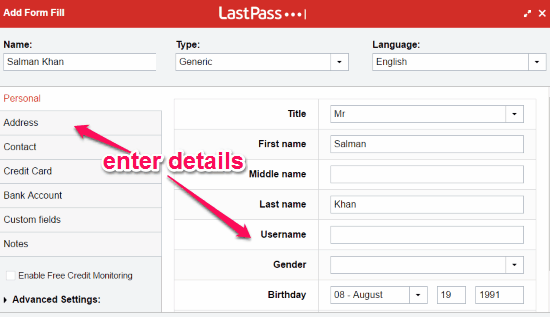
Step 2: After that, it will open up a new tab where you will be able to enter various details under tabs like Personal, Address, Contact, Credit Card, Bank Account, etc. You can also add custom form fields if required.
Step 3: When you browse any website, you’ll see a LastPass icon in the form fields. Now, to fill out the form fields all you got to do is click on the icon and select the option “Fill a Form with FormFill” and it will ask you to choose the form fill which you’ve created in the above step.
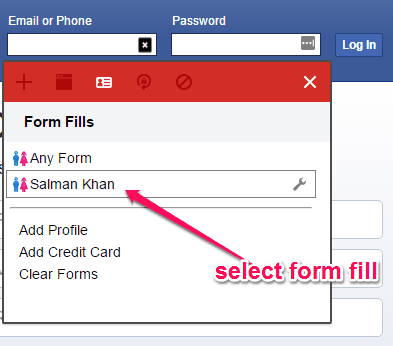
As soon as you select the form fill, all the form fields will be filled up automatically by this extension. Do note that if any form field doesn’t match with the details stored on your LastPass account, then you can use the context menu to add it manually.
Dashlane:
Dashlane is another useful password manager which also offers an additional feature to fill out forms automatically. Unlike the other extensions mentioned above, Dashlane requires you to install the desktop client which assist the Chrome extension to help you fill out forms automatically. You can read more about Dashlane from here.
Let use see how to use Dashlane to fill form fields automatically.
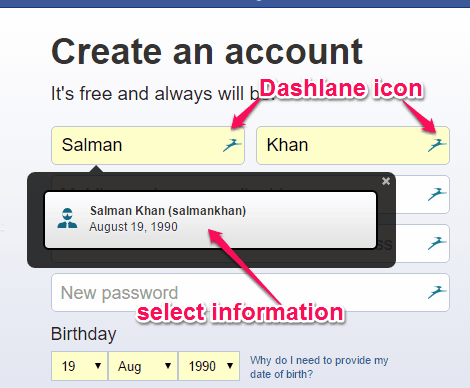
Step 1: First, install the desktop client to your PC and then it will automatically prompt you to install the Chrome extension. Once you do that, create a Dashlane account and sign in. On the right of the window, you’ll see a tab named Personal Info under which you’ll be able to add your personal details like name, email, phone number, address, etc.

Step 2: When you’re done entering your personal details, simply browse any web page in which you want to auto fill the form fields. Now, similar to LastPass, you will also see a Dashlane icon in all the input fields. After that, you need to simply click on any of the icons and choose the information dialog. As soon as you do that, all the form fields will fill up automatically with the details entered by you on the desktop client.
My Final Verdict:
Auto filling forms is definitely one of the best ways to save an enormous amount of time online. So, if you’re looking for ways to fill out all the form fields online without manually entering all the details, then go through this tutorial for that. In this tutorial, I have explained 5 of the best Chrome extensions which can help you fill out form fields automatically with a single click.
I hope you like this post.