ScreenToGif is a free screen recorder software that comes with options to record mouse clicks and keystrokes. For recording mouse clicks, it lets you select the color of your choice. And for recording the keystrokes, you have the choice to set font family, size, color, outline thickness, etc. These two options to record mouse clicks and keystrokes are quite rare and are not available in many other screen recorders.
You need to configure options so that you can begin the recording, capture and show mouse clicks and keystrokes in the output. The output recording can be saved as AVI video or animated GIF. It doesn’t support other video formats. Still, I believe this is the most suitable software when you want to record desktop screen along with keystrokes and mouse clicks and save recording as AVI file.

In the recording above, you can see that keystrokes and mouse clicks are visible in the output video, which is created by me using this software.
ScreenToGif has many other features, such as, you can use it to reverse animated GIF, add image watermark to output, record webcam as animated GIF, etc. So this is not just an ordinary screen recorder software. You can also read its full review here.
Record Desktop Screen With Mouse Clicks and Save The Recording As Video, GIF:
You can use this link to get the zip file of this software. Extract it and execute its portable application file.
The main interface of this software will open. There you will see Recorder, Webcam, Board, and Editor. We will use Recorder button to start recording our screen. But before that you have to access Options window so that you can enable record mouse clicks option. So, click on Options visible at the top right side on its main interface.

Options window opens with Application menu. In that menu, you will see:
- Option to show mouse cursor in the recording. This option is turned off by default. You have to turn it on.
- Option to Detect mouse clicks. You need to turn on this option also so that mouse clicks can be seen in the output recording. When this option is enabled, you also get the option to select your favorite color to present mouse clicks.

Set options, save it, and then you can come back to main interface of this software and use Recorder button. You can adjust the recording area, set frames per second, and begin the recording. You can also pause and resume recording whenever you want.

Finally, when recording is done, you can stop it. After that, editor window will open where you can preview the output and then save it as video.

To save video as AVI file, you have to click on Save as option and then a sidebar will open. That sidebar has two options for output: Gif and Video. Gif option is used to save output as animated GIF and Video option is used to save output as AVI file. For AVI option, it also lets you set the output quality, flip video, set frames per second, etc. Select an option, provide output folder and name for video. Finally, you can click Save button. The software will process the video and save it as AVI file in the output folder.

This way you can record desktop screen with mouse clicks and save to PC. Now let’s move to the next part.
Record Desktop Screen With Keystrokes and Save As AVI File:
Initial steps are very basic. You need to use Recorder button, start recording and then press keys whenever you want during the recording process. When you are done, stop the recording. After that, Editor window will be visible where you can preview the output. But you won’t see keystrokes that you pressed in recording.
For showing the keystrokes in recording, click on “Image” tab. After that, you will see Key Strokes option. Select that option.

A sidebar will open on the right side of Editor window. Here, you can select font type, text size, color, vertical and horizontal alignment of keystrokes, etc. Set the options and use Apply button.
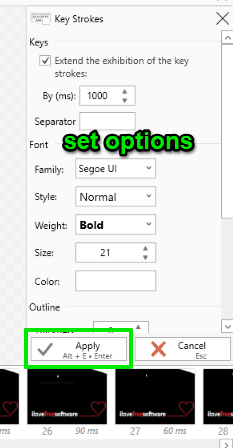
The Editor window will re-process the recording. After that, you can use play button to preview the output. Now you will be able to view the keystrokes that you used in recording.

Preview the keystrokes with options set by you and then press save as button. Again, you need to select Video option so that you can save the recording as AVI file.
The Verdict:
While creating tutorial videos, it is useful to highlight mouse cursor, show mouse clicks, and also show keystrokes. These features can help you show focus on a specific area and write useful information related to that particular area or object.