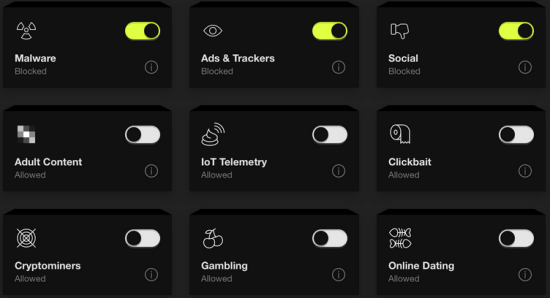
ControlD is a new free secure and fast DNS by Windscribe VPN. When you use it on your PC, it will use secure DNS to resolve requests and it has around 15 categories of filters to block ads, malware, adult content, IoT beacons, and gambling sites to make the internet child-friendly. In order to activate it, you just have to change the DNS to any address that it provides.
Even though there is a premium plan for the DNS but you can use it for free. And not only this but it even provides DNS over HTTPS. You can either use the legacy DNS or DNS over HTTPS or TLS based on your needs. Latter is more secure as your DNS requests will be encrypted.
There are can be many scenarios where you don’t want to use the default DNS provided by your ISP. For more secure and private browsing a secure DNS is an extra security layer. You can use to make the home computers child-friendly. Or, if you are annoyed by the ads that you see online then you can use that to get rid of them. Or, there is even an option to use the unrestricted DNS as well in case, you just need to switch to DNS other than your ISP’s.
Free DNS by Windscribe VPN to Block Malware, Ads, Bypass Censorship
The only thing you need to configure ControlD DNS is editing the network settings. If you know how to change IPv4 settings then you can easily configure it. There is no sign up or registration required in order to get the DNS address.
You just go to the main homepage and scroll down to the bottom. There you will see 4 different DNS addresses based on different restriction level. You just select the address you want for your network. Also, you can switch to the other tabs for the secure DNS.

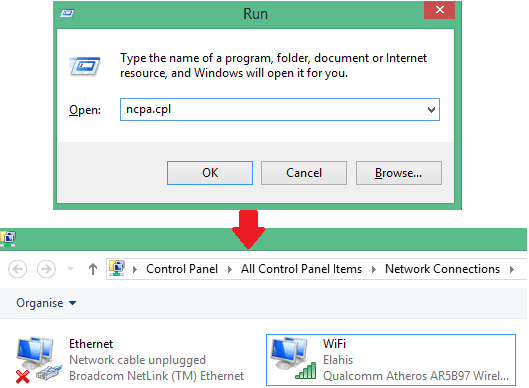
If you are on Windows then you configure DNS by going to the Network Sharing Centre. To go there, just open Run and then type “ncpa.cpl” and hit enter.
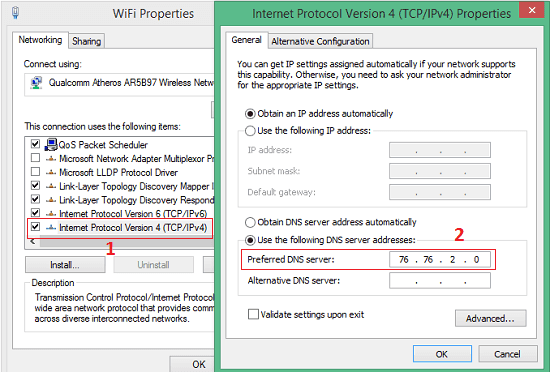
Now, just go to the active adapter settings. If you are connected through Wi-Fi and open Wi-Fi adapter setting else open Ethernet adapter settings. Go to the IPv4 settings and then enable the DNS option. Enter the address that ControlD provides and save the changes. This is as simple as that.
In this way, you can configure DNS settings in Windows 10. The process is the same for other operating system and even for Android. You can switch to any other DNS configuration anytime easily.
Final words:
If you like to try a new secure DNS then you can give a chance to ControlD and see how it works out for you. It even offers you a proxy service but for that you will have to subscribe to the premium plan. What I liked best about this DNS tool is that it lets you configure what kind of sites to block by simply flicking a switch. So, try it on you end and let me know what you think.