This article explains how to block IP, domain using PowerShell in Windows 10. The PowerShell on Windows 10 packs a wide range of functionalities that allow you to change and configure PC settings on the system level. With PowerShell, you can easily create Windows Firewall rules to block a website IP and domain on the PC by running a few simple commands.
In either case, you have to create a new firewall rule along with the IP address that you want to block. As you might already know, blocking a URL is not supported in the firewall. So, in case of blocking a domain, first, you have to get the IP range of the website. Then, you can block the IP range to block that domain on the PC.
Also read: How To Backup Device Drivers Using PowerShell In Windows 10
How to Block IP, Domain using PowerShell in Windows 10?
To block IP and website using PowerShell, we are going to use the Netsecurity module of the PowerShell. This module allows users to configure the Windows Firefox from the command line. We can use it to create inbound and outbound rules to block or unblock an IP/domain. Do note that, we need administrative privileges on the PC to block IP and domain.
Block IP or IP Range
Blocking an IP address is simple as we already know what IP address to block. All you have to do open PowerShell with administrative privileges and run the command given below:
New-NetFirewallRule -DisplayName "<rule_name>" -Direction Outbound –LocalPort Any -Protocol TCP -Action Block -RemoteAddress <IP address>
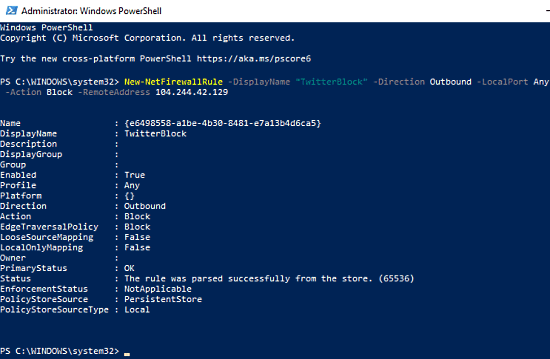
For example, let’s say we want to block 104.244.42.129, so we just have to put this IP in the command along with a name for the firewall rule.
New-NetFirewallRule -DisplayName "TwitterBlock" -Direction Outbound –LocalPort Any -Protocol TCP -Action Block -RemoteAddress 104.244.42.129
Block Domain

Since we can only block IP addresses in the Windows Firewall, to block a domain, we first have to find it’s IP address(es). But a domain might have multiple IP addresses and a DNS resolver can pick a different IP to open that domain. Also, blocking that IP might also block other services from that domain. So, the ideal way of blocking a domain is using a dedicated software or internet privacy tool. With that said, here is a method to do it via PowerShell.
Let’s say we want to block twitter.com. First, we have to run the following command to find the IP.
Resolve-DnsName "twitter.com"
This gives us the IP of the domain. Once we have the IP address, we can use the same command (with the resolved IP address) to block it.
New-NetFirewallRule -DisplayName "TwitterBlock" -Direction Outbound –LocalPort Any -Protocol TCP -Action Block -RemoteAddress 104.244.42.129
Do note that, this single IP based website blocking method might not work with all the websites.
Closing Words
This is how you can block domain and IP and using PowerShell in Windows 10. This method is simpler and quicker than manually creating Firewall rules through the Windows Firewall settings. And, if you want to unblock a website, you can do that simply by running the Remove-NetFirewallRule command in the PowerShell. Alternatively, you can also remove the rule from Windows Firewall settings.