Moneyble is a free personal accounting software that you can use to keep track of your expenses, credit card payments, loan payments, and transactions. This free software can be a solution for all your personal accounting problems. It lets you manage your budget, bank accounts, and schedule transactions, import bank statements, etc. You can easily manage your budget using this free software as you just have to set your monthly income budget and monthly expenses budget. It then automatically calculates your savings by month and year. You can view your savings and expenditure at the same place, which results in better monitoring and analyzing. It has built in formulae for calculating your last year income, total savings, average income of last 3 months, etc. You can customize your expenses into categories like groceries, entertainment, etc for more precise budgeting. You can change these categories later as per your convenience.
The best part is that despite being so feature rich, it is quite easy to use. In fact, the interface resembles an Excel sheet, so you can start using it immediately, without trying to figure out how to use it. This really separates it out from other free personal accounting software.
This free personal accounting software also lets you manage your accounts and transactions. You can manually add transactions and schedule them. You can also add bank transactions automatically by importing bank statements. It also gives you an option to synchronize your transactions through its Android application. This gives you flexibility as you can add your transactions from anywhere and anytime.
Keep reading next sections of this article to get to know how you can use this free personal accounting software to manage your budget, accounts, and transactions.
How to Manage Monthly Income & Expense budget:
You can start managing your financial account by first configuring your Monthly Income and Expense budget. These two budgets appears in 2 different sections of your Budget window. You can specify your various income sources in Monthly Income Budget. You can specify all your expenses in Monthly Expense Budget. You can specify expenses by adding a category and amount.
I chose to configure my budget tables as shown in the below screenshot. You can configure something like this on your own.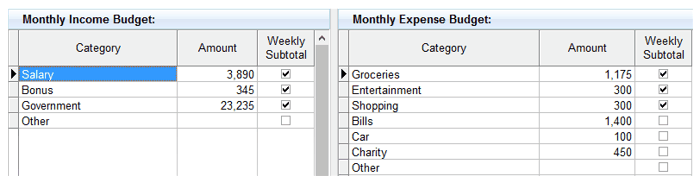 All savings and expense calculations are performed on the basis of these two tables. If you check Weekly Subtotal checkbox of a budget category, then that category will be calculated on weekly basis.
Editing values in Monthly Income & Expense budget:
You can edit values in Monthly & Expense budget tables just like you enter values in cells in MS Excel. You can cut, copy, and paste value of a cell to another one. You just have to select a cell and enter a value. You can also enter values using editing toolbar right above Monthly Income Budget. Editing toolbar appears as shown below: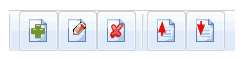
- Add budget category (Control+N).
- Edit budget category.
- Delete budget category (Control+D).
- Move Line Up (Control+up).
- Move Line Down (Control+down).
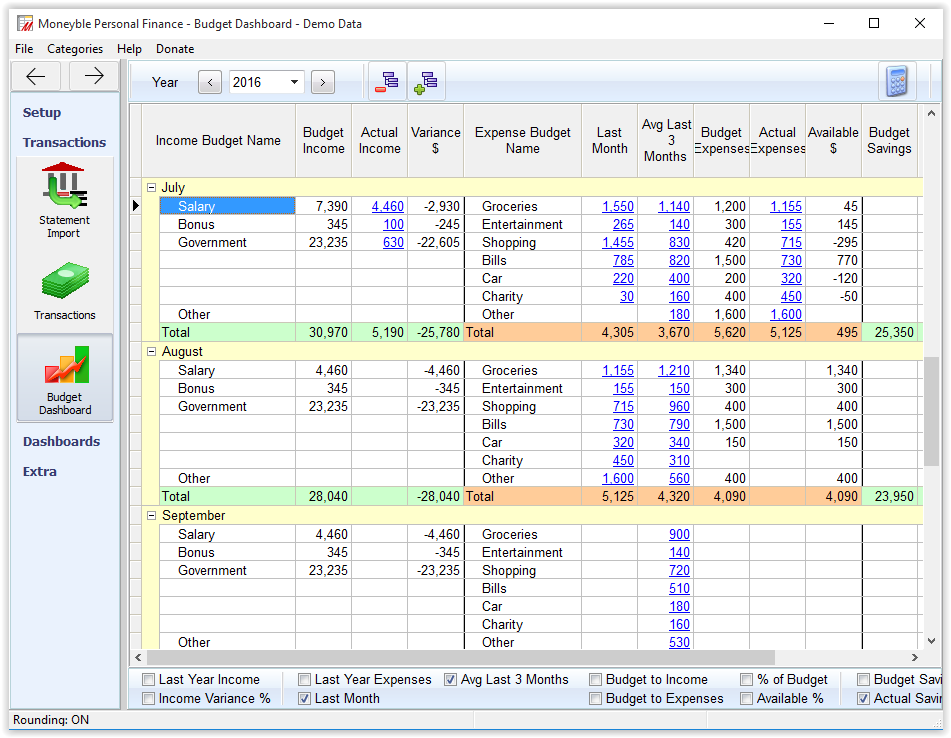
After you have configured your budget tables, Moneyble performs calculation of your saving and expenses on monthly and yearly basis. You can view summary of your expenses and savings under: Dashboards>>Saving By Months/ Saving By Years.
NOTE: By default Moneyble rounds off your figures. To turn it off, go to File>>Options>>Switch to Transactions tab>>Change rounding off factor.
Budget Dashboards:
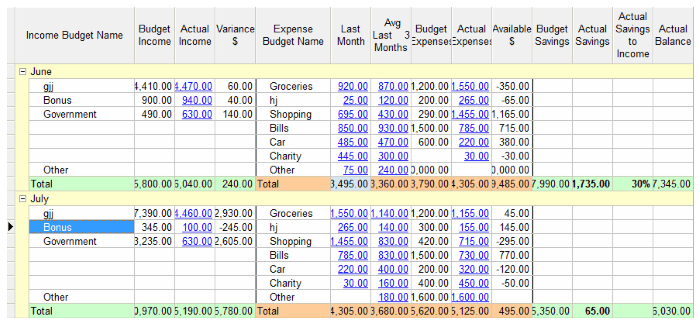
After you have configured your monthly income and expense budget then you can view your budget income, actual income, variance, how much you expended on each category on monthly basis, etc through Budget dashboard. Budget dashboard interface is inspired by MS Excel. Best part is that you don’t have to manually apply various formulae to calculate these. You just have to tick the checkbox to calculate that, as you can see in below screenshot.![]() You can automatically calculate the following:
You can automatically calculate the following:
- Last year income
- Income Variance %
- Last year Expenses
- Avg Last 3 Months
- Last Month
- Budget to Income
- Budget to Expenses
- % of Budget
- Available %
- Budgets savings to income
- Actual savings to income
- Cash Savings
- Cash Savings to Income
You can view your budget dashboard from Transactions>> Budget Dashboard.
Other dashboards are Savings by Month, Savings by Year, and Net Worth.
Manage your Bank Transactions:
You can also keep track of your bank transactions either manually or automatically by importing bank statements. But before you can do that, you have add your bank accounts. You can add any number of bank accounts. For adding bank accounts, go to Setup>>Accounts, which will open interface for adding bank accounts. You can add 2 types of accounts: Accounts excluding Credit Cards or Debit account. Interface provides different panels for adding these 2 type of bank accounts.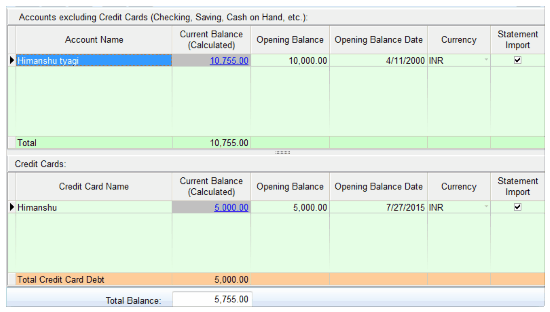 Adding accounts:
You can add any type of accounts and any number of bank accounts. After adding accounts, you can manually keep track of your transactions or automatically by importing your bank statements. Click on “+” button to add any type of account. For adding an account, you need to specify following parameters:
- Account Name.
- Opening Balance.
- Opening Balance Date.
- Currency
- Whether you want to import bank statements of that account or not.
One important thing, I would like to mention is that by default Moneyble allows you to associate your accounts to groups. You can choose to associate 1 bank account with any number of groups (can also be nil). If you want to use this feature, you can activate accounts groups from File>>Options>>Accounts>>Check Show Accounts Group. If you choose to associate your bank accounts with groups, then you can filter your scheduled transactions according to account groups. I had turned them off as I have just 1 bank account, so wanted to keep things simple. So you can choose according to your preferences. By default you can associate your accounts to following groups:
- Most Active.
- Debit Only.
- Credit Only.
- All accounts.
- Account group 5.
You can also rename these groups if you want. For renaming groups go to File>>Options>>Accounts>>Edit accounts group. You can’t add or delete a particular account group.
Now that you have added bank accounts lets move on to Transaction section to see how we can add, import, and schedule them.
Account Transactions:
You can easily keep track and forecast your transactions using this free personal accounting software. You need to follow these steps to manage your account transactions.
- Schedule your transactions.
- Add/Remove Transactions.
- Importing bank statements.
Schedule your transactions:
Scheduled transactions gets automatically executed after specific time. You can add those transactions here which occur periodically. So they execute automatically and reflect changes in your bank account. For adding scheduled transactions, go to Setup>>Scheduled Transactions. For scheduling transactions, you need to specify following parameters:
- Interval.
- Start Date.
- Type.
- Budget.
- Place.
- Tag.
- Comment.
- Select bank account.
You can edit values in same manner while adding accounts or editing budgets.
Add/Remove Transaction:
For adding transactions, go to Transactions>>Transactions. It will then open up interface for adding/removing transactions. Interface has two sections, one section for adding/removing transactions and other one for Transaction Forecast.
Lets first see how you can add and remove transactions.
You can easily add transactions by clicking on “Add” button. For adding a transaction you need to specify following parameters.
- Date of transaction.
- Type of transaction.
- Budget.
- Place.
- Tag.
- Comment.
- Add transaction amount in your account. If you want a sum to be added in your current balance then enter it in “+” column or if you want to subtract the transaction sum from your current balance then enter it in “-” column of your account.
After you have added a transaction, Moneyble automatically calculates your Debit, Credit, and Actual Balance.
For removing a transaction, you just have to select that particular transaction and press “Control+D” hotkey or you can also click on Delete button on top.
Transaction Forecast:
This section lists your scheduled transactions and you can process a single or multiple scheduled transactions at once to see your current balance after that scheduled transaction is processed in future. You can see your debit balance, credit balance, and actual balance. This feature is quite useful in planning your transactions.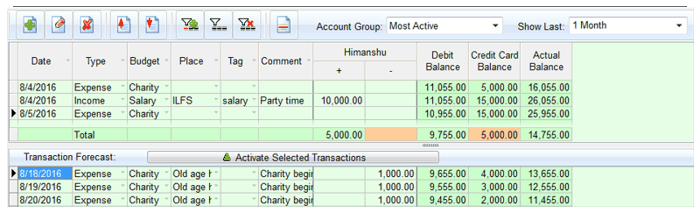 Importing Bank Statements:
As I mentioned earlier that you can also import your bank statements to automatically add transactions. You can import your bank statements from Transactions>> Statement Import.
- Download your bank statement in Comma delimited, Tab delimited, Excel, CSV, ASCII, etc file format.
- Click on Statement Import button.
- Now select your bank account and downloaded bank statement.
- For new statement entries, you need to map your columns.
- Click on Import button.
It also gives you an option to add transactions through Android application of Moneyble.
Verdict:
Moneyble is a free personal accounting software which can help you in managing your budget and financial transactions. You can schedule your transactions that will be automatically processed periodically. I will recommend this software as it automates the process of manually applying formulae for calculation. It will save your time and also prevent you from committing any mistakes in your financial calculations. It is also secure as it do not require your account password to process transactions.