Here are 3 free websites to remove audio from video online. You can use these websites to remove audio or sound from videos permanently. To do this, you can simply upload a video from PC to these websites, remove the audio, and later save the video soundless. Some of these websites also allow you to upload videos from Google Drive, Dropbox, and Web URLs. All these websites come with an intuitive interface such that you can easily remove audio from your videos.
There are dozens of software available using which you can remove sound from video, but when it comes to websites, there are just a few good websites which can remove audio from video. So, to make it easier for you, I have dug up 3 free websites which can be used for removing audio from videos.
Video Converter (by 123Apps):
Video Converter (by 123Apps) is probably one of the best websites to remove audio from video online. It is actually a typical online video converter with options to convert videos, change video codec, audio codec, etc. Apart from that, you will also see an option to remove audio before you convert or export the video.
How to Remove Audio from Video Online using Video Converter:
Step 1: To get started, simply go to the homepage of Video Converter and there you will see a conversion wizard with three simple steps. In the first step, you will see the options to upload video files. You can either upload a video file from your PC, Google Drive, Dropbox, or URL to remove audio.

Step 2: After uploading a video file, click on the “Video” tab in the second step. There you will see the options to choose output video format, resolution, and a “Settings” button. When you click on the “Settings” button, it will open up other options to change video codec, audio codec, etc.
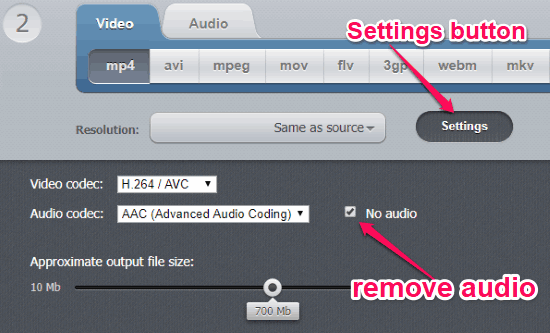
Step 3: On the right of the “Audio Codec” option you will see another option named, “No Audio”. Now, simply check the box associated with this option to remove audio from the video. After that, you can click on the “Convert” button in the third step to export the video without the audio. You can either save the video to your PC, Google Drive, or Dropbox.
YouTube:
YouTube also comes with a video editor with features like change brightness/contrast, slow motion, rotation, pan & zoom, filters, insert text, and so on. Apart from these features, it also allows you to tweak audio settings of your videos like you can change Bass, Pan, Treble, and Volume. So, to remove audio from video, all you gotta do is decrease the volume level to zero.
How to Remove Audio from Video with YouTube:
Step 1: After logging into your YouTube account, simply click on the “Upload” icon at the top. After that, upload the video from which you want to remove audio to YouTube. Once you do that, simply set the video privacy as “Private” so that no one else will be able to view the video on which you’re working.

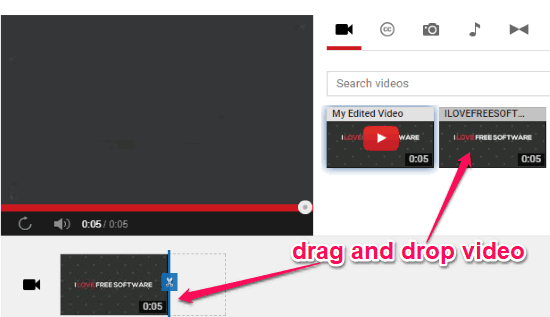
Step 2: After that, simply visit the video editor page on YouTube. You will see all your videos on the editor. Now, you would need to drag and drop the source video to the bottom of the editor where it says “Drag Video Here”, as shown below.
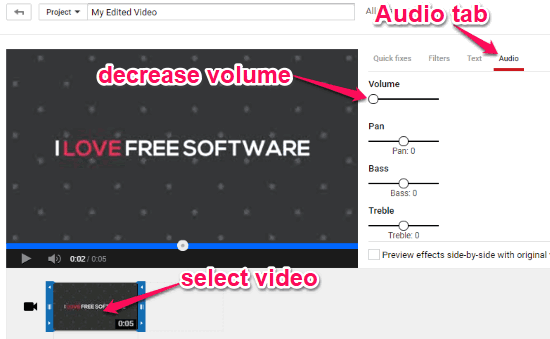
Step 3: After you do that, select the video and go to the “Audio” tab on the right. There you will see various options to change Volume, Pan, Bass, etc. Here, you need to decrease the “Volume” slider to zero. This will mute the audio from your video and you can click on the “Create Video” option to process your video.
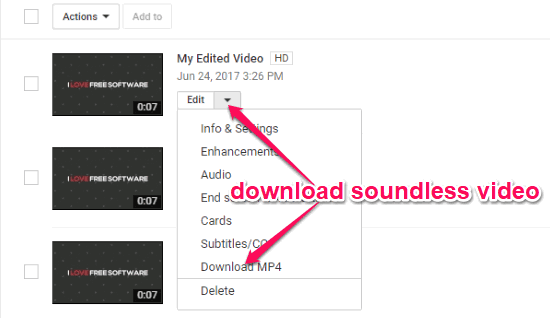
Step 4: It will take a few minutes depending on the video size to complete processing. Once the processing is complete, you can go to the “Video Manager” and there you will see your edited video. You can click on the “Edit” drop-down menu associated with the video and select “Download MP4” to export the video as an MP4 file. The sound would have been removed from that video.
EZGIF Video Reverse:
EZGIF Video Reverse is actually a free online video reverser offered by the GIF maker website “EZGIF“. The main function of this video reverser is to reverse videos such that they can play backward. But, it also comes with a simple option to remove audio from video. Now, let us see how to use it.
How to Use EZGIF Video Reverse to Remove Audio from Video Online:
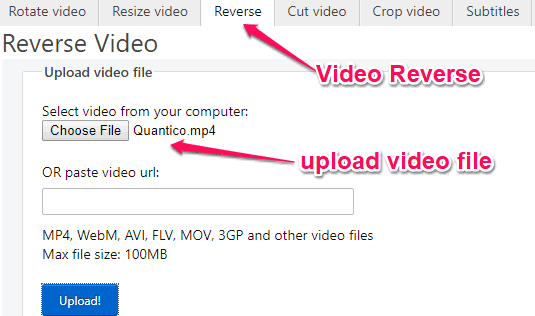
Step 1: Simply, go to the “EZGIF” website and browse the “Video Reverse” section using the link I added above. After that, you would need to upload the video from which you would like to remove audio. You will be able to upload a video from your PC or provide URL of an online video. Remember, the maximum file upload size is up to 100 MB per file.
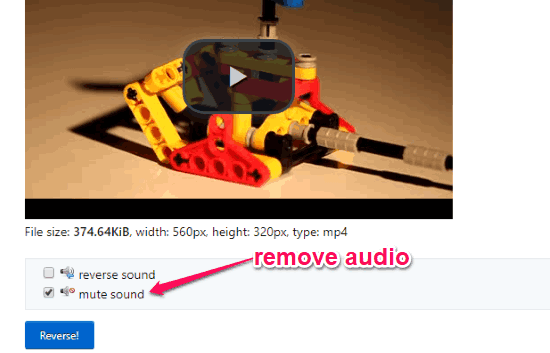
Step 2: After uploading the video file, simply scroll down to the bottom of the video preview. There you will see an option named, “Mute Audio” which you need to enable for removing audio from the video. Then click on the “Reverse” button to process and save the video file without any sound.
Step 3: As the exported video file is reversed, you need to again upload the edited video file to this website and reverse it back to get the original video. This time you don’t need to select the “Mute Audio” option, as the audio is already removed from the video.
Closing Words:
These are some of the best free websites to remove audio from video online. All these websites are very easy to use and you can remove sound from videos in no time. Personally, I like Video Converter (by 123Apps), as it is completely free to use and removing audio from videos is also very simple.
Try these websites and do let me know if you know other websites which can remove audio from video.