Here is a short tutorial that explains how to disable password protection on wakeup in Windows 8 in three different ways. You don’t need to install any additional software for this.
Whenever you wake up your Windows 8 PC from sleep, you are redirected to the lock screen. You need to enter password each time you wake up your PC. Although Windows has by default activated this feature for security purpose, but entering password every time you wake up your PC could be sometimes annoying.
Fortunately, Windows lets you disable this feature in three different easy to go ways. Find out which one works for you and disable the password protection on wakeup of your PC in Windows 8.
Disable Password Protection On Wakeup In Windows 8 Using Power Options:
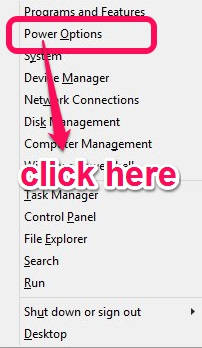
Step 1: The very first way is using power options. First thing that you need to do is open hidden Power User Menu of your Windows 8 (explore other interesting hidden features of Windows 8). To open, press Windows Key + X, or right click on the Windows icon. Click on Power Options from the popup list. You can even search for Power Options in Windows 8 Search Box.
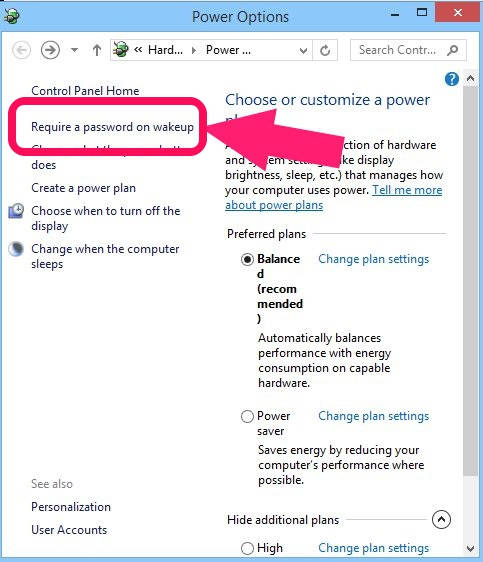
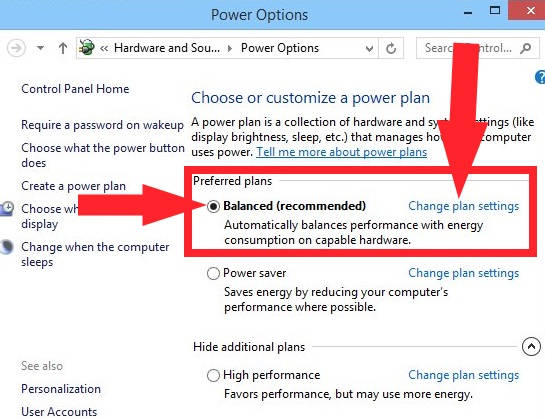
Step 2: It Will open “Power Options” in a new window. On the left panel, you will find a link that says “Require a password on wakeup”. Click on the mentioned link to open “System settings”.
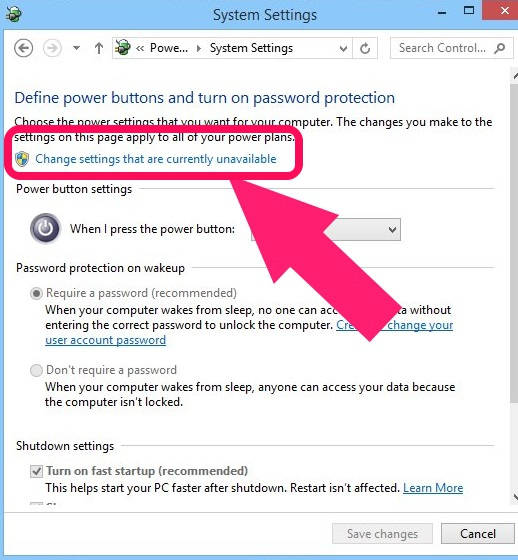
Step 3: In System settings, you will find another link that says “Change settings that are currently unavailable”.
Step 4: It will let you alter the settings now. Navigate to “Password protection on wakeup”, and then click on the radio button that says “Don’t require a password”.
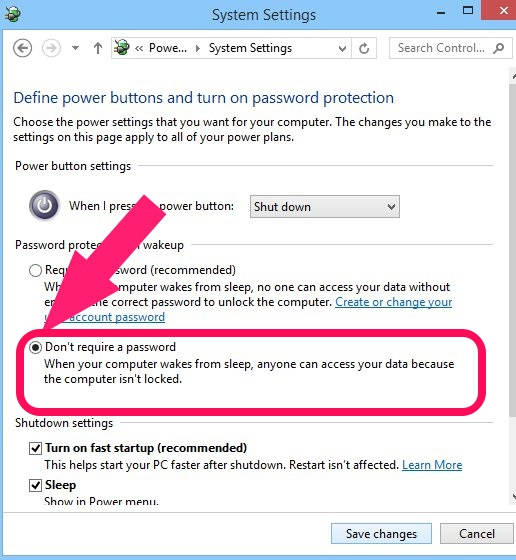
Apply the changes by clicking on “Save changes”. Now your system will not ask you for password on wakeup.
Disable Password Protection On Wakeup In Windows 8 Using Advanced Settings:
The next process to disable password protection on wakeup in Windows 8 is using the advanced settings.
Step 1: Go to Power Options (use Step 1 mentioned). In Power Options, navigate to the preferred plans. Click on “Change Plan Settings” that is available beside the plan you are currently using.
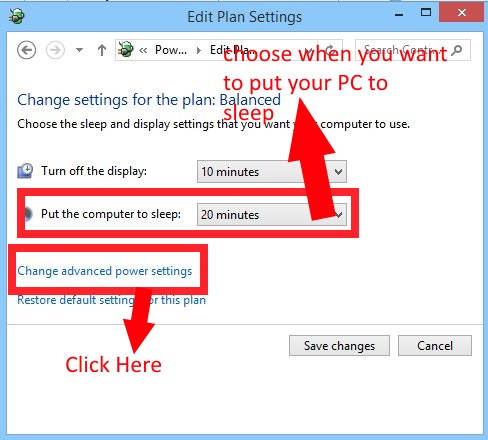
Step 2: It will give you various setting options to edit the plan settings you are using. Choose when you want your PC to sleep. You can choose never as well, if you don’t want to put your PC to sleep. The click on the link that says “Change advanced power settings”.
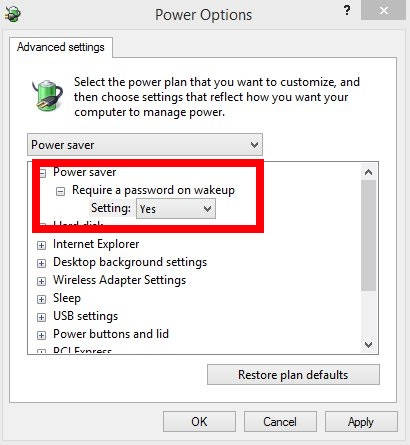
Step 3: It will open Advanced settings in a new window. Navigate to “Require a password on wakeup” and change the “Setting” to “No”.
When you will wakeup your Windows 8 PC next time, you don’t need to enter password to get started.
Disable Password Protection On Wakeup In Windows 8 Using Accounts:
The third option to disable password protection on wakeup is altering Windows 8 Accounts settings.
Step 1: Open Windows 8 Charm Bar by pressing Windows key + C, or point to the corner of the screen (also learn how to disable Windows 8 Charm Bar hint). Click on “Settings” and then on “Change PC settings”.
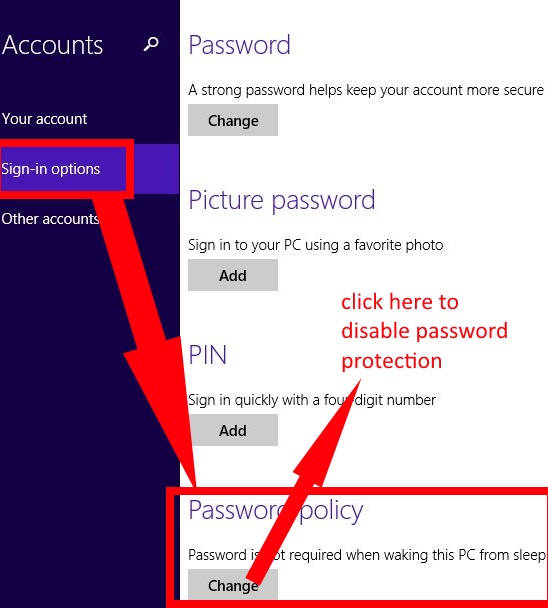
Step 2: In PC settings, click on Accounts and then on “Sign-in options”. In Sign-in options, you will see “Password policy on the bottom of the screen”. Click on change button available below password policy.
All the above mentioned methods let you disable password protection on wakeup in Windows 8. You don’t need to install any additional software in any of the above mentioned methods. Choose the method as per your choice and disable password protection on wakeup quite easily and quickly.