Here is the list of 6 free image editors to add gradient to photos. Using these free image editors, you can add various types of gradients to images, objects, and text in custom, as well as predefined colors. The Gradient tool may have different names in these software, but the core feature of adding gradient remains the same. The tools covered in this list support different types of gradients, like, Linear, Radial, Spiral, Diamond, Conical etc. In addition to that, some of these software also provide pre-defined gradients that can be used to apply not so common gradient to your photos. And some also support gradients with more than 2 colors. I will walk you through capabilities of gradient tool of each of these software as we move along.
A Gradient tool in an image editor creates a directed pattern of color from higher to lower intensity. It’s a nice tool that helps to add filter like effect to an image, text, object, or a selected area. You can either add gradient to your original photo, or to a layer (given, the image editor supports layers), then merge the layer with your photo by reducing the gradient’s Opacity or Blending Mode (explained later), to give it a new stunning look.
Lets see what are the free image editors that you can use to add gradient to photos.
Free Image Editor To Add Gradient To Photos: PixBuilder Studio
PixBuilder Studio is a free image editor to add gradient to photos. It lets you import various types of images and edit them using its basic and advanced image editing tools.
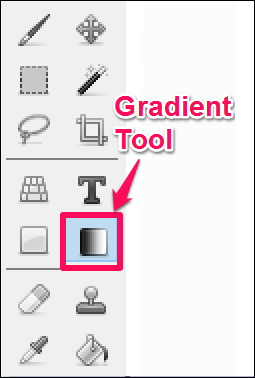
The user interface of PixBuilder Studio is quite similar to old version of Photoshop. You can see that all the tools are aligned at the left of the editor window in an organised toolbox. In the same tool box, you will find it’s Gradient Tool, that you can use to add gradient in your photos.
The Gradient tool of PixBuilder Studio lets you add various Gradient patterns, such as: Angular, radial, linear, diamond, or reflected gradient pattern.
It’s fairly easy to use gradient tool. In the following steps, you will learn how to apply gradient filter to a photo. Applying gradient to text or objects has been discussed later.
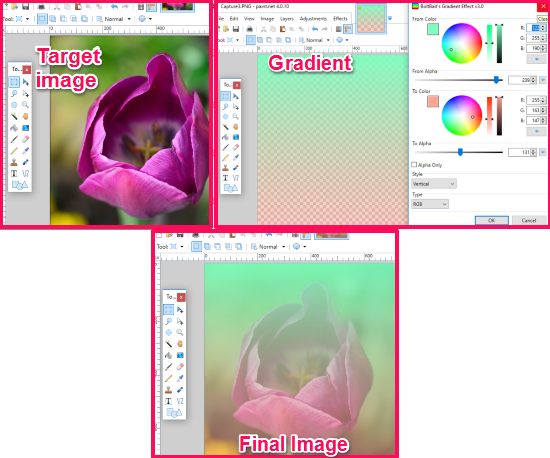
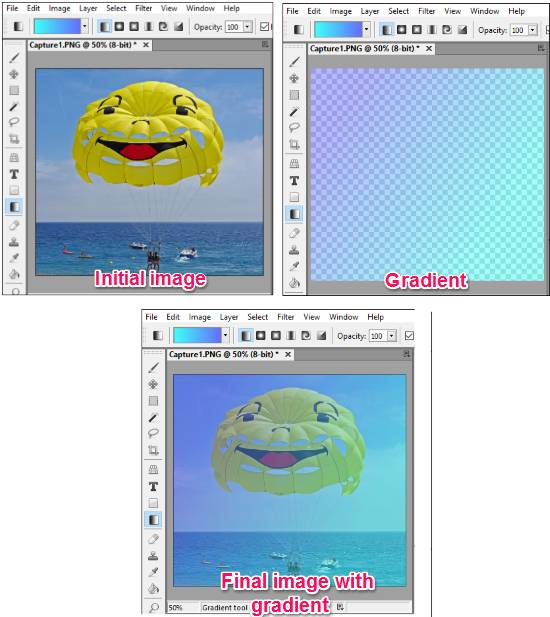
Step 1: Open your image in editor, then add another layer above your photo from the Layers Panel.
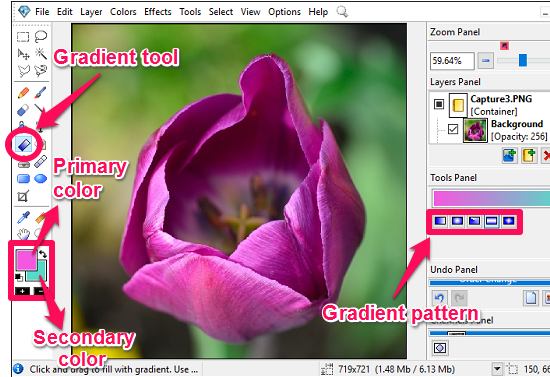
Step 2: Select Gradient tool from the toolbar, then choose primary and secondary color that you want to use in your gradient. You can manually choose gradient colors or simply choose any of the available predefined gradient color combinations. Also select the Gradient pattern that you want to use (linear, radial, etc.).
Step 3: On the new layer, apply your gradient by dragging your mouse horizontally, vertically, or diagonally. You will notice that the primary color appears first in the gradient followed by the secondary color. As long as you drag the mouse, the radius and intensity of the colors increase gradually.

Step 4: To apply gradient filter appear on your photo, adjust the opacity of the newly added layer using layer properties.
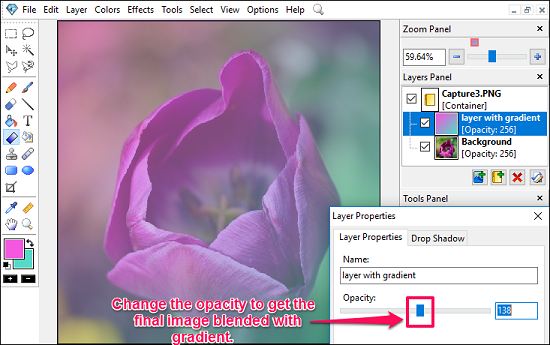
Finally, you will see that your image will start appearing as you decrease the opacity of the layer with gradient filter. When you are satisfied with the gradient amount, stop reducing opacity and export your image to any folder of your choice.
In PixBuilder Studio, there are various inbuilt gradient color combinations available. The best part about the Gradient tool is that you can add your own Gradient color combinations, so that you can use them later.
I have explained how to add gradient to text in the next section. You can apply the same process to add gradient to objects and selections in PixBuilder Studio.
So, now you know how to add gradient to photo using Gradient tool of PixBuilder Studio. It’s a great software to do it very easily. If you have some basic idea of image editing, then you will surely want to use PixBuilder Studio for fast and convenient image editing.
Cross-platform Image editor to add Gradient to Photos: GIMP
GIMP is free and cross-platform image editing software that is often knows as an alternative to Photoshop. GIMP comes loaded with a lot of image drawing and editing tools. It supports various popular image formats including PSD. With GIMP, you can do basic fixing as well as advanced image editing using its rich tool box. See the detailed review of GIMP here.
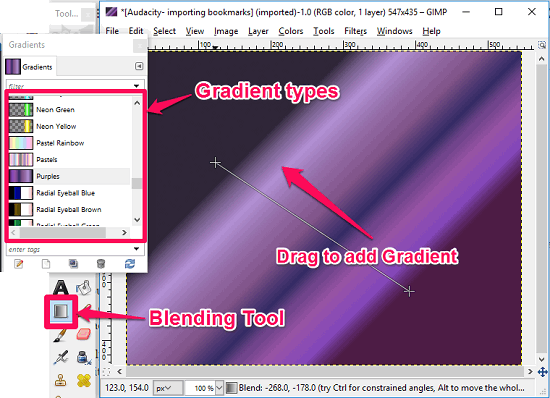
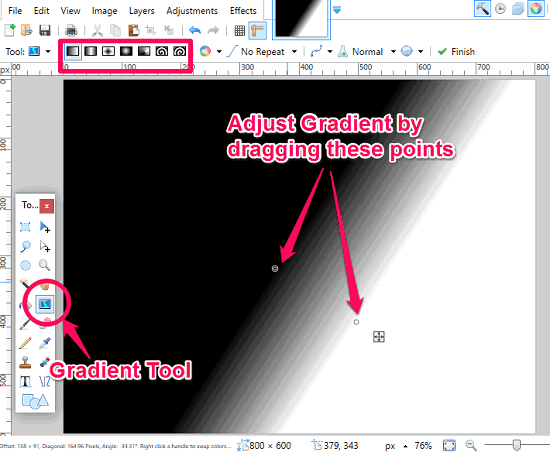
GIMP has a very powerful Gradient tool as well. Gradient tool in GIMP is known as Blend tool, and can be found in toolbox of GIMP. Even though the tool is differently named here, the functionality is same as a traditional Gradient tool.
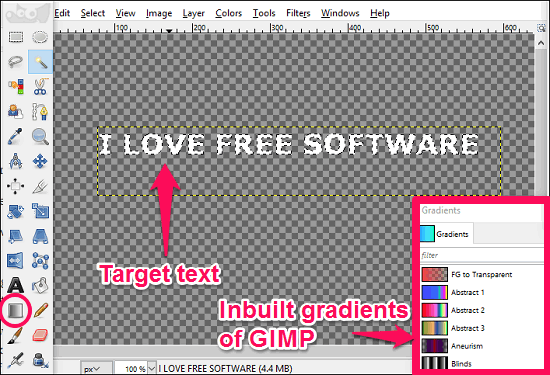
A very nice feature of GIMP is that it comes loaded with lots of built-in gradients, like: wooden, bar type, spectrum, horizon, and many more. So, if you want to save your time, then you can try any of these built-in gradients of GIMP and apply them in your photo. The built in gradient can be customized and you can even add a new gradient combination in the list for later use.
To use Blend (Gradient) tool in GIMP, just click on it or access it using shortcut key L. Once selected, just drag and drop it over your image / specific layer. See the below screenshot where I have applied gradient simply on a canvas.
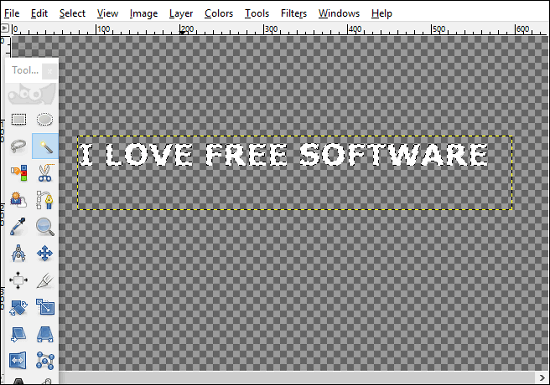
With GIMP, you can add Gradient to photos, selections, text, or objects. See the following screenshot in which I tried to add gradient on text.
How to Add Gradient to Text in GIMP:
Step 1: Take a transparent layer, then write some text on it. You can also add text on an image and add gradient. Select the text using the Magic Wand tool of GIMP, which is known as Fuzzy Select tool here. To select multiple selections (in this case, the letters of the text), you have to press and hold the Shift key, while selections are being made.
Step 2:When the text is selected, you can add any gradient to it. Choose any primary or secondary color; you can also choose various built-in gradients from the Blend Tool’s panel.
Step 3: Drag a line and drop it at some point across the text, you will see that the text is filled with the gradient that you chose.
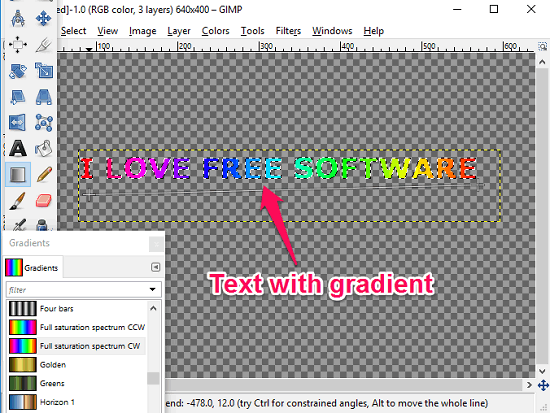
Your text will be ready to use. Simply copy it and paste wherever you want, or simply save your text.
You can use the same process used in PixBuilder Studio, to add gradient filter to photos in GIMP.
Another thing that you need to know that GIMP is an extensible software as it supports larger number of plugins. So, for adding gradient to your photos, you can also use the following gradient plugins for GIMP:
- Gradient Flare: This plugin lets you add lens flare to a photo, that too with colors. It lets you set glare properties as well as color gradient for the flare to make photo attractive.
- Gradient Map: This is an awesome plugin which lets you apply gradient map filter on any image, based on the gradient selected. It lets you create amazing gradient effects on your photos.
In this way, you can use Blend tool and some gradient plugins of GIMP to achieve the functionality of Gradient tool and give a new filter like effect to your photo or any other object. Overall, I really like the editing environment of GIMP and if you want an image editor with a large number of editing tools, and of course gradient tool, then I will recommend you to go with GIMP.
Paint.net: A Popular Image Editor to Add Gradient To Photos
Paint.net is one of the most popular free image editors out there. This free image editor comes with built-in Gradient tool. The Gradient tool can be found in its toolbox and you can also select it using hotkey: G.
The Gradient tool in Paint.net has various Gradient patterns, namely: linear, radial, spiral (clockwise and anticlockwise), and diamond. You can use any of these modes to add a gradient to your photo.
To add a gradient to any photo, you can follow the same steps that we followed in case of PixBuilder Studio in the beginning of this article. You can also add gradient to text, objects, or selection, like we did in GIMP.
Paint.net supports layer based image editing, and you can add various blending modes and change opacity of layers to set desired Gradient. There are no inbuilt gradient textures, and you cannot even add custom gradient textures to use later.
So, it was all about the built-in gradients of Paint.net.
Apart from using the built-in Gradient tool of Paint.net, you can also add more specific Gradient features by using free Gradient plugins of Paint.net. There are many Gradient plugins available; I will talk about 2 of them here that I found very useful:
BoltBait’s Gradient Effect Plugin for Paint.net
This plugin lets you add more types of gradients and styles in addition to the built in Paint.net gradients. This plugin lets you specify primary and secondary colors in gradient, and also lets you control their alpha intensity separately. See the below screenshot, showing the interface of BoltBait’s Gradient plugin. 
To use this plugin in your photos to add gradient, just access it from Effects > Render > Gradient menu. Then adjust the Gradient parameter on a new layer and finally merge it with your photo. See the below screenshot.
Multi Color Gradient Plugin
Multi Color Gradient is another plugin that you can use to add gradient effect in your photos using Paint.net. With this plugin you can add up to 20 different colors in your gradient, choose 3 different modes of gradient, angle of the gradient, and set the opacity of each color.
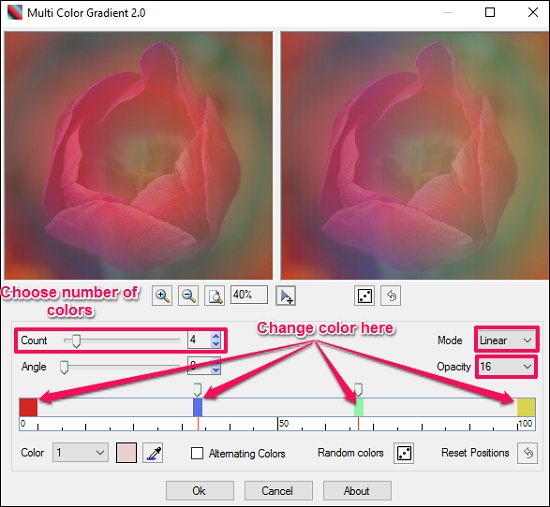
It’s very simple to get started with it. Simply access it from Effects > Render >Multi Color Gradient menu. After adjusting the gradient color and other parameters in from it’s interface, you can apply it in your photo. See the above screenshot.
To increase the number of colors in gradient, use the count slider. Now, define color for the newly added gradient color points. You can also let this plugin add random color in your gradient.
In this way you can add a multi color gradient in your photo using Multi Color Gradient plugin of Paint.net. And what I like the most about this plugin is that you can control the opacity, mode, and the final view of your image directly from its interface.
I find it a very interesting task to add gradient to photo using Paint.net’s built in gradients and as well as using some of its free plugins. You can also do it, just give it a try.
Simple Image Editor to Add Gradient to Photos: Artweaver
Artweaver is a very simple image editor to add gradient to your photos. It comes in two versions: free and paid. I will use its free version that is loaded with numerous image editing tools, like: crop, resize, rotate, flip, color correction, layer wise editing, and many other features. You can read its detailed review here.
You can find Gradient tool in toolbox of Artweaver. The gradient tool can be accessed by clicking on it directly or you can invoke it using keyboard shortcut: G.
The process for adding gradient filter to photos, or adding gradient to objects or text is the same as described above. Lets know about the features of Gradient tool that Artweaver offers. It’s a layer based image editor, hence you can add gradient on a new layer, then change the Blending mode or Opacity of layers to apply suitable gradient.
Various Gradient types are available, such as: Linear, Radial, Spiral, Conical, Diamond, etc. Inbuilt Gradient textures are available in various color combinations. In addition to that, you can also add your gradient texture manually to use it later.
One interesting feature of this software is that it lets you import and export gradients. This means you can easily share your custom gradients with others, and also use on your different PCs.
An option available lets you directly control the Gradient opacity while applying it, so that you do not have to reduce opacity later.
A Lightweight Image Editor To add Gradient To Photos: PhoXo
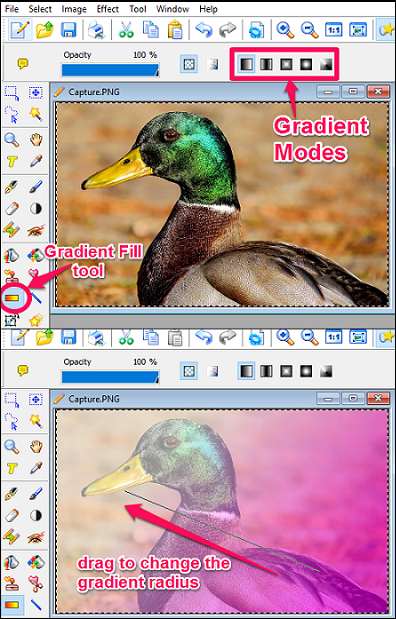
PhoXo is another image editor to add gradient to photo. The Gradient Fill tool of PhoXo works like Gradient tools of the above mentioned software. You can select the Gradient tool from the toolbox and apply on a desired photo. The Gradient Fill tool of PhoXo supports linear, square, reflected, conical, and radial mode.
Using PhoXo image editor, you can add gradients on text, objects, selection, any part in an image, or whole image.
To add gradient to a photo using PhoXo, the process is similar to what we followed in case of PixBuilder Studio. Adjust the opacity of the layer in order to perfectly blend your photo with the gradient layer. You can see the below screenshot in which I tried to add a gradient using a transparent layer.
PhoXo has no built-in gradients nor you can add a new custom gradient to it.
You can read its full review here.
A Portable image Editor to Add Gradient To Photos: LazPaint
LazPaint is a portable image editor to add gradient to your Photos. It’s a lightweight image editor which is written in Lazarus. It provides various image editing tools like resizing, rotating, cropping, magic wand, lasso, etc. You can see the detailed review of LazPaint here.
The Gradient tool in LazPaint is Known as Render Gradient. With this tool, you can add gradient on any selection, including text, objects, or any other part of an image. It has diamond, radial, reflecting, linear, and sine gradient modes for adding gradient effect in your photo. See the below screenshot to get a rough idea about Render Gradient tool of LazPaint.
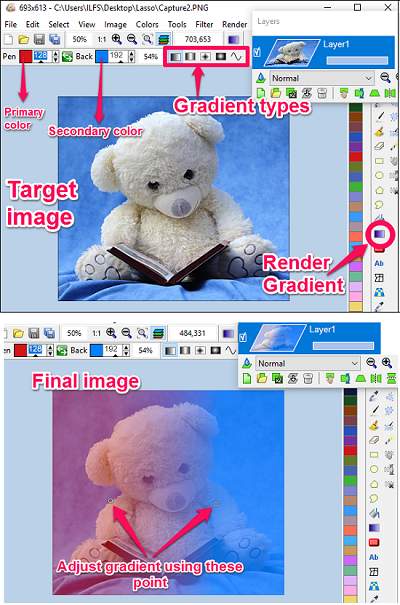
The best thing that I liked about LazPaint is that, you don’t have to use an additional layer to add gradient. In LazPaint, you can add gradient directly to the image and adjust the primary, secondary colors, and opacity by the options given at the top of the editor window. See the above screenshot.
LazPaint doesn’t have any built-in gradients or support to add new gradients. Moreover, you can use it if you only want to add just single Gradient effect on a picture. Its suitable for application of basic gradient filter, for more complex options, go for Artweaver or GIMP.
I really like LazPaint due to its fast operation and powerful tools in just 8 MB of size.
Closing Words
If you are looking for an image editor to add gradient to photos, then this is the list that can come handy to you. Personally, I really like PixBuilder Studio, Paint.net, and LazPaint to be the best software in my list to add gradient to photos.
Download and use any of these freeware and, if you know some other free image editor to add gradient to photos, then you can tell me.