Vizor 360 lets you create interactive 360 virtual tour and is now available for free. Using Vizor 360 you can create virtual tours which can be viewed and interacted with through a web browser or a VR headset. The website requires you to upload a series of pictures and then stitch them together to make a 360 image. Then you can add interactive elements like websites, audio, text, and images to it.
This website provides you a very simple way to create and share a 360 virtual tour by just drag and drop. The best part is that there is no coding required to create this WebVR experience. Just drag and drop to share your stories with people on any web enabled device.
Before starting the working part, you may check a quick video related to this interactive 360 virtual tour creator made by us:
Let’s see how Vizor 360 works:
When you open this website using the link provided at the end of this article, you will see a page like the one shown in the screenshot above. Use the login option and create a user account. You would need to put in a username, email ID, and password. Once you have created an account you will be logged in and you will see your project manager pop up window, as shown in the screenshot below.
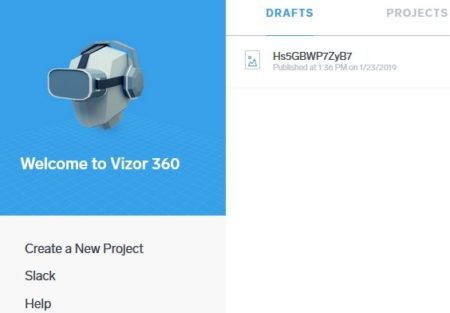
In this pop up window you will get options to create a new project on the bottom left side. On the right side you will see your projects that you are working on. The ones which have been published will appear in the projects section, while, the ones you are working on will appear under drafts section. The projects in the draft section are private, whereas, the projects which are published are public. Click on create a new project and you will be taken to the editor interface, as shown below.
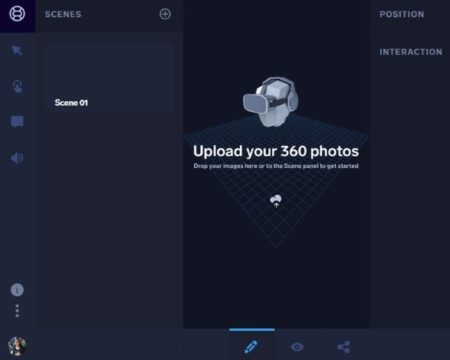
On this interface use the plus icon at the top to add images. When you add images they will appear on the left side of the screen. This can also be seen in the screenshot below.

On the left side you will also notice a menu bar. This menu bar has icons to add links, media and audio to your 360 image to make it interactive. Let’s look at how to add these interactive elements.
Adding Links:
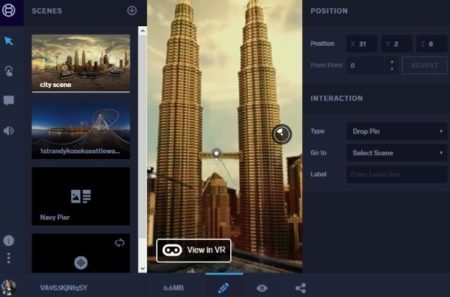
For adding links click the arrow icon in the menu bar. Now click on a particular area in the image where you want to make the link. A pin point can now be seen on the image with options to edit it in the right side window. This can be seen in the screenshot above. You can change the position of the pin by changing its axis. From the type drop down box you can select if you want a drop pin, circle, external URL, custom link pin, etc.
Next from the go to box select the picture name that you want to link this with. This will appear in case of drop pin or circle. In case you choose the URL option then you would be shown a box to enter the URL. Now give a label to your drop pin. That is it. You have just added a link to your 360 image.
Adding Media:
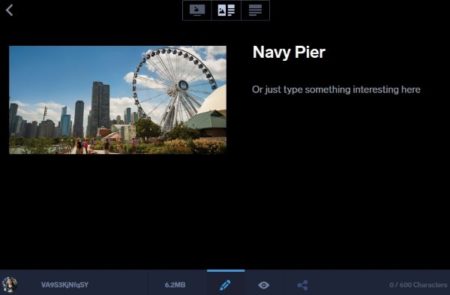
Click on the media icon and then click anywhere on the image where you want to add media. Now media has three options which are images only, text only, and images & text. Double click the media icon which is placed on the 360 image and it will open up a box like the one seen above. Choose what you want to add, and then browse to add images to this page. You can also add images and text along side. You can also hyperlink text to a different page if you want.
Adding Audio:
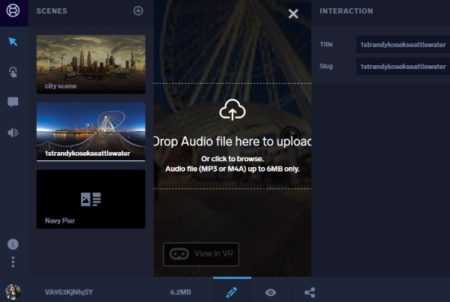
In this option you will be asked to select whether you want to add an audio loop or a narration. Select the option you need, I selected audio loop option. Right now the website only allows uploading MP3 or M4A format files which are up to 6 MB in size. So browse and select the audio file and it will be added to your project.
Once all these interactive elements have been added you can use the preview icon to see how your virtual tour has turned out to be. The preview icon is given at the bottom of the window.
You can move around the 360 image using your mouse. Click the links and media added to the virtual tour, which will take you to relevant pages. You can also share this virtual tour project of your with friends without publishing it. Just click the share link next to the preview icon.

A share window will pop up. From this window you can click the copy link button. Now you can share this link with friends. In case you want to publish your project, then go to the publish tab which you can see in the above screenshot.

From this section, give a title to your project and click on publish button. Your project will be published. After being published people can view your 360 virtual tour either in a web enabled device or through a VR headset.
Conclusion:
Vizor 360 is an awesome website to create and share interactive 360 virtual tours. These can be used by students as well to create a 360 tour of a school field trip they went on. They can create a virtual tour with interactive elements like photos, links to other pages or websites, adding audio or narration, etc. Try this website out.
Check out Vizor 360 here.