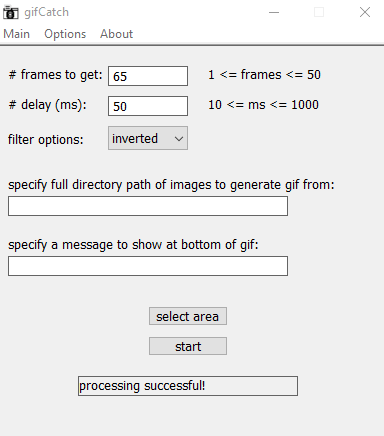
Here is a free software to create GIF by taking desktop screenshots with defined GIF frames. You can set number of frames per second (FPS) and then it will take screenshots based on the defined FPS. Apart from that, it also lets you select the desktop area for capturing the screenshots and creating GIF using those screenshots. The name of this software is “gifCatch“.
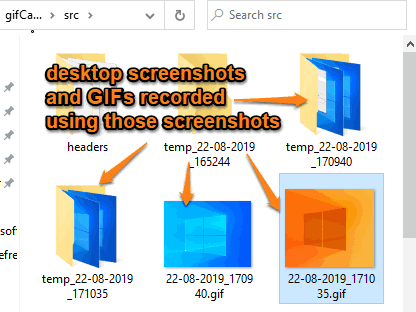
This software has a very simple interface where you can configure options and then start the screenshot capture process. You can’t set the custom output folder but it will create the output as per the needs. In the screenshot below, you can see that I created animated GIFs and captured screenshots using this free software.
This software also helps to set a filter for creating the animated GIF. You can set grayscale, inverted, saturated, mosaic, outline, or other available filter for GIF.

Note: This software also helps to create animated GIF from BMP images. You need to specify the full path of that folder that contains BMP images so that it can process them to create GIF. Also, there is an option to add custom text or message that will appear at the bottom part of GIF, but this didn’t work for me. You can try this if it works.
How to Create GIF by Taking Desktop Screenshots with Defined FPS using This Free Software?
Step 1: Download the zip file of this software using the link added at the end of this software. The link will jump you to its homepage where you will see a Green (Clone or download) button that helps you to grab its zip archive.
Step 2: Extract the ZIP archive of this software in a folder. That folder will contain the output GIF as well as desktop screenshots. Now, in that folder, you will see a gifcatch.exe file. Execute it and the software interface will be visible to you.
Step 3: The interface include all the options that you can set as per the requirements. You can:
- Set number of frames (screenshots or snapshots) that will be captured during the recording.
- Delay between screenshots (in ms).
- Use Select Area option and then select an area on the desktop screen by using left mouse button to capture screenshots for that particular area only.

When you have set everything, use “start” button and then it will start capturing screenshots to the area specified by you. When defined FPS limit is reached, it will automatically stop the processing. After that, you can access the output folder. There you will see that it has created and stored animated GIF for all those screenshots and also created a folder that has stored all the screenshots.
The Conclusion:
There are a lot of screen recorder software (check this list) already available for free, but to create GIF by taking desktop screenshots with defined FPS is a unique feature, which is provided by this software. I really like the feature that it also stores screenshots as still images to a separate folder for each recording so that users can use those screenshots anytime.