This article covers a simple approach to organize tabs into groups in Microsoft Edge Chromium. The new stable version of the Edge browser has been released with a set of multiple useful features to make the processes as easy as possible. Tab Groups is another hidden unique feature that comes inbuilt with the browser. As per Microsoft team, this feature allows you to organize tabs into visually distinct groups. For example – to separate tabs related to different tasks.
However, in Microsoft Edge Chromium, Tab Group is not enabled by default. In order to activate this feature, you need to go to the Edge flag page and make the feature enabled manually. So, let’s move to the below section and know the way to organize the tabs into groups.
How to Organize Tabs into Groups in Microsoft Edge Chromium?
In order to organize the tabs into groups in the Edge Chromium, simply follow the steps below:
Step 1: First, you need to launch the Edge Chromium browser. Once it opens, navigate to the address bar of the page.
Step 2: In the address bar, type edge://flags and then press the Enter key. On the following page, search for the “Tab Groups”. Alternatively, you can type “edge://flags/tabgroups” to launch the flag directly.
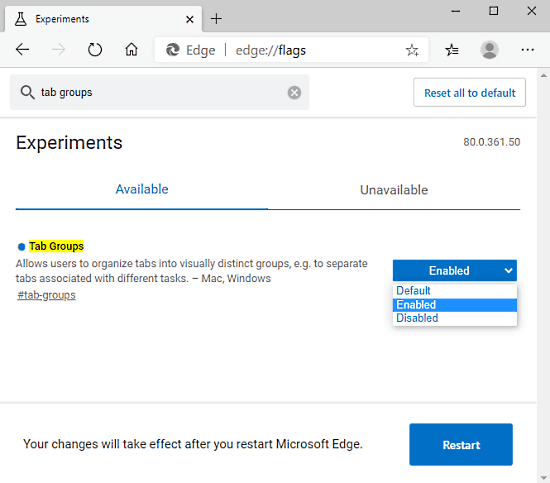
Step 3: Once you find the flag in the below section, click on the drop-down menu and switch it to Enabled from the Default option.
Step 4: After that, click on the Restart button so that the changes will take effect in the browser.
Once you perform the above procedure, you can go to a tab and right-click on it. From the right-click context menu select “Add to new group” option. It will create a tab group of the same name which is available on the tab.
You can add more tabs in the created group just by right-clicking on the tab you want to add. And then from the side menu, select the “Add to existing group” option. In order to remove any tab from the group, again right-click on the tab and select the “Remove from group” option.
Closing words:
Tab Groups feature is also available in the new version of the Chrome browser to organize tabs into groups. Once you switch the flag to enabled, all you need to do is right-click on any tab you want to organize and then select “Add to new group”. If you need to disable the feature, visit the flag page, search for the Tab Groups and then set it to disable using the drop-down menu.