Verisign Public DNS is a free DNS service that offers stable, private, and secure DNS service that you can use on your PC. Unlike many other DNS services, this DNS service promises to respect user privacy and doesn’t compromise with the public DNS data. It also takes various important network entities into consideration such as improved security, reliability, stability, connection speed, and more. There are many DNS services which claim to provide a better DNS service, but they might sell your public data to third-parties and also redirect you to some sites with ads after failed queries on your browser. However, the best part about Verisign Public DNS is that it won’t sell your public DNS information to any third-parties or redirect you to the error pages or websites which serve intrusive ads after failed queries.
You might have used dozens of DNS services, and Verisign Public DNS is another secure, reliable, and private DNS service. To start using Verisign Public DNS, all you got to do is configure your PC with the public DNS addresses offered by this DNS service (i.e. 64.6.64.6 and 64.6.65.6).
How to Configure Verisign Public DNS:
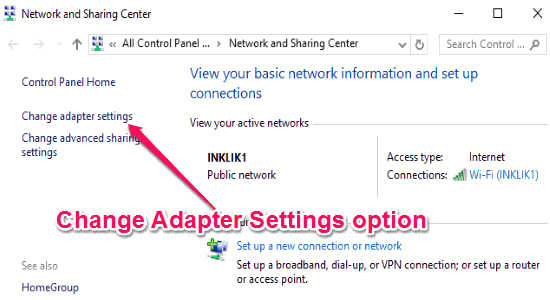
Step 1: First, open up “Networks and Sharing Center” from Control Panel on your PC. After that, click on the “Change Adapter Settings” option on the left navigation pane.
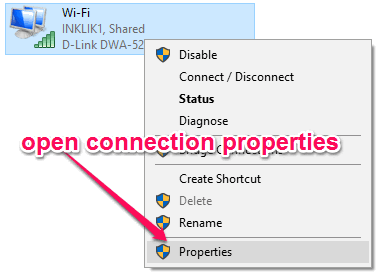
Step 2: After that, you’ll be able to see all the network connections where you need to right-click on the connection (to which you would like to apply Verisign Public DNS addresses) and then select “Properties”.
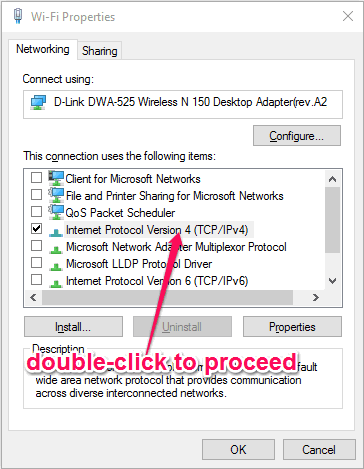
Step 3: As soon as you do that, the connection properties popup window will appear where you need to click on the “Networking” tab. After that, simply double-click on the “Internet Protocol Version 4 (TCP/IPv4)” item, as shown below.
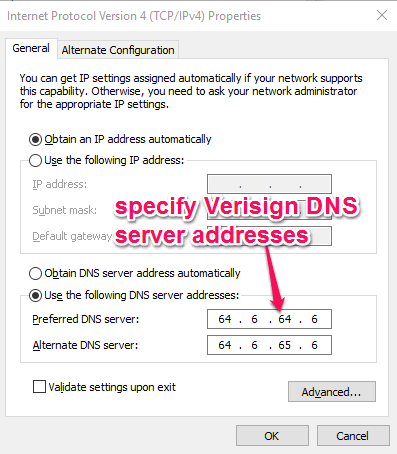
Step 4: When you do that, the “IPv4 Properties” window will pop up on which you have to click on “Use the following DNS server addresses” option to specify the Verisign DNS server addresses. After that, simply enter 64.6.64.6 in the “Preferred DNS Server” field and 64.6.65.6 in “Alternate DNS Server” field.
If required, simply repeat the entire steps for IPv6 and enter 2620:74:1b::1:1 and 2620:74:1c::2:2 in “Preferred DNS Server” and “Alternate DNS Server” fields respectively.
That’s all, you can now experience a better DNS network with improved speed, reliability, stability, security, and more importantly privacy.
Now, comes the bigger concern (or doubt) that why you should choose Verisign Public DNS over other alternatives. Well, the answer is pretty simple and can be explained with the following advantages:
- Stability: The stability feature of Verisign Public DNS promises high-reliability platform for public DNS system. This means that due it its huge network of DNS servers, you can be assured that the system works pretty nicely, and fast as well.
- Security: This feature offers strong and sturdy protection of your public DNS data from security breaches.
- Privacy: This is the most important and useful feature of Verisign Public DNS. It respects your privacy and doesn’t sell your public information to third-parties. Apart from that, it also doesn’t redirect you to any website with irritating ads after failed queries on your browser.
My Final Verdict:
Verisign Public DNS is a good DNS service that is more concerned about users privacy and public data security. Apart from that, you can also enjoy a faster and reliable connection after configuring your PC’s DNS addresses with Verisign public DNS server addresses. So, give it a try and keep your connection secure and private.