Often, it is important to block certain emails so as to clean up your communication. You can free up space in your mailboxes and devices by stopping unwanted messages from cluttering up your Inbox. At the same time this helps you to safeguard yourself against viruses via emails and other types of targeted cyberattacks.
Additionally, blocking emails boosts your productivity and unclutters your inbox so that you can maintain a stable and uninterrupted workflow.
You may already be blocking emails from specified senders based on your experience, yet sometimes, you will receive several emails with different addresses, but all from the same domain. In such a scenario it makes more sense to block the entire domain in Gmail rather than blocking individual email addresses that takes more time and effort.
When you block an individual email address in Gmail, they are automatically sent to the Spam folder rather than sitting in your Inbox. Alternately, you can create a filter to delete such unwanted messages. Similarly, an entire domain (such as @domain.com) can also be given the same treatment. There are two methods of carrying this out and in this article we will be discussing both the methods:
Method 1: Creation of a Filter from an email
1. Sign in to Gmail and open any email from the domain that you wish to block.
2. Click on the 3-dots at the top right of the email page and next click on ‘Filter messages like this’.

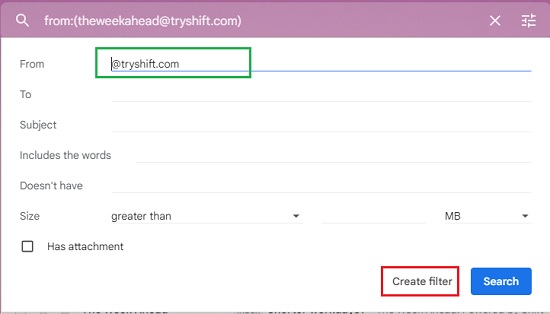
3. This opens up the filter creation window. You will find that the ‘From’ field is auto-populated with the email address. Select and delete everything to the left of the @ symbol and then click on ‘Create Filter’.
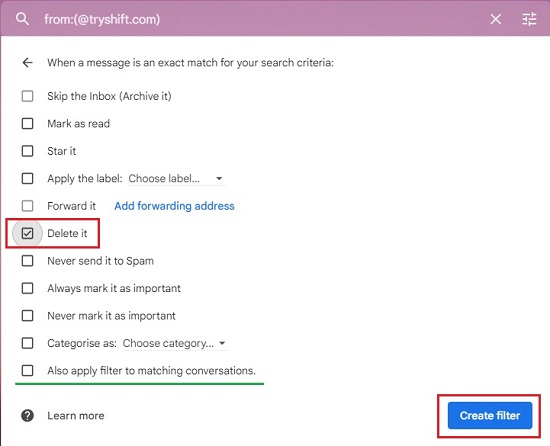
4. In the next screen, click on the checkbox beside ‘Delete it’. Additionally, you can also enable the checkbox next to ‘Also apply filter to matching conversations’. A number will indicate the count of emails from that sender in your inbox. Finally click, ‘Create Filter’
5. Henceforth, any emails arriving from the domain that you specified in Step 3 above will be deleted rather than getting stored in your inbox.
6. Had you chosen the Block option in the 3-dots menu in Step 2, it would have sent all mails from the specified email address (not the entire domain) to the Spam folder.
Method 2: Creation of a Filter from Gmail settings
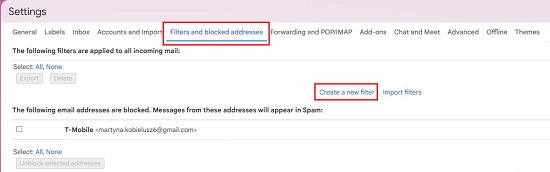
1. Sign in to Gmail, click on the Gear icon at the top right and select ‘See all settings’.

2. This will display the Settings page. Click on the ‘Filters and Blocked addresses’ tab and then click on ‘Create a new filter’ at the bottom.
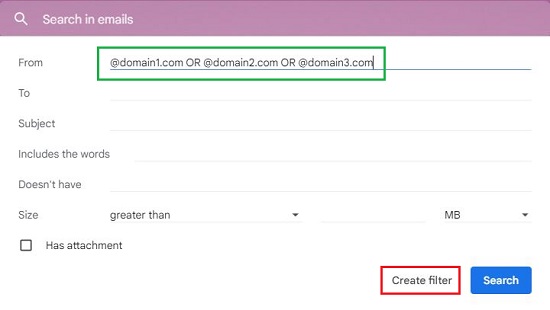
3. In the ‘From’ field, type the @symbol followed by the domain that you wish to block, for example @domain.com and then click on ‘Create filter’.
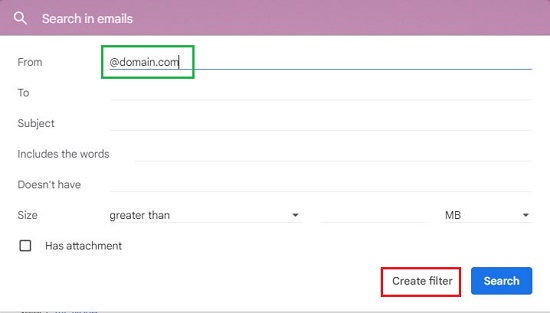
4. You can simultaneously block multiple domains by separating them with ‘OR’. For example: @domain1.com OR @domain2.com OR @domain3.com…
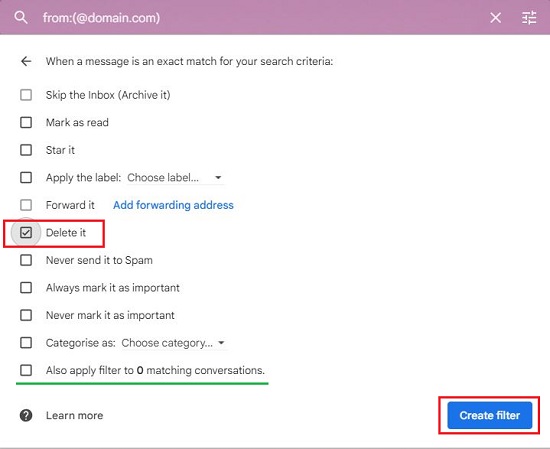
5. In the next screen (identical to Method 1), click on the checkbox beside ‘Delete it’. Additionally, you can also enable the checkbox next to ‘Also apply filter to matching conversations’. Finally click, ‘Create Filter’
6. Hereafter, any emails that are sent from the domain (or domains) that you specified above will be deleted when they arrive.
Finally, remember that when you create filters to delete emails that arrive from a particular domain, it doesn’t necessarily block that domain as is the case when sending to Spam. However, it gives you absolute control to remove the messages before they clutter up your inbox.