Microsoft Copilot is a AI chatbot based on large language models. It was earlier launched February 2023 as an inbuilt feature for Microsoft Bing and Edge and serves as the primary replacement for Contana that has been discontinued. Microsoft Copilot can help you with a variety of tasks relating to the settings on your PC as well as generating content. For example, you can use it to write an essay, help you shop online, organize your Windows, turn on your computer’s dark room and more with a simple natural language prompt.
Microsoft has recently announced a significant step in taking its AI-powered Copilot forward by dedicating a new Copilot key for keyboards on Windows 11 computer systems that will ship in the coming months. This will be a dedicated button on the keyboard on a Windows 11 PC to open Copilot with a single press, similar to the Windows button that we use to launch the Start menu on Windows.
In this article we will be exploring a method using which you can assign a button on your keyboard to Copilot if you do not want to upgrade to a new PC. The process of assigning a button to Copilot on your keyboard is very easy and requires you to remap a button on your keyboard using PowerToys. This is a free application that you can install from the Microsoft Store and consists of a set of utilities for power users to streamline and tune their Windows experience. When you press Win + C on a Windows 11 PC, it automatically opens the Copilot. We will remap this to a key to get a dedicated Copilot button on any keyboard in Windows 11.
How it Works:
1. Launch Microsoft Store, search for PowerToys and install it on your Windows 11 PC.
2. Launch Microsoft PowerToys and notice that you will see the ‘Open Settings’ button when you launch the app for the first time.
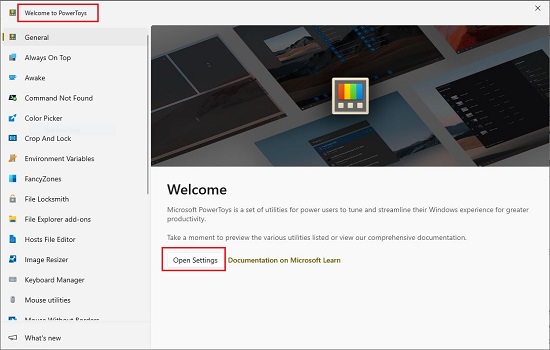
3. Click on this button to open the PowerToys app Settings, then click on the ‘General’ option in the left panel and scroll down to the ‘Administrator mode’ section.
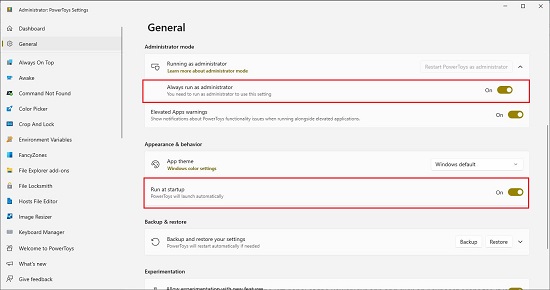
4. Click on ‘Restart PowerToys as administrator’ to relaunch the app as Administrator once you click ‘Ok’ on the ‘User Account Control’ prompt.
5. Next, enable the toggle buttons ‘Always run as administrator’ and ‘Run at startup’ so that the app automatically launches at PC Startup and runs as Administrator for the dedicated designated button to work every time. You must remember that you cannot uninstall the PowerToys app or disable it as long as you want the button to work.
6. Now, scroll down the left panel and click on ‘Keyboard Manager’. You must activate it using the corresponding toggle burrow as it is disabled by default.
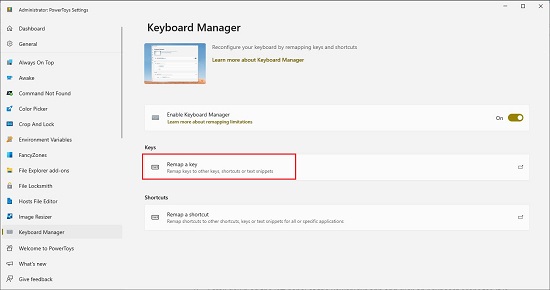
7. Next, click on ‘Remap a key’ and click on ‘Add key remapping’. Under the ‘Select’ dropdown, choose the key that you want to assign the Copilot button to, such as ‘Scroll Lock. Next, under the ‘To send’ section, choose ‘Win’ and ‘C’ in the two dropdowns respectively.

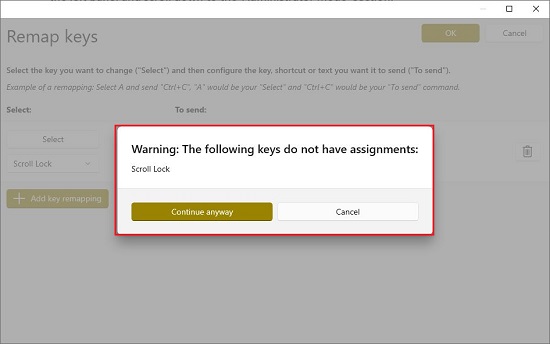
8. Click ‘Ok’ to save the changes and when click on ‘Continue anyway’ when you observe the warning saying ‘The following keys do not have assignments’.
9. That’s it. You have now successfully created a dedicated Copilot button on your Windows 11 PC without any upgrades. You can use it to launch Copilot directly using a single key on your keyboard.
Closing Comments:
The above method can be easily used to assign a button on your keyboard to Microsoft Copilot in Windows 11 if you do not want to upgrade to a new PC.