This tutorial explains how to reverse a video and save to PC.
I have added three different methods to reverse video. Each method uses some free software to reverse a video. These software support a lot of input video formats (MP4, AVI, MOV, 3GP, etc.). So you will be able to convert most of the popular or common video format files.
The output format depends on the software. If the software supports only AVI format, then you will get the output in that particular format only.
Let’s start with the first method to reverse a video.
Method 1: Reverse a Video using Free Video Time Reversal Software

This is probably the most convenient video reversal method in this list. You can open a video, press Reverse button and select the output location to save the reversed video.
Video Time Reversal software supports WMV, MOV, AVI, MP4, 3GP, and MTS video formats and lets you preview the output on its interface. This gives a good idea about the output video. Apart from that, you can also set the output video format to AVI, same as original (if possible), MPEG 4, etc.
The interesting part is that it also provides the option to reverse the audio of the video. However, the audio quality might not come as good as you expect. Also, you won’t be able to understand the audio easily because it will play in the reverse order. You can also remove audio from the video or save it separately as WAV file.
So, these are a couple of really interesting features in this free video reversal software. In addition to these features, another advantage of this software is that it processes the video in lesser time as compared to other software in this list. So, if you want to reverse video quickly, this software is probably the best bet to go with.
Method 2: Reverse A Video Using Free NCH Video Pad Video Editor Software:
Video Pad Video Editor (by NCH software) is also good option that can be used to reverse a video and save to PC.
Step 1: Add a clip or video (AVI, MP4, VOB, MPEG, XVID, MPG, DIVX, MOV, or other supported formats) and give it time to load properly.
Step 2: After loading the clip, you can set the Start and End marks for the output video.
Step 3: Now click Sequence Menu and then click Video Effects. A new dialog box with various options will open. Go to the bottom of this dialog box and click Speed Change button.

Step 4: A pop up will open. In that pop-up, you need to enable Play Clip in reverse option and click Set button.

It now starts processing the clip in reverse order. Now you can save this clip as reverse video by using the Export > Video File option.
You can change the format and quality of the output clip if required.
Method 3: Reverse a Video Using VirtualDub and AviSynth Software
VirtualDub software is also able to reverse a video file but it takes the help of AviSynth software. VirtualDub supports various video formats including AVI, DIVX, MPG, MPEG, M1V, DAT and many more. However, the output can be generated in AVI format only. This is a bit lengthy method but works successfully. Follow the steps:
Step 1: First, install VirtualDub and AviSynth in your PC. After installing both these software, open VirtualDub and select a video file.
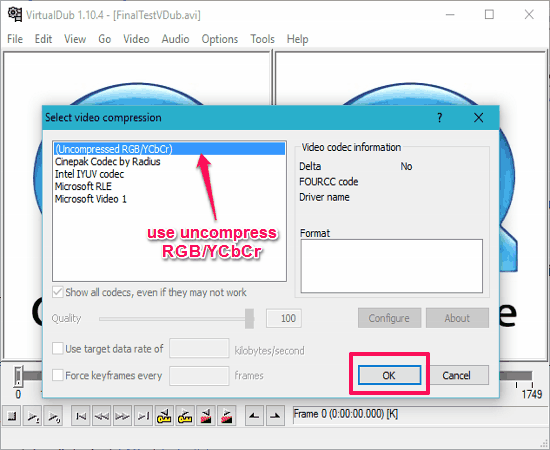
Step 2: Go to Video menu and choose Compression option. It will open “Select video compression” window. In this window, you need to select (Uncompressed RGB/YCbCr) and click OK.
Step 3: Use File menu, click Save as AVI option and save the video file with “InputFile.AVI” name. After that, close the software.
Step 4: Open Notepad and copy the following code:
AviSource("InputFile.avi").Reverse()
Step 5: Save this Notepad file as “Output.avs” in the same location where you have saved the “InputFile.AVI” file. Make sure the file extension is .avs, and not .txt.

Step 6: Now open VirtualDub again and open that Output.avs. After opening, use File menu and click on “Save as AVI” option.
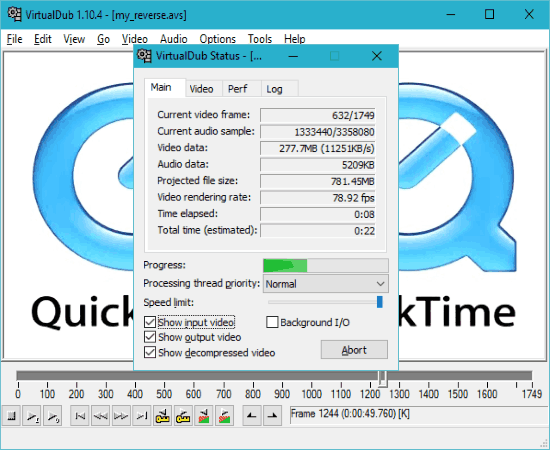
By doing so, the InputFile.AVI video is converted to generate the Output.AVI video in reverse order. This won’t overwrite the InputFile.AVI video. Instead, it will generate a new video. When the processing is done, you can play the output video and you will see that the video file has been reversed.
Final Words:
So, which method you’re gonna use if you have to reverse a video. Probably, the very first method would be most suitable. This method includes a software with the straightforward interface. The other methods are also good, no doubt, but when you need output in an easier way, then the first method is the one that you would like to use.