This tutorial covers how to disable “Windows Features“ in Windows 10. Windows Features is an important parts of Windows 10. You can use it to enable or disable Microsoft Print to PDF, XPS Viewer, TFTP Client, Telnet Client, etc. So some crucial features can be enabled or disabled using Windows Features. Therefore, if you don’t want to let anyone else change default options or options set by you in Windows Features, then you can simply hide or disable this feature. After that, whenever someone will try to access Windows Features, they will get an error message.
There are 2 ways to do this. You can do it by making minor changes in Registry, or you can do from from Group Policy Editor. If you are using Windows 10 Home, then you will have to go with Registry route, as Windows 10 Home does not have Group Policy Editor.
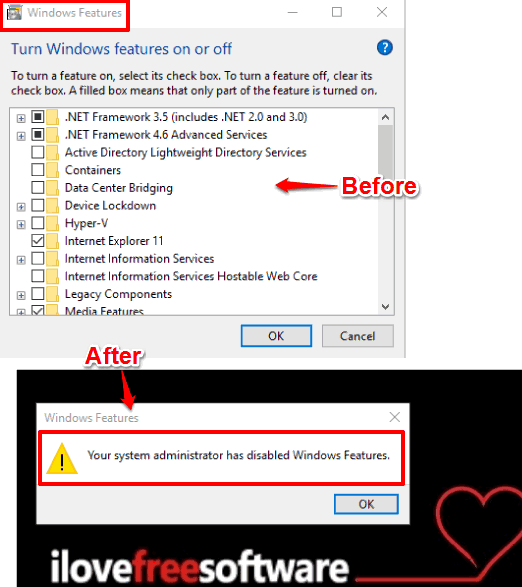
As visible in the screenshot above, first I was able to access Windows Features window. But after applying the trick, access to Windows Features is disabled.
Method 1: How To Disable Windows Features In Windows 10 Enterprise, Education, and Pro Editions
Step 1: Write gpedit in the Search box to open Group Policy Editor window.
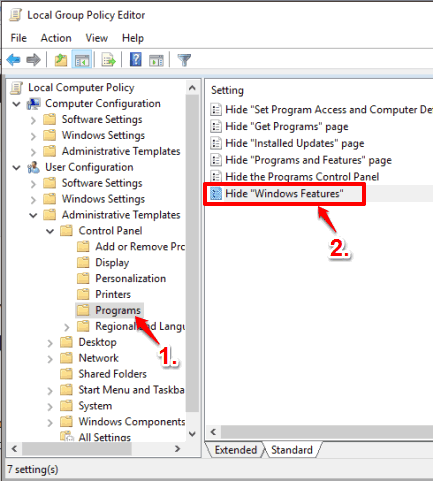
Step 2: Navigate to User configuration, Administrative Templates, Control Panel, and Programs. Under the Programs folder, you will find some options (at the right side). Among those options, double-click “Hide “Windows Features” option“.
Step 3: Hide “Windows Features” window will open. Like many other windows related to the options present in Group Policy, you will see 3 options in this window: Disabled, Not Configured, and Enabled. By default, Not Configured option is selected which means that you can access Windows Features. To disable the access, select Enabled option and save it.
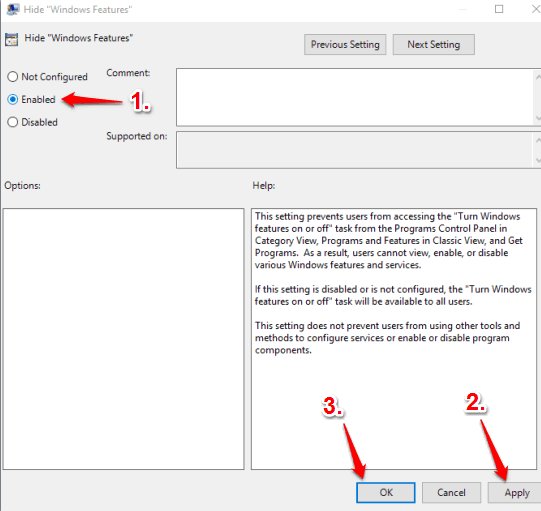
Now you won’t be able to access Windows Features window.
To regain access to Windows Features window, you can set Not Configured option again and save this change.
Method 2: How To Disable “Windows Features” In Windows 10 Home Edition
Step 1: Access Registry Editor (by typing regedit in Search box).
Step 2: Go to the Policies key. You will find it here: HKEY_CURRENT_USER→SOFTWARE→Microsoft→Windows→CurrentVersion→Policies.
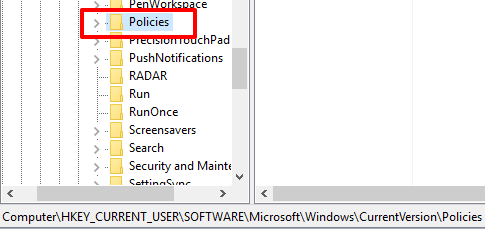
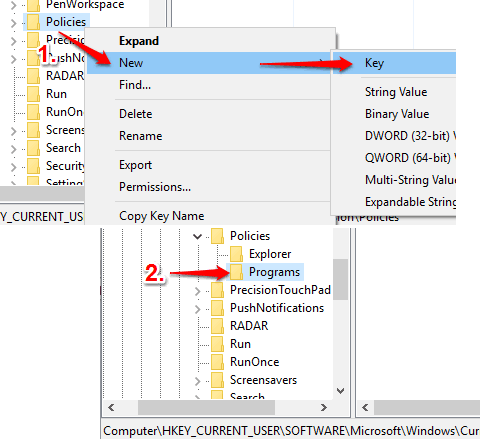
Step 3: Create a “Programs” name key under Policies key. For this, right-click the Policies key→New→Key. Rename the new key as Programs.
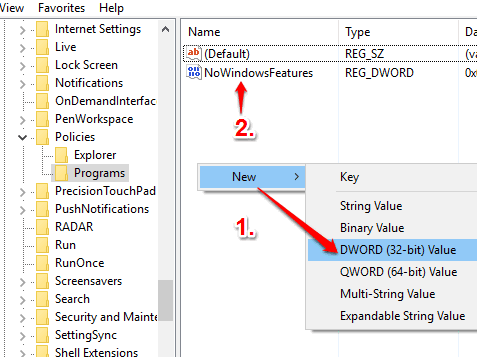
Step 4: Under Programs key, create a new DWORD value and set the name of this value as “NoWindowsFeatures“.
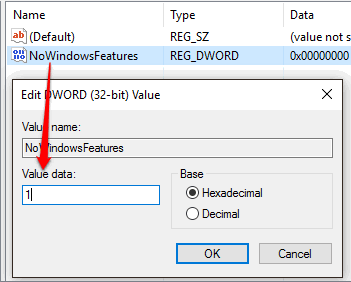
Step 5: Now we are in the final step. We need to set the value data of NoWindowsFeatures value. So double-click that value and in the Value data box, enter ‘1’ and save it.
Now try to open Windows Features. You will receive an error.
To access Windows Features again, set ‘0’ in value data of NoWindowsFeatures DWORD value.
Here are other interesting tutorials: How To Hide System Tray Clock from Windows 10 Taskbar and How To Disable Desktop Wallpaper Change In Windows 10.
The Verdict:
Windows Features is an essential part of Windows 10. If misused, it can prevent access to some important options. So, when you want to temporarily disable Windows Features in Windows 10, these two built-in methods will help you. For me, Group Policy editor is best.