Here is a simple tutorial that explains how to prevent uninstalling Google Chrome extensions.
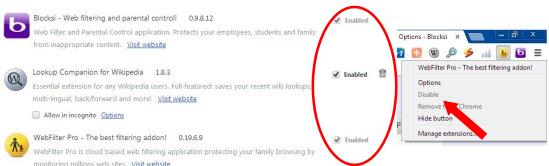
Uninstalling a Google Chrome extension is pretty easy. Even a kid knows how to uninstall a Chrome extension; just by going to Chrome Settings and uninstalling the extensions. This also means that anyone can install an extension, even if you don’t want him or her to.
Update: (November 07, 2013) Google has disabled silent extension installation in its Chrome browser with the release of version 25 (Read more here). So this method would no longer work if you have the latest version of Chrome installed. Till now we haven’t found any other method to prevent uninstalling Google Chrome extensions. As soon as we find one, we would post an update.
The good thing is that there is a way to prevent removing these extensions through Google Chrome itself. And that is what we are going to discuss here. The process will deactivate “Enabled” check box and “Remove” icon against each extension on the Extensions page, and “Disable” option from the context menu of the extension icon, leaving no way to remove them from Google Chrome. And we will not use any third party software for that.
The basic idea behind this is to create a list of registry entries of the extensions that you don’t want to uninstall. These extensions will be installed automatically to Chrome and nobody will be able to remove them, unless their registry entry is deleted.
Do note that it is always dangerous to mess with your registry, so I strongly advice you to create backup of registry before you start making any changes.
The idea is a bit tricky, but you can easily get through the process following simple steps I have listed here
- First of all, you need to open the Registry Editor. You can open it through your command prompt by typing “regedit” and pressing Enter.
Note: You can open Registry Editor only if you have administrator rights.

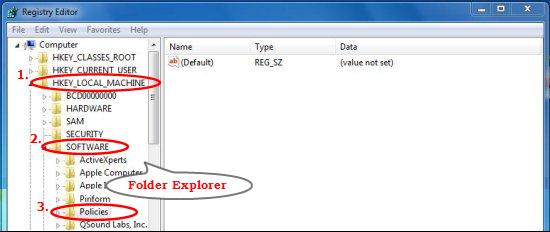
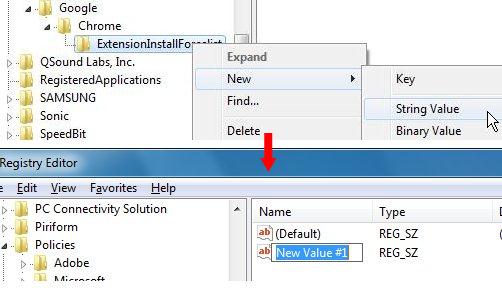
- This will open the registry Editor. You will see a folder explorer on the left, listing all registry folders in your system. Go to HKEY_LOCAL_MACHINE\Software\Policies.

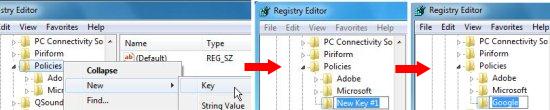
- Here you have to create a new folder for keeping registry entries for your Google Chrome browser. Right click on the Policies folder and select “New>Key” option from the context menu. This will create a new folder under Policies folder. Rename it as “Google”.

- Repeat last step by creating a new folder with the name “Chrome” under Google.
- Again repeat the step, this time with a folder name “ExtensionInstallForcelist” under Chrome folder.
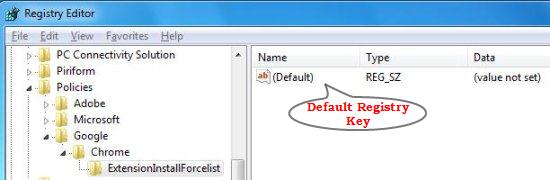
- Now you have reached the desired path: HKEY_LOCAL_MACHINE\Software\Policies\Google\Chrome\ExtensionInstallForcelist. This folder will contain entries for all the Extensions that we want to prevent from uninstalling.
- The right panel shows the default registry entry inside ExtensionInstallForcelist folder. For every extension you want to prevent from removing, you need to create a new registry entry inside the ExtensionInstallForcelist folder.

- Now right click on ExtensionInstallForcelist and choose “New>String Value” from the context menu. This will create a new registry entry that will be displayed on the right panel, with the name “New Value #1”. Rename the entry through its context menu option.

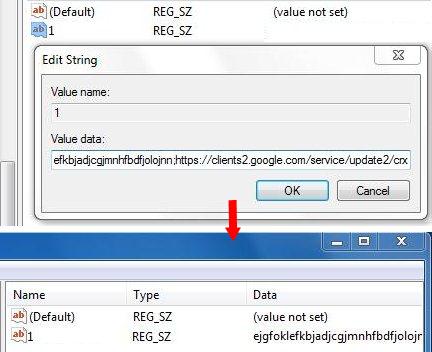
- Right click on this and select “Modify” option. A popup window will come up where you have to enter value of the key under the “Value Data” field. This value is formed by appending the extension’s name with a constant string.

- The extension name can be found in the URL of the extension’s homepage. This will be something like a string formed by random alphabetic characters. For example, if the URL of the extension is “https://chrome.google.com/webstore/detail/parental-control-app/fbkcmiiikbnoldnlanjaoakakibelich”, then the extension’s name will be “fbkcmiiikbnoldnlanjaoakakibelich” (string between backslash and question mark).
- Just copy the extension’s name, append it with “;https://clients2.google.com/service/update2/crx”, and copy the whole sting in “Value Data” field.

- Press Ok and close your Chrome browser.
- The next time you will open Google chrome, the extension will get automatically installed in your browser, leaving no space to remove it in anyway (Not even from the “Settings” page).
- If you want to add more extensions to the list, just navigate to HKEY_LOCAL_MACHINE\Software\Policies\Google\Chrome\ExtensionInstallForcelist folder in registry, and then create a new entry for that extension. Just give “Value Name” to some other number than what you have already used (like, 2, 3, etc.)


This is how you can prevent some extensions to be removed from Chrome. If you want to uninstall the extension, just remove its registry entry form the registry Editor and you are all done.
How Does this Works:
If you are curios to know how this works, here you go: Chrome (and Chromium) give you an option to define a few policies on your computer that the browser will follow. One of these policies is called “ExtensionInstallForcelist”. This policy lets you specify a list of extensions for which Google Chrome should not give any option to uninstall. You can see more details around this in Chromium documentation here.
This feature is especially helpful for network administrators if they want to install a set of extensions on Chrome browsers in entire organization, and do not want to let users to uninstall those.
I found a need for this while doing my research for Parental Control extensions for Chrome. As I note in that article, there are some really nice parental control extensions, but the fact is that they can be installed very easily by even a kid any whole idea of parental control can quickly blow up in smoke. Thankfully, this interesting, albeit tricky method exists to stop any Chrome extension from uninstalling.
Note: You are strictly advised not to fiddle with any other registry folder; otherwise your system may run into serious problems.