Early versions of Windows 11 had settings button next to the power button. But in the latest builds, it can’t be found. It is disabled by default. But you can enable it and I will show you how. There is a simple setting that you have to do to enable it or, you can also use a simple Registry Editor hack to do it.
Even though Settings app icon is pinned in Windows 11, there are cases where you are using the debloated Windows 11 build. Or, you have unpinned all the apps. In that case, you have to search for Settings first and then open it. But if you enable the Settings button next to the power button then you will not have to have that.
In a click, if you want to open Windows 11 settings app, then this tutorial will be helpful. On the other hand, the settings button does look good next to the power button.
How to Enable Settings Button in Windows 11 Start Menu?
There is no need to use any this party app for this. You can do that by simple sliding a switch to get the Settings button back in Windows 11.
Method 1: Using Windows 11 Settings Itself
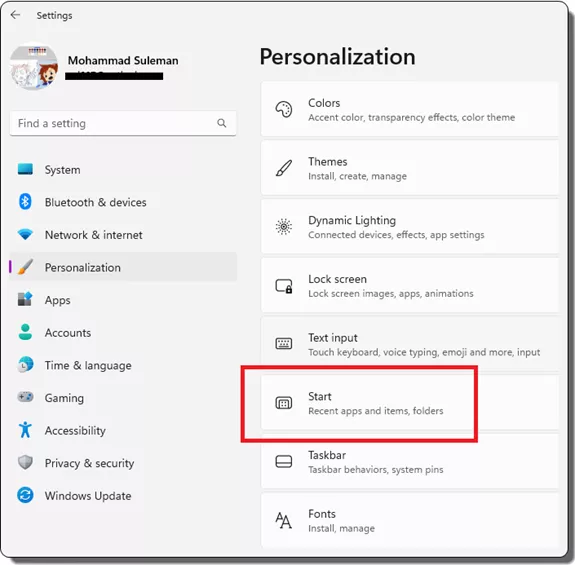
Open Windows Settings and then go to Personalization > Start.
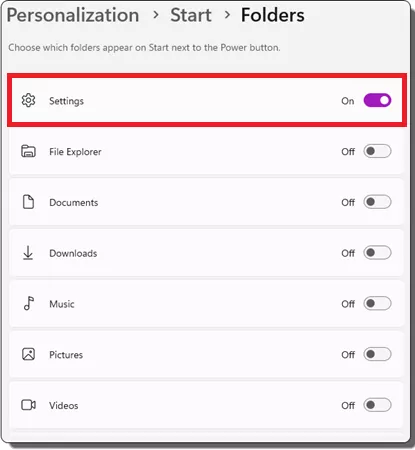
Now, go to the Folders section and then from here, enable the switch next to the Settings option. And that is it.
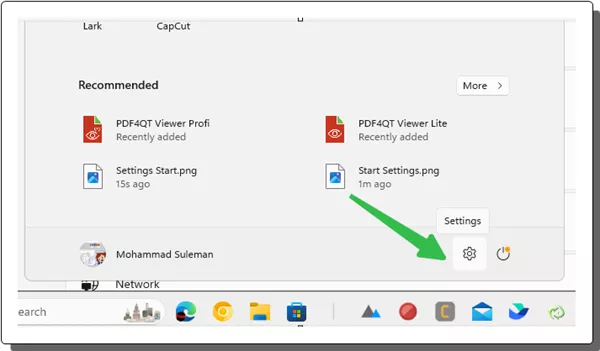
Open Start menu and now you will see the new Settings button right next to the power button. This is as simple as that.
Method 2: Using Registry Editor
Apart from the above method, there is another way to enable the Settings button in Windows 11. But for this, you don’t need to open the Registry Editor or Group Policy Editor.
You just copy-paste the following PowerShell script snippet in the Terminal and hit enter. It will automatically set the desired Registry key with the correct value to enable the Settings app back in Start menu.
$path = "HKCU:\Software\Microsoft\Windows\CurrentVersion\CloudStore\Store\Cache\DefaultAccount"

$data = "02,00,00,00,e6,e3,14,8b,6c,38,d9,01,00,00,00,00,43,42,01,00,c2,14,01,cb,32,0a,01,05,86,91,cc,93,05,24,aa,a3,01,44,c3,84,01,66,9f,f7,9d,b1,87,cb,d1,ac,d4,01,00,c2,3c,01,c2,46,01,c5,5a,02,00"

$hex = $data.Split(',') | ForEach-Object { "0x$_"}

foreach ($v in Get-ChildItem -Path $path) {

if ($v.Name.Contains(("windows.data.unifiedtile.startglobalproperties"))) {

Set-ItemProperty -Path ($v.PsPath+"\Current") -Name Data -Value ([byte[]]$hex)

}

}

Once the command finishes successfully, you can open Start menu and you will find the Settings button right there. This is a good method in case you want to enable the Settings app button programmatically on some PC.
In this way, you can now easily enable the settings button in Windows 11 Start menu. Just follow these steps and you are all good to go. The process is very simple, and you only need to follow then carefully. Also, if you no longer need the Settings app button in Start then you can again turn it off by following the above-mentioned methods in reverse.
Closing words:
As a Window s11 user, if you want to try new things then try adding the hard-wired settings button in the Start button. A very small process you have to follow to do this. I really like Settings button right next to the power button. And not just the Settings button, but you can also add Explorer, Personal folder buttons there as well.