Random Access Memory (RAM) is a crucial component of your computer and serves as the primary working memory responsible for storing temporary data on your PC. The operating system and various applications consistently write data to the RAM and retrieve it as needed. For example, when you visit a webpage using a browser, the information is temporarily stored in RAM during your interaction. Similarly, when initiating a computer game, data is transferred from slower system storage, like a hard drive or solid-state drive, to the significantly faster RAM.
Should your PC experience freezes or application crashes, there’s a great likelihood that the RAM might be the culprit. A malfunctioning or faulty RAM in your computer can give rise to serious issues. While your computer attempts to save data to the RAM, accessing and reading it may result in encountering disparate or corrupted data. This discrepancy can lead to a range of problems, including blue screen errors, application crashes, system freezes, and various other issues.
So, the question that emerges is how to determine if a PC is afflicted with faulty RAM. Numerous methods exist for conducting a memory test, ranging from third-party applications to convenient in-house tools furnished by Windows. These tools operate by writing data to every sector of the RAM and subsequently reading it. If the retrieved value differs from the originally written one, it indicates potential faults in the RAM. Few of the RAM testing tools also require that you reboot into a special bootable system that gets Windows out of the way ensuring that the tool has complete and low-level access to your RAM for the purpose of testing.
In this guide we will be exploring a few methods that you can use to check your RAM health in Windows.
Windows Memory Diagnostic
1. The faster but least in-depth method to analyze your RAM for errors is to use the Windows Memory Diagnostic. For this, click the ‘Start’ button, type mdsched.exe and hit ‘Enter’.
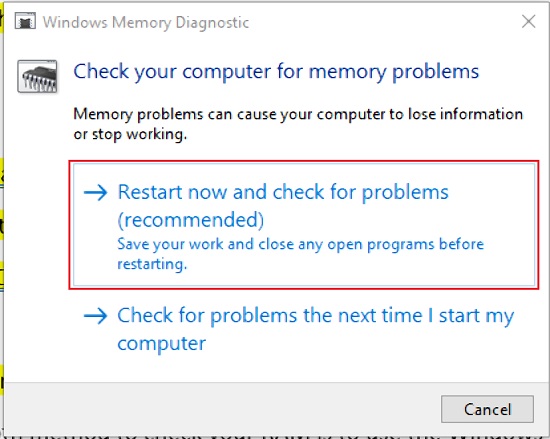
2. Restart your system when prompted and notice that it will now boot to the Memory Diagnostic tool.
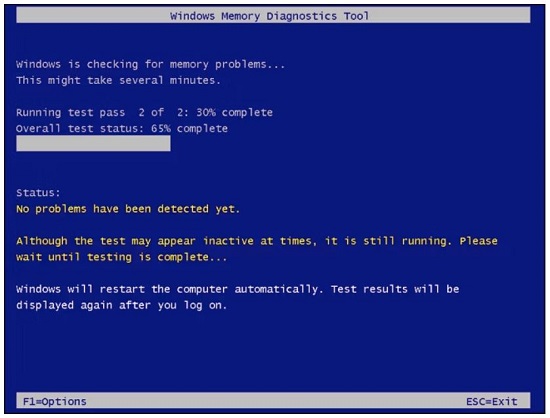
3. By default, the test will commence in the Standard Mode. In case you want a quicker scan, press F1 and choose the Basic Mode. If you want a more detailed scan, you can opt for the Extended Mode which is the recommended option for the most precise results.
4. You must remember this process will take some time especially if you have selected the Extended test. You can walk away and do continue any other work while the test is being run. Once the test has been completed, your system will automatically shut down.
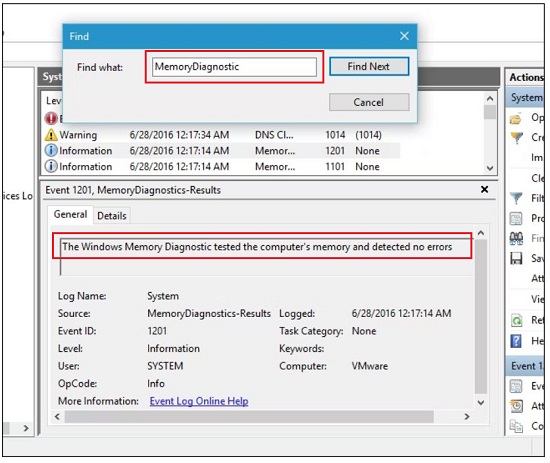
5. Once you boot into Windows back again, click the ‘Start’ button, type event and then click on ‘Event Viewer’.
6. If your system has passed the test, you will see a notification on the right-side of the taskbar informing that no errors were found.
7. Now, expand the ‘Windows Logs’ dropdown list, right-click on ‘System’ and choose ‘Find’. Type ‘MemoryDiagnostic’, click on ‘Find Next’ and you will be able to view the test results. If errors have been listed, sometimes they will also provide you with the faulty RAM module that makes it easier to find out which one needs to be replaced.
HCI MemTest
HCI MemTest is a simple but thorough RAM testing program designed for Windows. Its purpose is to confirm whether your computer can consistently store and retrieve data from its memory. An optimally performing computer should accomplish this task with absolute precision on a daily basis. You have the option to let the application run for multiple hours or even days. A well-functioning RAM should yield no errors, regardless of the duration of the test.
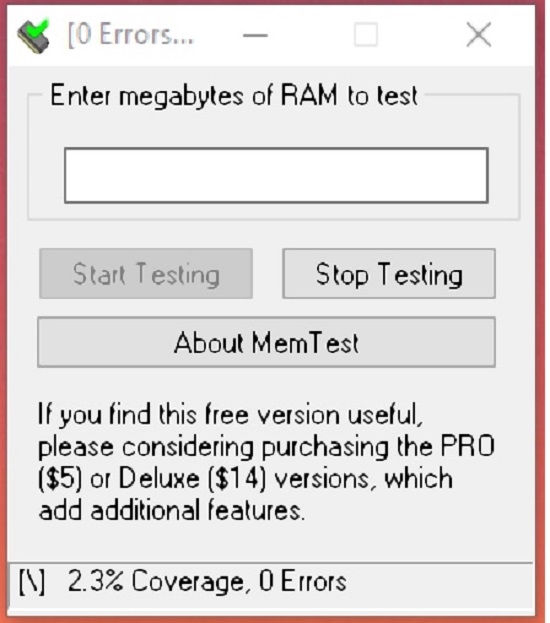
1. Click on this link to download the free version of HC MemTest. Extract the files from the archive and then launch the application. The free version only allows you to set how much RAM you wish to test in Megabytes.
2. It’s important to note that HCI MemTest places some load on your CPU and RAM. Therefore, it is recommended to close any running applications on your PC, if feasible, and allow the tool to conduct the test for a few hours.
3. The results are presented in a straightforward manner. If you receive a notification stating, ‘Memory error detected,’ it indicates a problem that requires further investigation.
4. The more extended the duration of running HCI MemTest, the more accurate results it will produce. In the case of faulty RAM, it might identify numerous errors within just an hour.
MemTest86
In case the above tools do not bring up any errors, but you are convinced that your system’s RAM has an issue, it may be worth trying MemTest86 which is a more detailed tool for testing your RAM and works by way of a bootable USB drive. MemTest86 was earlier used for PCs with 32-bit processors, hence the name but it is now available for 64-bit machines too.
1. Click on this link to download the version of MemTest86 (10.6) that runs on systems with UEFI BIOS.
2. You must remember that the above version supports only UEFI boot. If your system does not support UEFI BIOS, then MemTest86 will not boot. In this case you must download the older V4 BIOS release of MemTest86 instead from the ‘Older Versions’ section.
3. Next, extract the contents of the ZIP archive and run the imageUSB.exe file to launch the image creation tool.
4. Now, insert a USB flash drive in your system, choose it in the Step 1 of the tool and then select the current location of the image fie ‘memtest86-usb’ in Step 3.
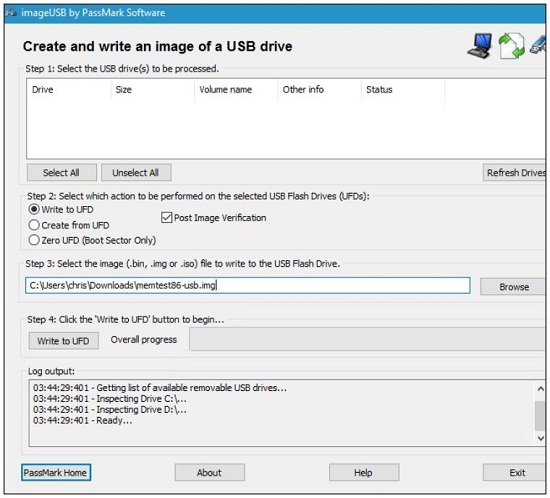
5. Finally, click the ‘Write’ button in Step 4 to write the image to the USB flash drive. Next, reboot your PC and set your USB drive as the primary boot device in the BIOS. Then, reboot your PC again and notice that it will boot to MemTest86.
6. Once your system boots in MemTest86, the tool will start running and scanning your RAM automatically by running tests one after the other and notifying you in case of any problems.
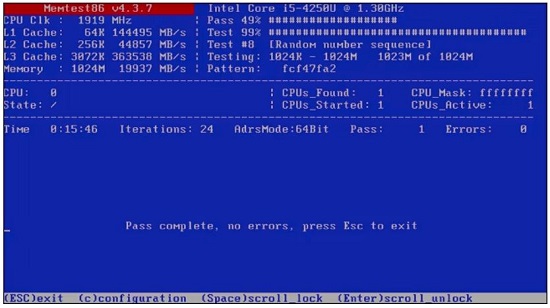
7. MemTest86 will keep performing the tests until you choose to halt it, and this allows you to test how the memory performs over a longer duration of time. When you are through with this procedure, simply press the ‘Esc’ key to exit it and restart your system. Click here to for more technical information.
Closing Comments:
If any errors have been detected by the above-mentioned RAM Testing tools, the best method would be to replace the RAM. But before you take this extreme option, it is also worth checking to see if the RAM stick is properly inserted in the slot.
You can try removing the RAM sticks from your computer one by one and running the tests to see if the errors disappear to figure out which is the faulty one if any. If you find errors popping up every time you insert a certain stick, there is obviously a problem with it. Additionally, if there are errors each time there is a RAM stick in a specific slot, then there could be an issue with the slot and you should be looking at a probable motherboard replacement.