Virtual meetings have now become a part and parcel of our daily lives and Zoom has just recently introduced a new state-of-the-art solution called Zoom Clips that especially caters to those who seek a substitute for conventional live meetings.
Zoom Clips is an asynchronous video application and enables users to swiftly record, edit and share short video messages internally as well as externally with viewing permissions. Team members with the required permissions can comment on the videos while the creators can track and monitor views. This helps teams to communicate asynchronously so that they can reduce the number of meetings and the time that is often lost in ambiguous interaction.
There is a centralized content management system where the Clips are stored and promote engagement while allowing for simple research and discovery. Zoom Clips has been offered to customers with Zoom One licenses including Basic and Enterprise. In this article we will be explaining how you can use Zoom Clips across for Asynchronous communication.
Working:
How to enable / disable Clips
1. Sign in to your account on the Zoom Web Portal and click on ‘Settings’ in the navigation on the left side.
2. Click on the ‘Clips’ tab at the top of the page and then click on the toggle button to enable or disable it. In case you disable Clips, you will not be able to create new Clips but will have access to the existing ones in the web portal as well as the desktop client.
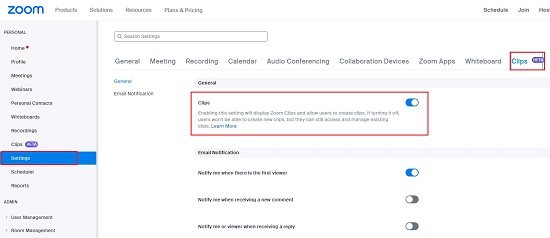
3. On the same page you can go ahead and configure the Email notifications so that you are alerted when you get the first viewer for your clips or receive a new comment and more.
How to create a Clip
You can create Clips from the Zoom Web Portal as well as the Desktop Client. Please make sure that Clips is enabled as discussed in the above steps.
Create a clip from a Web Portal
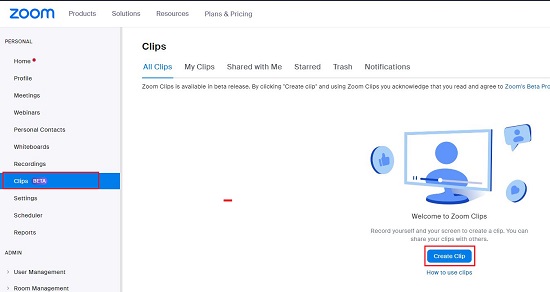
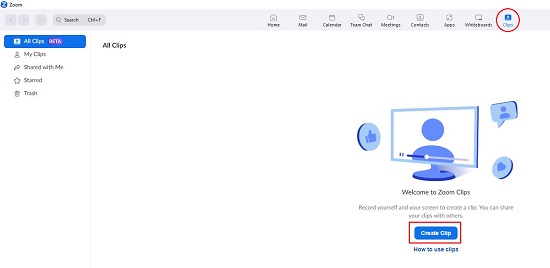
1. Sign in to the Zoom Web Portal, click on ‘Clips’ in the navigation menu and then click on the button ‘Create Clip’ in the right pane.
2. You will now be asked to open your Zoom application and then ‘Create Clip’ window will be presented on the screen.
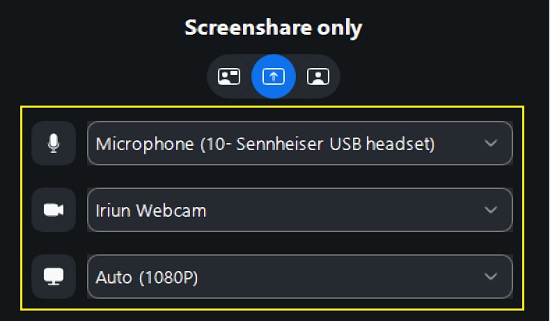
3. Choose the Microphone, Webcam device and the Resolution from the respective drop-down menus.
4. You must now choose the Recording Mode from the following available choices by clicking on one of the corresponding buttons:
- Screenshare and video: You can click on the ‘Screen’ button to select the desired screen that you wish to record along with the webcam recording.
- Screenshare only: Like earlier you can select the desired screen to be recorded without any webcam.
- Video only: This records only your webcam video without any computer screen.

5. You can now go ahead and click on ‘Start Recording’ and a count down timer will be displayed so that you get some time to be ready to start recording.
6. While the recording is in progress, a Clock will be displayed indicating the duration of time since the recording started. You can also choose to Mute / Unmute the audio, Pause / Resume the recording in case any breaks or Start / Stop the camera if required by choosing the corresponding controls.
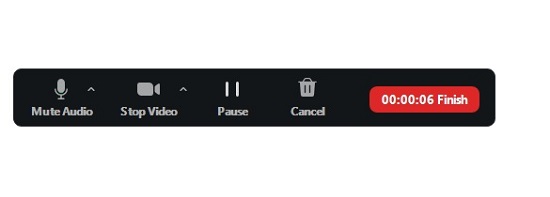
7. To stop recording, click ‘Finish’ on the clock display. The recorded clip will now be uploaded and will be visible in the Clips tab of your web portal as well as the desktop client application.
Create a clip from the Zoom Desktop Client
1. Sign in to your Zoom Desktop application and click on ‘Clips’ on the top menu bar.
2. Next, click on the button ‘Create Clips’ to open the ‘Create Clip’ window on the screen.
3. You can now follow the same steps as we have mentioned above to choose the Recording Mode and proceed to record the clips. Like earlier, all your recorded clips will be accessible from the Clips tab of both, the web portal as well as the desktop client.
Manage Clips
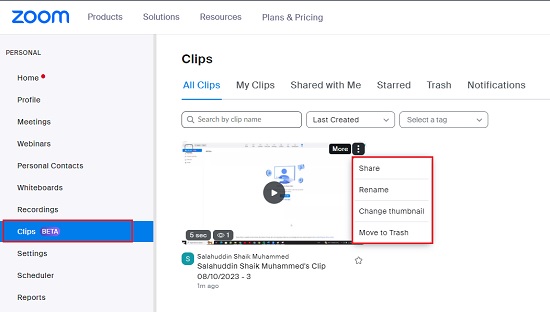
1. You can click on the 3-dots (More) icon at the top right of you clip to Share or Rename the clip, change its thumbnail, or move it to trash.
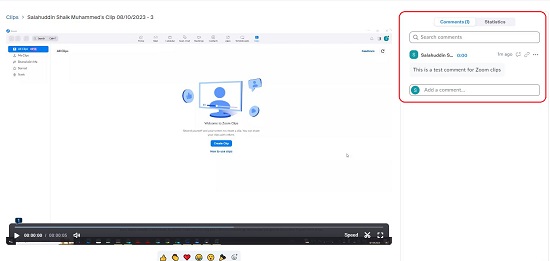
2. Click on any clip to open it and the Comments pane will be visible at the right where you can add or view the comments.
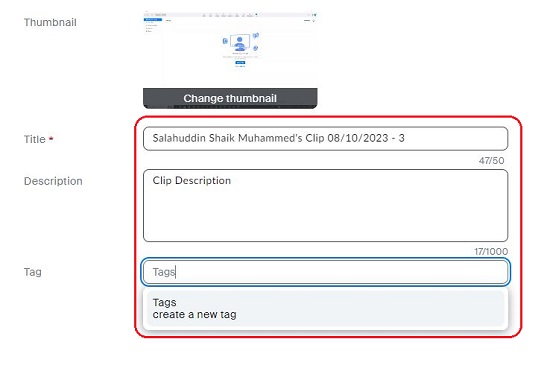
3. You can now click on the ‘More’ icon at the bottom right of the clip to edit it and modify the Title or to add a Description or Tags. You can also click on the ‘Copy Link’ icon beside the ‘More’ button to copy the URL of the clip and share it with others.
Closing Comments:
Zoom Clips has been clearly developed to overcome the challenges posed by the general prevalent fatigue that is associated with video conferencing that is so common in the post-pandemic area. This new feature from Zoom is sure to offer a fresh and engaging way for teams to communicate and collaborate with each other.