Are you encountering low disk space warnings on any internal drive in your Windows 11 system? Put your concerns aside, as all you need to do is relocate some programs or applications to another drive, and the good news is that Windows 11 provides a native solution for this task.
It is strongly advised to maintain a minimum of 15% to 20% of free space on your internal drive, particularly on the C drive. This is crucial as the C drive is the primary location for storing most of the Windows 11 updates. Therefore, it should always have ample space to accommodate additional updates, system files, and settings, among other necessities.
Fortunately, if you have free space available on another disk drive, like the D drive, you can easily move certain programs from the C drive to the D drive in Windows 11, effectively freeing up space. This process is swift and seamless, allowing you to continue using the applications without the necessity of uninstalling them. It is also handy for situations where you have mistakenly installed an application on the wrong drive and wish to relocate it to the correct one.
In this article we will be exploring 2 methods to relocate installed applications in Windows 11 to another drive.
Before transferring any applications on your system, there are several essential steps you must take. These Precautions are crucial to avoid potential file corruption, data loss, or other complications.
- At the outset you must confirm that the destination drive, where you intend to move an application, has sufficient space to accommodate the relocated program. Without ample space, the entire process will be in vain. If space is limited, take the necessary steps to free up storage.
- Generate a system restore point, especially when relocating a program to or from the drive that houses your operating system. This precaution allows you to restore the operating system to a functional state in the event of potential corruption to system files during the relocation process.
- Keep in mind that System Restore does not generate a backup of the application you’re moving. Therefore, it’s essential to perform a separate backup. You can back up the application on an internal or external drive, or preferably, on a secure cloud storage platform to ensure its safety in case of any mishaps on the device.
- If you are working on a laptop, you must ensure that it is sufficiently charged. If you’re utilizing a desktop computer, it’s advisable to check for possible electrical outages in the vicinity.
How to use the Settings app in Windows 11 to Relocate Applications from one drive to another
The best way to relocate an application to a different location in Windows 11 is by using the ‘Move’ feature in the Settings app. The following steps describe this procedure:
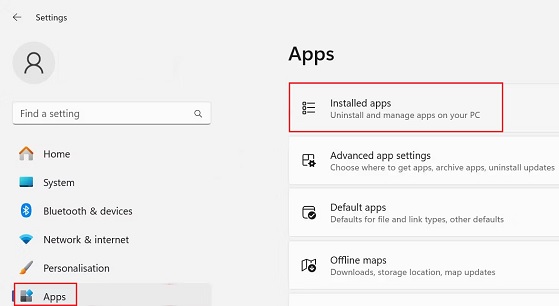
1. Right-click on the ‘Start’ button and choose ‘Settings’.
2. Next, navigate to the ‘Apps’ tab on the left-side and then click on ‘Installed Apps’ on the right where you will find all the applications that have been installed in your system.
3. Click on the 3-dots icon next to the application or program that you desire to relocate and then click on ‘Move’.

4. Now, Windows will show the current installed location of the program and the drives where you can relocate the program to. Choose the preferred drive and then click on ‘Move’.
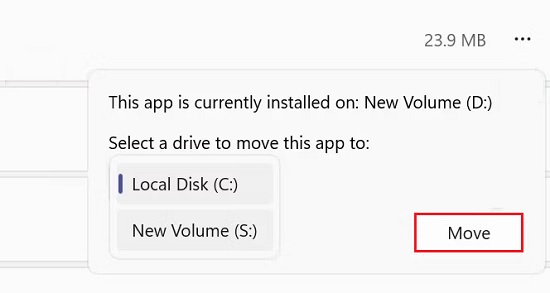
5. Wait patiently for some time while Windows 11 seamlessly moves your application to the chosen location.
Although, this is the easiest and simplest method to relocate applications in Windows 11, you must remember that it may not be universally applicable. This option may not be available for some applications and for others, the option may be grayed out. But do not worry since an alternative method is available using the command prompt.
How to Use the Command Prompt to Relocate Applications from one drive to another
1. At the outset, you must find the installation folder of the application that you wish to relocate.
2. If you are not sure about it, then input the application name in Windows Search, right click on the app and choose ‘Open File Location’. This will take you to the Start Menu folder.
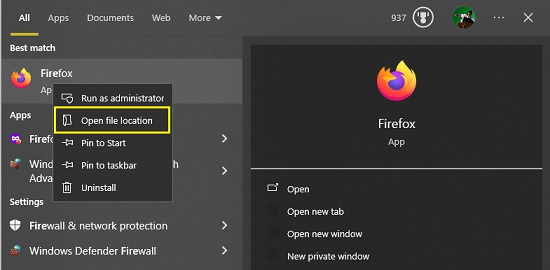
3. Next, right-click the application icon and select ‘Open File Location’ and you will be navigated to the application’s real installation location.
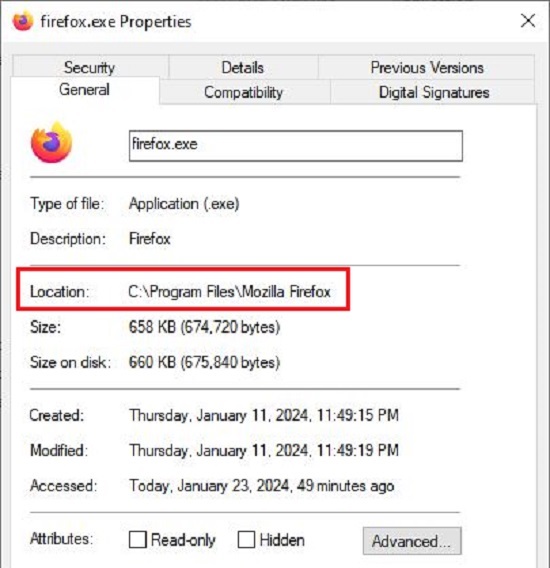
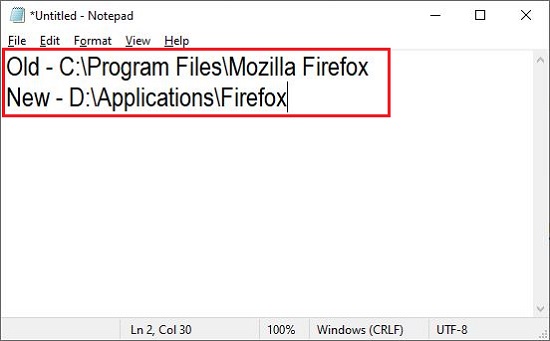
4. Again, right-click on the application icon, choose ‘Properties’ and you will be able to see the complete installation folder path in the popup box. Copy and paste this path into a Notepad file. Henceforth, lets refer to this as ‘old’.
5. Now, navigate to the drive where you wish to relocate the application and create a folder specifically for it in this drive. Then, copy and paste the path of this newly created folder into the same Notepad file as earlier. Henceforth, this path be referred to as ‘new’.
6. Next, open the Command Prompt in Windows 11 with administrative privileges. For this, type ‘Command Prompt’ in Windows Search, and click on ‘Run as Administrator’.
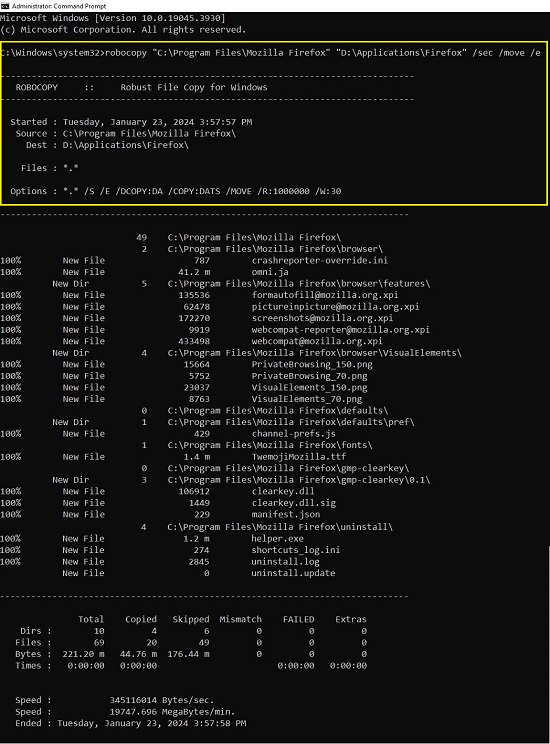
7. Now, type the following command and hit ‘Enter’. You must replace ‘old’ and ‘new’ with the paths that you have pasted in the Notepad file.
robocopy ‘old’ ‘new’ /sec /move /e
The specified application will now be moved to the new location.
8. Further, paste the command given below and press ‘Enter’. As earlier, replace ‘old’ and ‘new’ with the paths that you have pasted in the Notepad file.
mklink “old” “new” /j
The above command will establish symbolic links or hard links between files and directories and ensures that any application shortcuts that are possibly pointing towards the old location continue to work seamlessly.

9. It is important to note that the above process will not automatically remove the application from its old location. Hence you need to manually delete the application to free up storage space after successfully relocating it and creating the links between the old and new directories.
Closing Comments:
You can follow the above instructions to seamlessly relocate your applications from one drive to another. Apart from the precautions that we have stated above you also need to avoid doing certain things when the application is being moved as follows:
- Avoid performing any updates to your Windows system.
- Do not install another application while the process of relocation is under way.
- Refrain from making alterations to the drives involved in the relocation, including any adjustments to settings. Additionally, abstain from running the application being relocated.
- Do not restart or shut down your system while any application is being relocated else this may result into lost or corrupt application files.