Codeboard is a free online IDE to teach programming in classroom. This online IDE supports quite a good set of programming languages that you can use to create a project and then distribute it via URL. It supports programming languages like C/C++, Java, Haskell, Python, Eiffel, etc. Using Codeboard, your students will access the code and after completing it they can submit it back. Later on, you can analyze code submitted by students. In some of the programming languages, it supports auto-grading feature as well.
There are some websites which let you create an online classroom for general subjects, but creating an online classroom for coding is very different, which you can do pretty easily using Codeboard. It comes with an intuitive interface and the IDE is very much similar to what you usually see in desktop IDEs.
![Online IDE to Teach Programming in Classroom]](https://www.ilovefreesoftware.com/wp-content/uploads/2017/07/Online-IDE-to-Teach-Programming-in-Classroom.png)
If you have ever used an online classroom service like Google Classroom, then you will easily figure it out how to use this online IDE.
Main Features of this Online IDE to Teach Programming in Classroom:
If you are a programming teacher, then Codeboard is a very nice online service that you can use. It offers numerous features that you will like. If you have some students or people to whom you want to teach programming online, then Codeboard is the one solution to your needs. It has following key features in it:
- Create Project and manage user roles: Codeboard website allows you to create a project in any of the available programming languages. Also, it lets you add various users to your code if you are contributing to a project in the group. But note that this feature is different from code collaboration.
- Private or Public code sharing options: It lets you specify the sharing options for your code. If you want, you can make your code private and then only you can access the code. Also, if you want to add some people with whom you to share your private project, then you can also do that.
- Manage your project by adding or removing files: This IDE lets you create new files in your project and you can also delete the old ones if you want. All other options like adding a folder, saving changes, etc., are also available.
- Hide specific files of a project: If you want to share your code with others, but don’t want them to see specific project files, then you can also do that. There is an option in the IDE which lets you hide files. Also, you can unhide files whenever you want.
- Intuitive IDE: The interface of this IDE is pretty intuitive. The IDE supports code highlighting and code formatting feature. And if you want, you can also change the theme of its interface. You will find a lot of themes in it along with options to customize font size, keyboard handler, and gutter.
- Real-time code Compilation & Execution: All the programming languages that it supports can be compiled and executed on its web interface. The compiler of the IDE is quite powerful and works like any compiler that you use offline. There is an option in it for the user to type the input parameters, making execution of code really interactive.
- Search and Explore Other projects on Codeshare: You can see public programming projects from other users as well. There is a search option that you can use to search all public projects using a query. And you can also make changes anonymously. But the changes will not be saved in the original project. It will create a new submission in that project and will save your submission there.
How to Use This Online IDE to Teach Programming in Classroom?
Using Codeshare is very easy. But it is mandatory that you, your students, and peers should have an account on its website. After that, you will be able to create projects and exercises for your students.
Here are some steps to get started with this online IDE to teach programming in classroom:
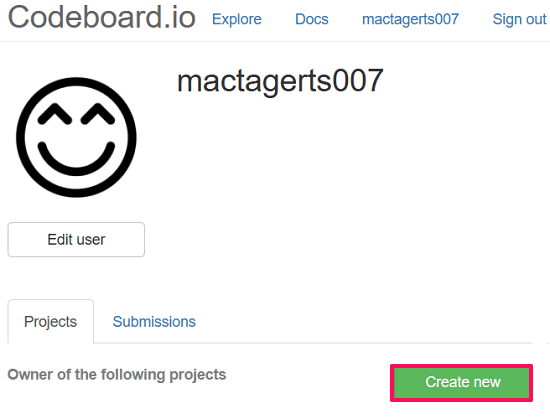
Step 1: When you have registered on its website, you will see your dashboard. From the dashboard, you can create a project. To do that, simply hit the Create button.
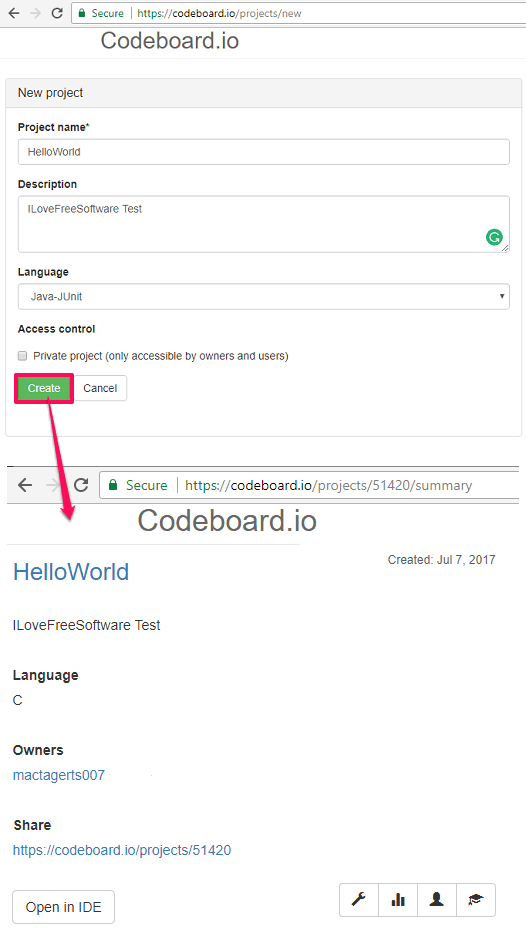
Step 2: Now, a pop-up will appear and here you will have to specify various project properties. Specify Name of the project, Description, Programming language you want to use, make project private, etc., like details. After the project has created, it will give you a unique URL that you can share with your students.
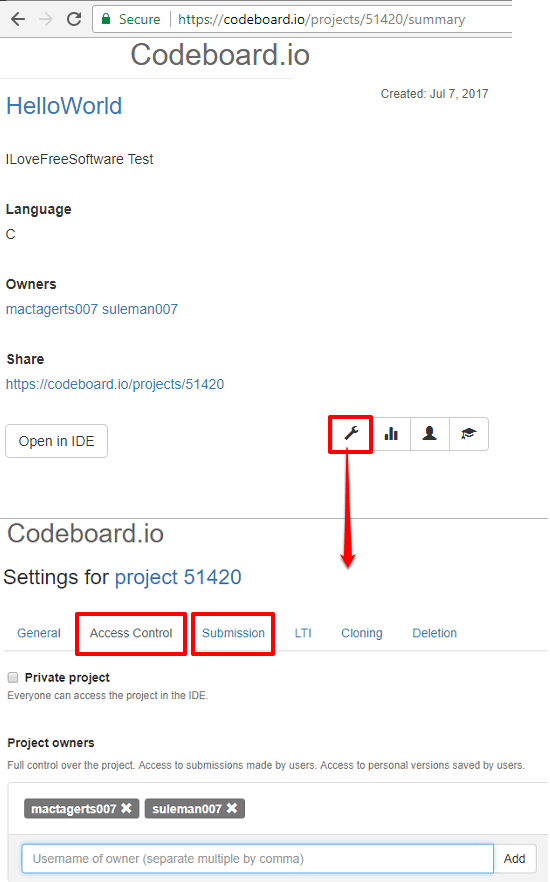
Step 3: If you want to make other people the owner of the code, then you can do that. For this, open project Settings. After that, move to the Access Control Section. Next, you can add the username of people you want to add to it (separate names with a comma). Also, enable the submission option of the project using the Submission tab. Now you can save changes using the Save Changes button.
Step 4: You can now open the code IDE and start adding files and write code in them. If you want that your students should complete the code, then you can tell them what to do in the description of the project. After that, share the URL of the project.
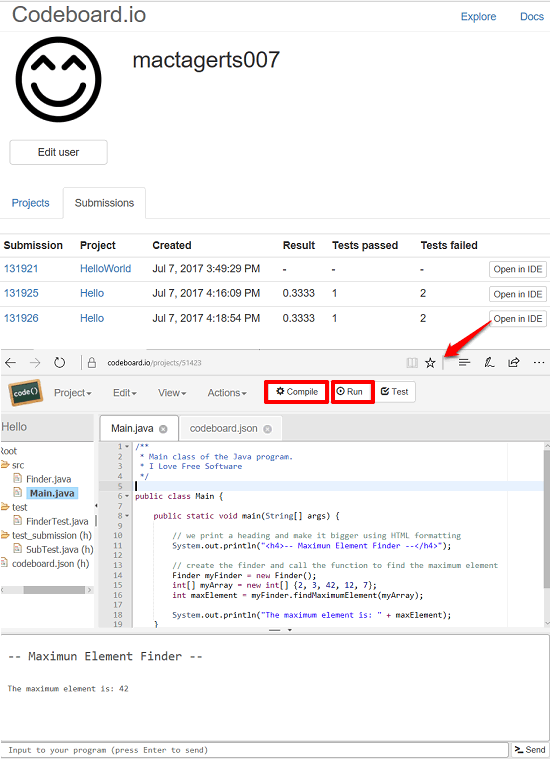
Step 5: Now, when your students or peers have submitted the code, then you can see the submission history in the Submission section. Each submission can be opened in the IDE and there will be different submissions for each user.
This is how you can easily use this online IDE to teach programming online.
Closing Words:
Codeboard is a very nice and unique website that you can use to teach programming to your students who are away from you. And it makes sit pretty easy to do that. You can just have to share the URL of the project that you want to give as an exercise to your students. They will access the project and submit it after completing it. As simple as that.