Here is an article on how to change boot screen of Windows. Windows operating system includes a nice and simple boot screen which looks good. But it becomes really boring when you regularly see the same boot screen again and again on start-up. Now you would be wondering about How can you change or customize your boot screen for Windows operating system. Yes, off course you can change your boot screen. This article is all about how to change boot screen for Windows 7, Windows Vista and Windows XP.
How to Change Boot Screen Of Windows 7
Windows 7 has got a very simple and nice boot screen, but it seems to be boring when you see the same boot screen on a regular basis while starting up your PC. So now you can change the boot screen of Windows 7 installed on your PC. Boot screen of Windows 7 can be changed with the help of utility software named as Windows 7 boot updater. So follow these simple steps to change boot screen of Windows 7.
- Download Windows 7 boot updater.
- Run this software.

- Now you need to download a boot screen from here.
- After downloading, run this software as administrator.
- In the booting option under animation, from the scroll down menu select static image, then browse the downloaded boot screen.
- Moreover you may also edit the message that appear on your default boot screen and write whatever you want.
- Now you need to hit apply button and wait.
- Restart your PC to view the new boot screen.
How To Change Boot Screen of Windows Vista
If you find Windows Vista boot screen boring, then you should read this carefully so that you can change boot screen. Customize the boot screen and give it a taste that suits you.
These are few simple steps which you should follow carefully to change boot screen:
- Firstly you need to download Vista boot logo generator. Now install it and run it.
- Click Browse for image button and select the images for both resolution bitmap files.
![]()
- Save your file by clicking File, then selecting “Save Boot Screen File AS” option.
- Now you should replace winload.exe.mui file present in C: ‘Windows’System32’ en-us with the file you created now.
- And make sure that you backup original file before copying your new file.
- For replacing give file permissions to your account , so that you can overwrite the original file with the file you created.
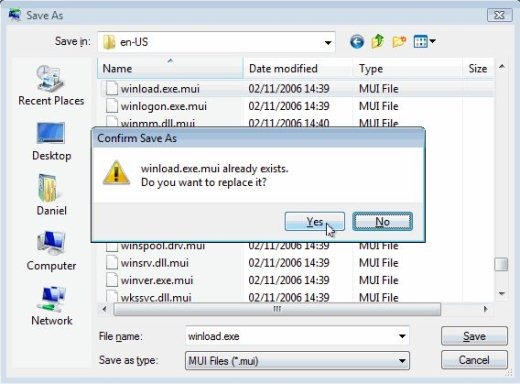
- Save the modified logon file in C:’Windows’System32’en-us directory. Click Yes to overwrite the existing file.
- Now this will prompt you to change boot setting in msconfig tool, click ok to proceed further.
- Click the start button and type msconfig in the box.
- Click continue if prompted with the user account control dialog
- In System configuration tool, simply click on Boot tab.
- Check “No GUI Boot” in boot options.
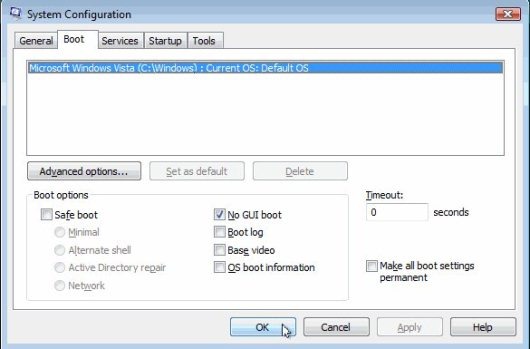
- This will prompt you to restart. Click restart and see new customized boot screen.
For Replacing the already existing file with the new created file please follow these instructions:
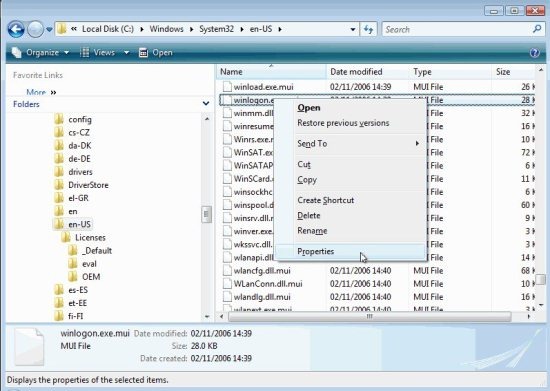
- Log in as an administrator, Open the Windows explorer.
- Go to C:’Windows’System32′ folder. Now right-click on winload.exe.mui file, choose properties.
- Under the security tab, click on “Advanced” button.
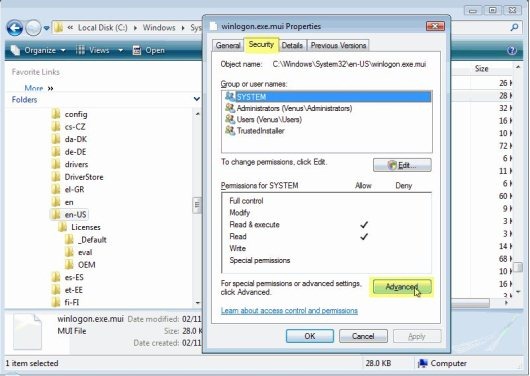
- Tap the ownership tab and click on edit button.
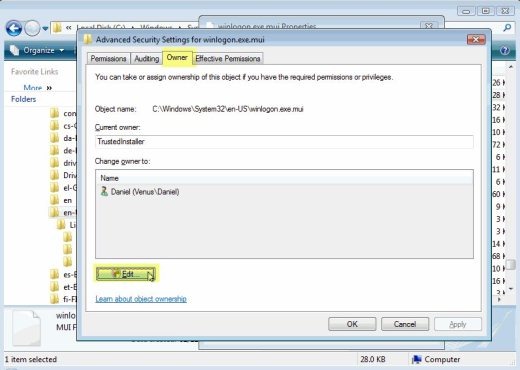
- Click on Continue if user account control dialog pops up.
- Select administrator account or the user which consists administrative rights, then click OK.
- For adding the user account click on edit button back in security tab.
- Tap on “Add”, select a desired user account, then click on OK.
- When user account is shown in the list , check in full control check box.
- Click OK in all way out. that’s all.
How to Change Boot Screen of Windows XP
Change boot screen of Windows XP with TuneUp Utilities software. Tune up utility is a user-friendly software which is available in full version for purchase and in 30 days trial version. So you can either purchase it or download 30 days trial version.
Follow these simple steps to change boot screen of Windows XP:
- Firstly download TuneUp Utilities, then install it. Run it directly from the desktop.

- Now tap “Customize Windows”. Click on Logon Screen.
- A window opens up with several options.
- Click on Add, then select “Load boot screen from file”.
- Choose boot screen file, then tap “Install boot screen”.
- Moreover you may make new and fresh boot screen, For this click on “New Screen” button.
- A window opens up, now simply click search local drives link for selecting an image.
- Image borders, background color, alignment, etc. can be adjusted.
- Click “Save boot screen” link and name boot screen.
- You may also view a preview of your boot screen with a single click on “Show large preview link”.
- Click on “Install boot screen” button for applying it. Watch a video tutorial in which shows “How to change boot screen of Windows XP using TuneUp Utilities.
So follow these steps for changing boot screen of Windows 7, Vista and XP.