Zoho Backstage is a free online event manager with features like unlimited events, unlimited attendees, speaker management, ticketing system, event microsite, and much more. It allows you to easily create events by adding various event details, agenda sessions for different programs, speakers (guest, normal, or featured), and more. You can also create tickets for your events by integrating with Eventbrite. To make it much easier for you to create and manage events, it allows you to invite team members as organizers or admins and collaborate with you. The best part of Zoho Backstage is that it lets you create a microsite for your events and make them live for others to see and attend events.
You can also easily manage your events by tracking the sale of tickets, checked-in attendees, manage speakers, day-wise sessions, etc. This is probably one of the best free event management software for agencies and corporate who frequently organizes events for themselves or their clients. It provides almost all the necessary tools required to create, organize, and manage events in a hassle-free way.
It works just like another free online event manager called “Tame” which I have reviewed earlier. But, it has certain limitations in the free version like only 1 portal, no interactive sessions & presentation library for speakers, no option to add sponsors to an event, etc.
How to Use Zoho Backstage Create and Manage Events:
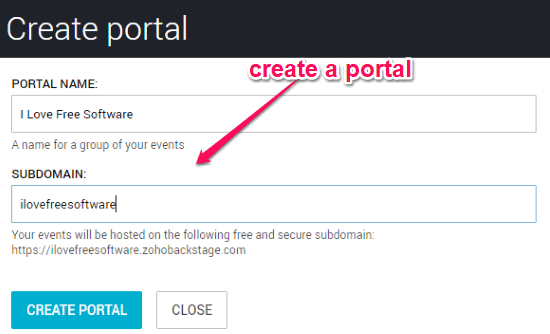
To start using Zoho Backstage, the first thing you would need to do is create a new Zoho account or login to your existing account. As soon as you do that, it will ask you to create a portal. For that, you would need to enter a portal name and a subdomain. The subdomain is where your events will be hosted. It will basically help you create microsites for your events.
When you’re done with creating a portal, you can see the option to create events, add team members, etc.
How to Create an Event in Zoho Backstage:
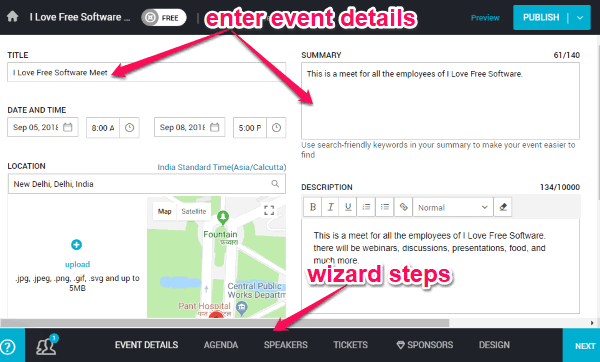
To create an event, simply click on the “Create Event” button on the portal dashboard. After that, it will open up a wizard with different steps named, Event Details, Agenda, Speakers, Tickets, Sponsors, and Design. Now, let’s us see what you need to do in each step to complete the event.
Event Details:
In this step, you would need to enter various event details like the title, summary, description, event date & time, and location. Apart from that, you can also choose the event category from a list of predefined categories such as Automotive, Business, Career, Design, Education, Engineering, Marketing, Retail, and much more. It also lets you add your company’s social pages and handles if you want to the event.
Agenda:
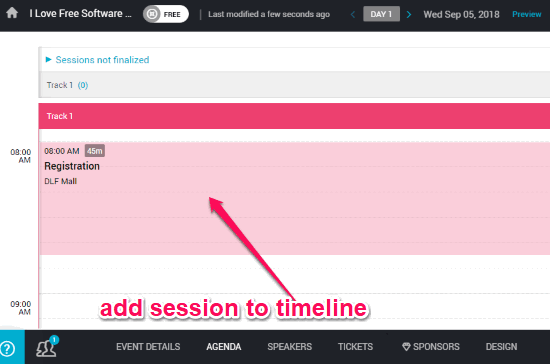
When you’re done with entering the event details, you can proceed to the “Agenda” tab. Here, you will see a day-wise timeline or track in which you can add the sessions of your event. To add a session, all you gotta do is choose a time period and double-click on the timeline. After you do that, it will open up a slider window on which you can create a new session. For that, you would need to choose a session type, title, agenda day, start time, duration, add hall, and a description.
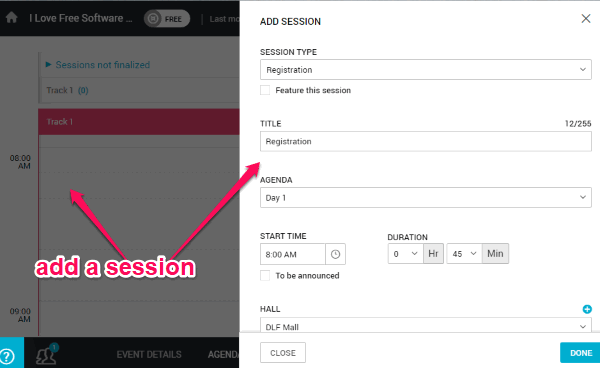
There are different types of sessions which you can select like Registration, Breakfast, Welcome Note, Keynote, Presentation, Break, and more. This way you can add as many sessions as you want for an entire day. You can manually change the agenda day and add new sessions for that day.
Speakers:
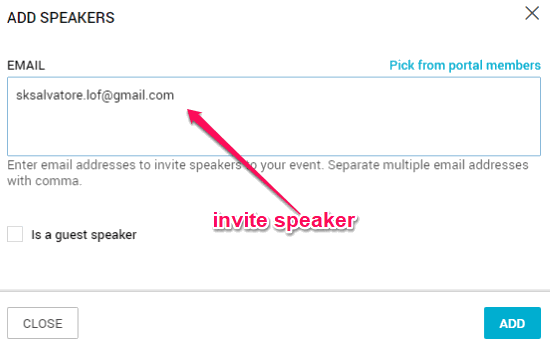
After setting the agendas, you can proceed to the “Speakers” tab and then invite speakers for your events. To do that, click on the “Add Speaker” option and then enter the email of the speaker to send an invitation. There you will also see an option that says “Is a guest speaker” which you can enable if you want to add anyone as a guest speaker.
When you’re done inviting speakers or adding guest speakers, they will be visible on the on the “Speakers” tab. Now, you can edit the details of the speaker by clicking on the “edit” option associated with each speaker. You can edit the name, address, contact information, feature him/her in your event, switch role from speaker to organizer, and more.

This way you can add as many speakers as you want to give speeches at your event.
Tickets:
After adding speakers, move to the “Tickets” tab to create tickets for the event and sell them to others. Do note that, you would need to connect your Eventbrite account in order to create and sell tickets. Using Eventbrite, you can create as many free and paid tickets as you want and show them on your event page.
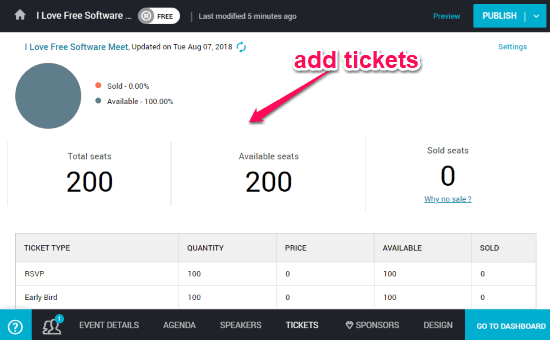
You would need to enter your bank account details in order to receive money for the tickets. You don’t need to do this for free tickets.
Sponsors:
In the step, you can actually add sponsors to accept sponsorships for your events. You can easily draw up packages and benefits of sponsors and do more. But unfortunately, this feature is not available in the free version of Zoho Backstage. Apart from the sponsors, the discussions and gallery part of the event webpage is not available in the free version.
Design:
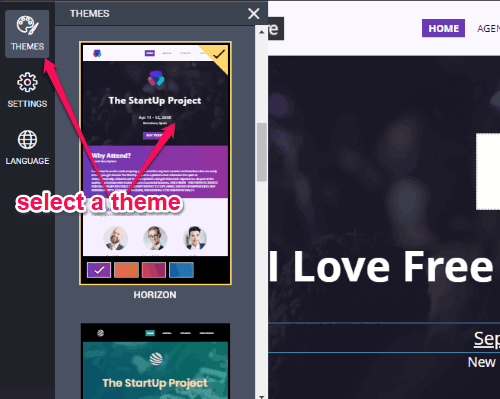
So, now you can move to the last step i.e. “Design”. When you open this tab, you will see the preview of your event webpage along with the option to customize it. To do that, the first thing you would need to do is select a theme for the webpage. Just click on the “Themes” option on the left and then it will open a list of themes from which you can select anyone you like.
After that, you can proceed to customize other elements of the webpage like add a logo, edit event title, add media files (images & videos), show/hide website menus, add popular hotel options near the event venue, add a contact form, and much more.

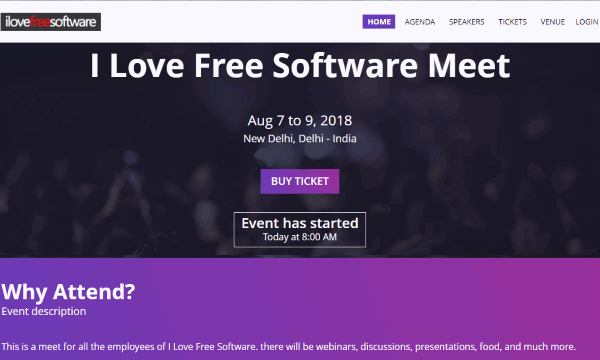
When you’re done with that, you can preview the event webpage and then finally hit the “Publish” button at the top. As soon as you do that, it will ask you to create your microsite URL. To do that, you can enter any name you want after the subdomain, which you have added while creating the portal. Once done, you can make the event webpage live.

Now, you can share the URL with others, post on your social media accounts, broadcast via email, etc. Anyone with the link can open the event webpage, see all the details, and also book tickets for the same (if required). You can have unlimited attendees for a single event.
How to Invite Team Members to Zoho Backstage:
If you think that creating an event alone is a hectic task, then do not worry as it also allows you to invite team members for collaboration. You can invite as many team members as you want to Zoho Backstage and then add them as organizers. To invite anyone, all you gotta do is click on the “Invite” icon at the bottom of the event creator screen and then enter the email of the team members. They can use the invitation URL to join and collaborate.

Apart from organizers, you can also add team members as admin for the portal. To do that, you would need to select the “Team” tab on the portal dashboard and then invite other users as admin.
How to Manage Events in Zoho Backstage:
When you’re done creating an event, it will be visible on the portal dashboard. There you can find two different options associated with the event named, Dashboard and Experience. These options can help you seamlessly manage and track your event, attendees, and much more.
Event Dashboard:
When you choose this option, it will open up a new screen with various tabs including Dashboard, Promote, Progress Tracker, etc. Now, let us take a look at the tabs and what they can help you for.
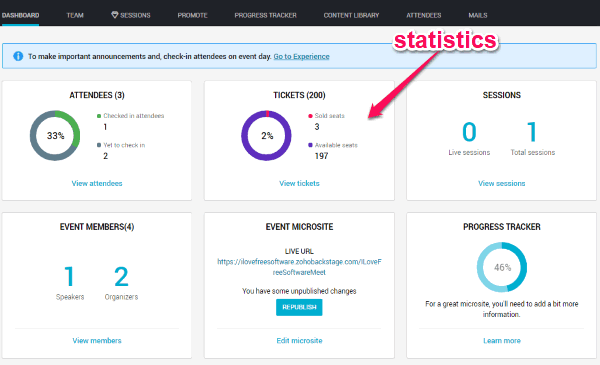
- Dashboard: In this tab, you can see various statistics about your event like the percentage of checked-in/yet to check-in attendees, sold/available seats, number of live and total session, event members, your microsite URL, and its information completion progress.
- Team: In this tab, you can view and manage all the organizers and admin of the event.
- Sessions: This feature is not available in the free version.
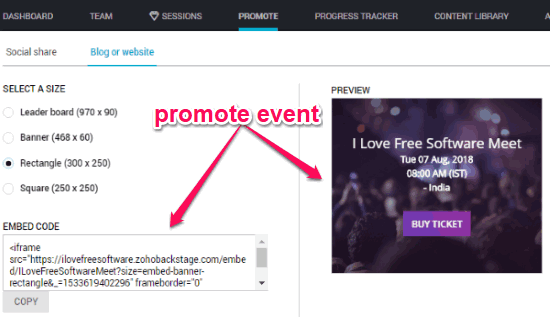
- Promote: This tab contains the option to promote your event via social media and website. You will find a pre-created post which you can share on social media to engage more attendees. In addition to that, you can get an embed code of an event banner that you can display on your blog or website.
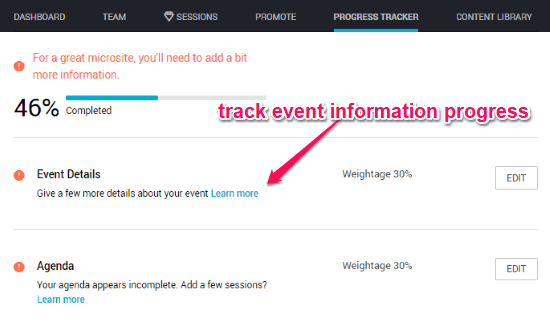
- Progress Tracker: Here, it will show you the information progress of your event. It will tell you the weightage of your event details, agenda, sessions, etc. and how much more information you need to add for making your event microsite great.
- Content Library: Here, you can see all the files you have used in the event webpage like images, videos, etc.
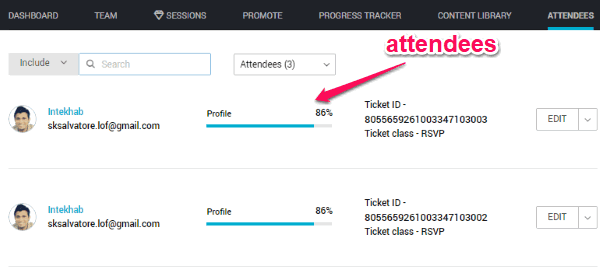
- Attendees: In this tab, you can see all the attendees who have bought tickets for your event. You can edit their profile information, see ticket ID, etc.
- Mails: This feature is also not available in the free version.
Event Experience:
When you select the “Experience” option of the event, it will open another screen where will see two different tabs named, Check-In and Announcements. Let’s see what you can do with them.
- Check-In: In this tab, it will allow you to manage all your attendee check-ins. You can see the “Yet to check-in” attendees and then manually check them in when the event date arrives. It will also show you the checked-in attendees, total expected attendees, and the cancelled check-ins in separate sections. Another useful feature is that you can manually add check-ins if you have the ticket ID of any attendee or simply add guest attendees with a guest pass.

- Announcements: This feature actually lets you keep your attendees up to date with all the happenings related to your event. Unfortunately, you can’t use this feature in the free version of Zoho Backstage.
There are some other useful features available in Zoo Backstage:
- Google Analytics integration to track usage of your event microsites.
- Standalone events section to see live events, drafts, past events, and trash.
- Zoho backstage app for attendees to seamlessly get event details, respond and reply to speakers in real time, customize the event agenda, and more.
Closing Words:
Zoho Backstage is a very useful online event manager which can help you easily create and manage unlimited events for free. Some of the features which I liked about this service is the microsite, speaker management, and attendee management. You will find enough features in the free version that can help you seamlessly organize events for corporate and agencies. Go ahead and give it a try.