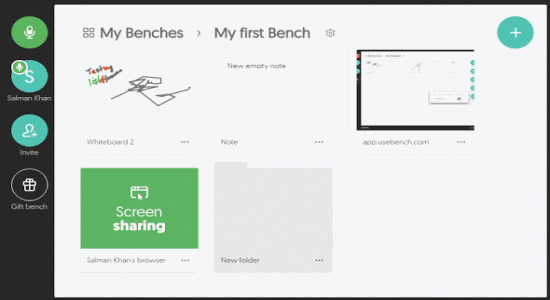
Bench is a free online team collaboration application with powerful features like screen sharing, Whiteboard, file sharing, share browser screenshots, etc. Using this application, you’ll be able to create benches and then invite team members for collaboration in brainstorming ideas, discussing important topics, etc. In each bench, you will be able to add notes, start whiteboard demonstration, share files (from PC, Trello, Dropbox, & Basecamp), share screenshots, etc. Unlike other team collaboration applications such as Missive, TeamTaskManager, and Slack, everything you do in your benches will be visible to your team members in real-time as you’re in a same room.
The best part of Bench is the Whiteboard, which is quite similar to the other online Whiteboard applications and lets you draw and demonstrate your ideas in real-time to your team. If you want to let your teammates know that what are you doing exactly on your PC, then you can use the screen sharing feature to make your PC screen visible to others.
Note: The free version of Bench lets you create up to 3 benches, which can be increased up to 25 benches by upgrading to the paid version.
How to Create a New Bench and Invite Team Members:
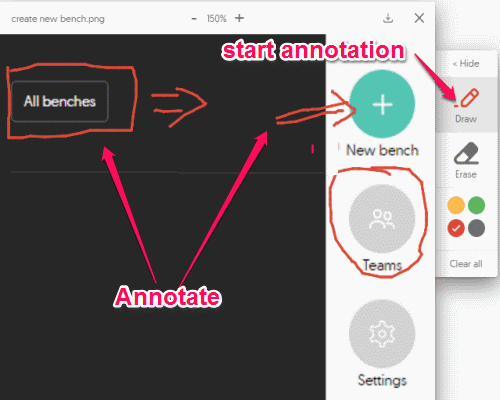
Step 1: At first, browse the homepage of Bench and register for a new account using your email id. After that, you will see a blank “All Benches” section and 3 different options on the right panel as New Bench, Teams, and Settings.
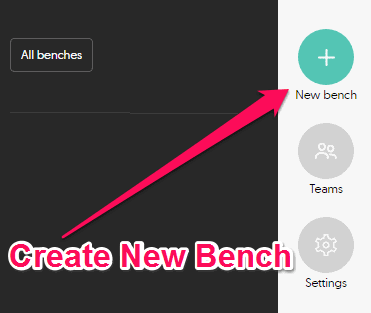
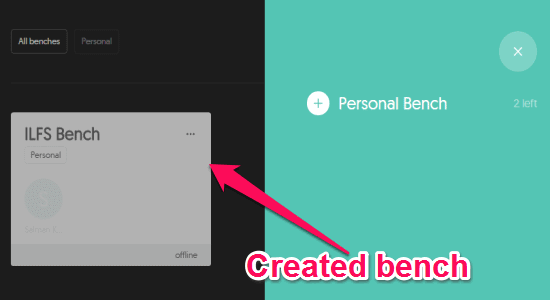
Step 2: To create a new bench, simply select the “New Bench” option and then click on the “Personal Bench” button. As soon as you do that, a new bench will be created and will be visible on the “All Benches” section. You can rename the bench as required by clicking the “Dots” icon at the top of the bench. Remember, you can only create 3 personal benches in the free version.
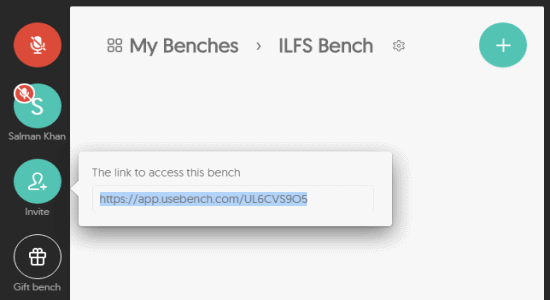
Step 3: Once you’re done creating a bench, simply click on the bench name to open it up and invite team members. To invite others on your bench, simply click the “Invite” button on the left panel and a unique URL will be generated. Now, you can share the URL with anyone in order to let them join your bench. Now, whatever you and team members do on the bench, canvas will be visible to each other in real-time.
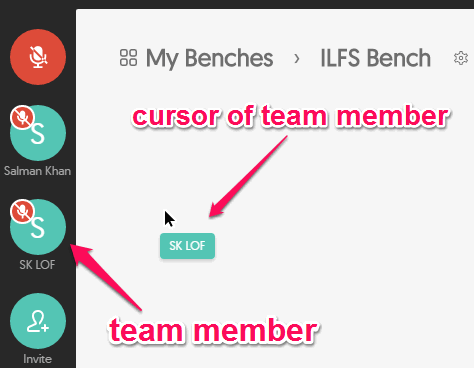
Step 4: After anyone joins your bench, a circular bubble with the username will appear on the left panel. Apart from that, you’ll also be able to see the mouse cursor of all the team members on the bench canvas with their names at the bottom of the cursor as shown below. The cursor can help you understand what your team members are trying to indicate in the bench canvas.
How to Share Files and Add Notes on Benches:
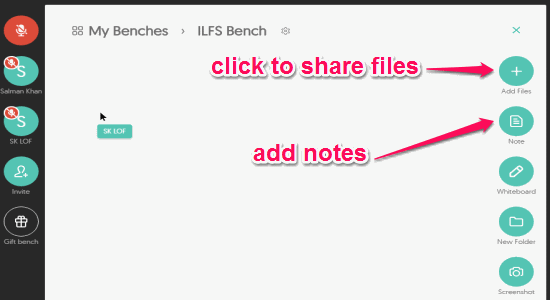
Step 1: On the right side of the bench canvas, there will be a large “+” button which can be used to share files, add notes, start Whiteboard session, etc. To share files like documents, images, and more, simply click on the “+” button and then select the “Add Files” option from the list.
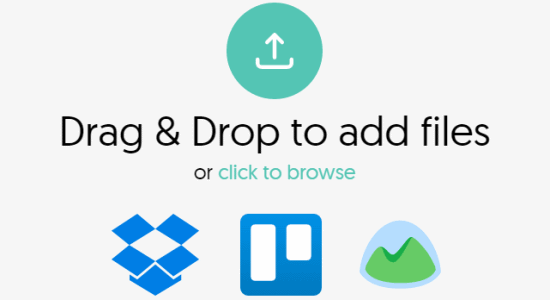
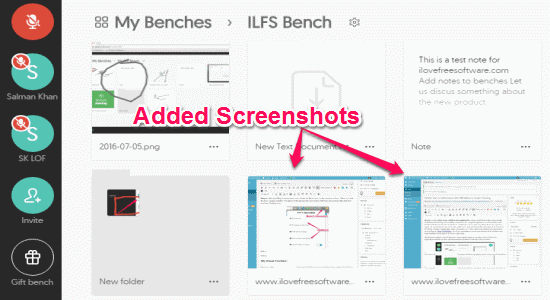
Step 2: As soon as you do that, you will be able to import files from your PC and also from your Dropbox, Trello, and Basecamp accounts. All the added files will be visible in the Bench canvas as individual files, which your team members can view and download.
Step 3: Another useful feature of Bench is that it lets you and your teammates annotate on images which you have added to the bench. To start annotating, simply click on the image to open it up and then use the “Marker” button on the right to annotate.
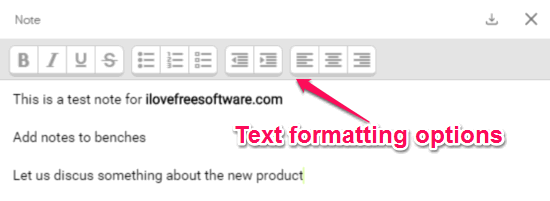
Step 4: Apart from sharing files, it also lets you jot down notes and add them to your bench. After clicking the “+” button, simply select the “Note” option below the “Add Files” option to start writing anything in the note window. The note window comes with various text formatting options like bold, italic, underline, strike-through, bullet lists, numbered lists, indentation, etc.
How to Start a Whiteboard Session with Team Members:
Step 1: The best part of this application is the Whiteboard, which can be used to demonstrate anything by drawing on the white canvas. To start a Whiteboard session, click the +” button on the right of the bench canvas and then choose “Whiteboard” from the list.
Step 2: As soon as you do that, the Whiteboard window will appear on the bench canvas which will also be visible to all the team members of that particular bench. You will see 3 different options on the right of the Whiteboard window, which can be used to start drawing, erase drawing, and change the color of the maker as shown below.
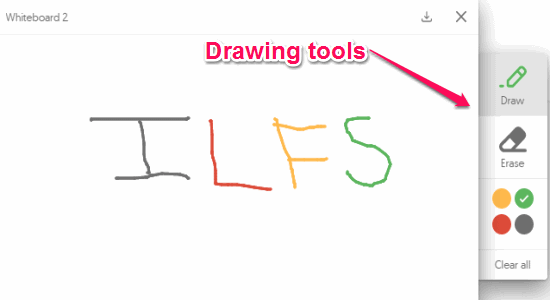
Step 3: Whatever you draw on the Whiteboard will reflect on the bench canvas of your teammates in real-time. All the team members can also draw anything they want in the same Whiteboard. Once you’re done with brainstorming on the Whiteboard, you or any of the team members can download the Whiteboard session as a PNG file.
How to Share Screenshots and Share your Screen with Team Members:
Step 1: Apart from all the above features, it also comes with two other interesting features using which you can capture & share screenshots of your browser screen and enable screen sharing. Please do note that in order to use these features, you need to install the free Chrome extension of Bench.
Step 2: After installing the extension, you will see the Bench icon on the browser toolbar. When you click the icon, a popup window will appear with options like Screenshot, Full Page Screenshot, This Tab Live, and Your Desktop Live.
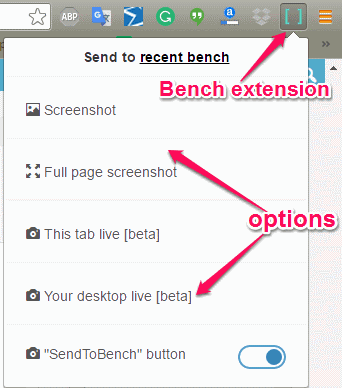
Step 3: The “Screenshots” option can be used to capture screenshots of any open tab on your browser. When you click the “Bench” icon and choose the “Screenshots” option, it will instantly capture a screenshot of the tab and add it automatically to your bench canvas. It only includes the application interface and excludes the address bar/toolbar section of the browser.
Step 4: But, what if you want to share screenshots of a web page which is pretty lengthy and requires scrolling down to view the entire page. Well, the “Full page Screenshot” feature of Bench extension lets you do the same with ease. When you choose the “Full Page Screenshot” option, it will automatically fetch the entire webpage in one single screenshot and add it directly to the bench.
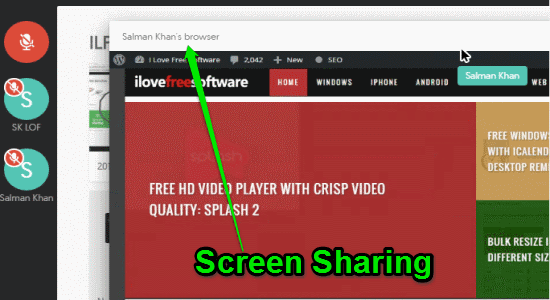
Step 5: The other two options “This Tab Live” and “Your Desktop Live” can be used to share your screen with all the team members on your bench. The “This Tab Live” option can be used to only share any of the particular tab opened on your browser, whereas, the “Your Desktop Live” option allows you to share anything on your PC screen.
My Final Verdict:
If you’re looking for an online application to collaborate with your team in real-time, then you can start using Bench. Personally, I like this application because of the Whiteboard feature as it lets you draw and demonstrates ideas with your team as you’re in the room. The user interface is super simple and makes it much more easier for you to collaborate with team members. The only thing that I think this application lacks is the private chat feature to have one-on-one conversation with team members.