If you are tired of constantly referring to man pages or Googl-ing CLI commands to remember right flags, then you don’t have to do that anymore. Microsoft came through with a genius solution – inshellisense!
inshellisense sounds a lot like IntelliSense that is found usually in Visual Studio and VS Code. But now they have released the similar tool for command line stuff. It works on macOS, Linux, and Windows. You can autocomplete commands with it and even lookup the right syntax right inside the terminal.
What is really interesting in this tool here is that how well it works across hundreds of different tools without any extra configuration. I was able to instantly start using advanced Git commands that I have never touched before. It comes with an easy learning curve and in a day or so, you will learn how to use it and make yourself productive at work.
Here’s full list of shells it supports for now.
- Bash
- Zsh
- Fish
- Pwsh
- PowerShell
If you use any of the above shells on your PC, then you can install inshellisense there and then let it autocomplete complex commands for you in no time. In the next section, you will see how to install it and use it.
Installing and using Inshellisense:
Here, I am going to show you how to install and setup in Windows 11. But if you are using some other platform then you can follow the same process.
So, to install and setup inshellisense, you need Node.js.
- Download and install Node.js.
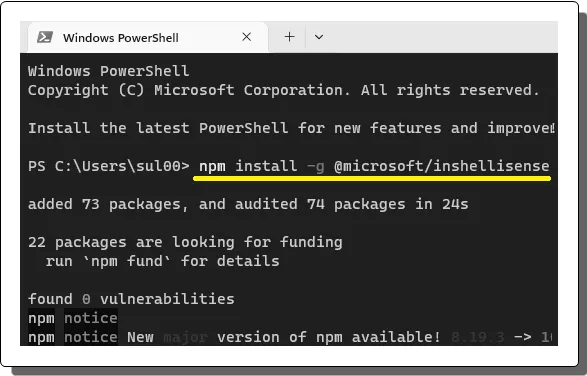
- Run this command to install inshellisense:
npm install -g @microsoft/inshellisense

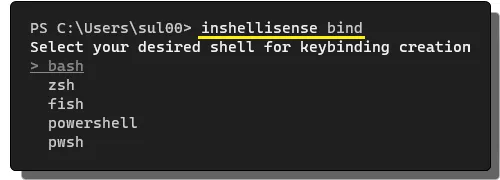
- Now, it is time of bind it. Run this command to do that:
inshellisense bind

- Select the shell type you are using, and press enter.
- Done.
If the above steps completed successfully for you then you can just go ahead and then start using it. After binding the command, you can then invoke it using the Ctrl+A shortcut.
So, just type a command and then press Ctrl+A. You will now start seeing suggestion through an interactive TUI. You can see that in the screenshot below. You can add different flags and then it will automatically change the suggestions for you in a box.
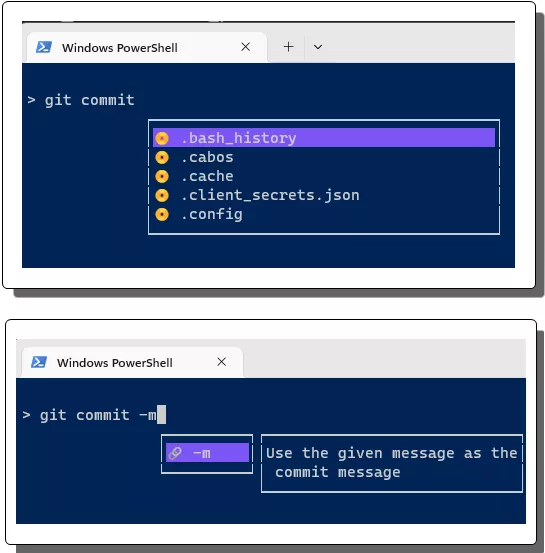
When you have the correct suggestion, just hit enter to execute the command. Or, if you want to quit the inshellisense shell, then just press Ctrl+D to exit.
In this way, you can now use this powerful auto completing system by Microsoft in various shells. It works perfectly and makes it easy to discover the correct syntax and parameters for a given command. What’s even best here is that it is open source. If you want to take a look at its coding aspects, then visit its GitHub repository here.
Closing thoughts:
Whether you’re a beginner looking to level up your CLI skills, inshellisense is a total productivity booster for you. Pair it with the shell you use and watch your workflow speed up noticeably. This little tool brings IDE-style autocomplete directly to your favorite shell (PowerShell, Bash, etc.). Simply download it and use it as I have explained above, and you’ll start to see suggestions as you type out commands.