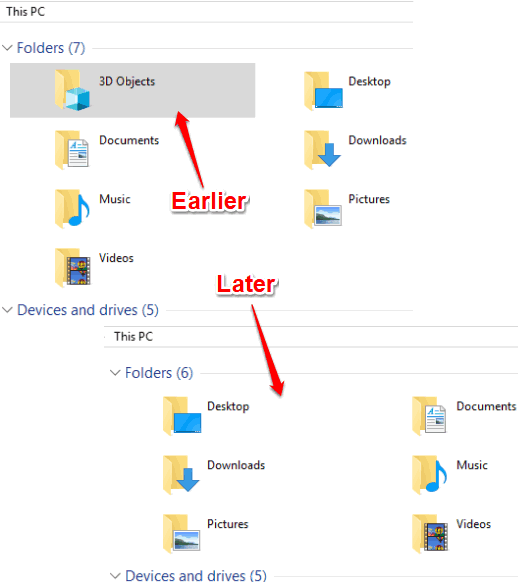
In this tutorial, you will learn how to hide or remove 3D Objects folder from This PC in Windows 10. Pictures, Downloads, Music, and other folders are already present in This PC section. This 3D Objects folder is a new entry in This PC, which is added in Fall Creators Update of Windows 10. If you don’t use 3D Objects folder from This PC and want to remove/hide/delete it from that location, then this tutorial is gonna help you.
To remove 3D Objects folder from This PC in Windows 10, you need to use Registry Editor and then change the value of an entry. All the steps for doing this are covered in this tutorial. So, deleting or hiding 3D Objects folder will be very simple for you. You can also show 3D Objects folder again in This PC anytime you want. Do note that this trick doesn’t delete 3D Objects folder from your PC, it only removes it from This PC section. You can easily access 3D Objects folder under the user profile folder (default location is C:\Users\PCName (like ILoveFreeSoftware)) of your Windows 10 PC.

You can see in the screenshot above that earlier 3D Objects folder was visible in This PC, but later it is removed by tweaking the registry.
How To Remove 3D Objects Folder from This PC In Windows 10?
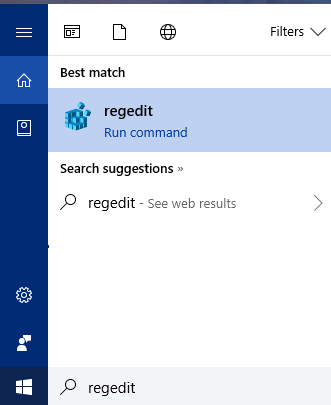
Step 1: Open Regedit or Registry Editor. For this, you can use Search Box or Run Command. If you are using Search box, then type regedit in that box and select the result available for Registry Editor. If you are using Run Command (Windows Logo Key + R), then type regedit in text box and press OK.

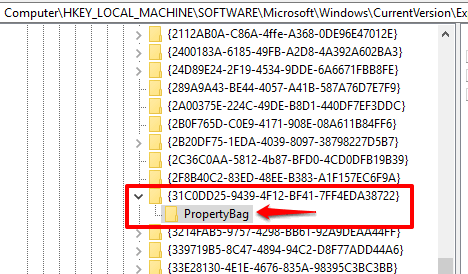
Step 2: You have to explore HKEY_LOCAL_Machine and find registry entry (PropertyBag) related to 3D Objects folder. Follow this path to access PropertyBag registry entry for 3D Objects folder: Computer → HKEY_LOCAL_MACHINE → SOFTWARE → Microsoft → Windows → CurrentVersion → Explorer → FolderDescriptions → {31C0DD25-9439-4F12-BF41-7FF4EDA38722} → PropertyBag.

You can also see screenshot above to access this registry key.
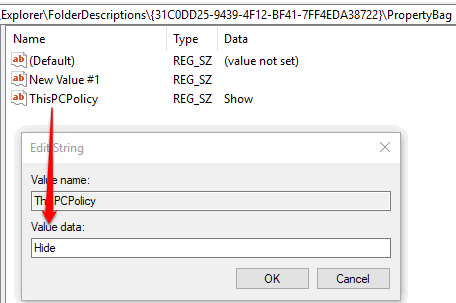
Step 3: PropertyBag key of 3D Objects folder contains a String Value “ThisPCPolicy“. The value data of this String value is set to “Show”, which means that 3D Objects folder will be visible in This PC. You need to change its value data to Hide. Double-click ‘ThisPCPolicy’ String value and add “Hide” in Value data.

Save the change.
That’s it! The new change is added immediately. Open File Explorer and click on This PC. You will see that 3D Objects folder is not visible anymore.
Whenever you have to show 3D Objects folder again in This PC, you can add “Show” in value data of ThisPCPolicy String value.
Other useful tutorials covered by us for you: How To Set Windows 10 File Explorer To Open With ‘This PC’ View and How To Save File Explorer Search In Windows 10.
The Conclusion:
For me, 3D Objects folder in This PC is of no use, at least for now. So, I have temporarily removed 3D Objects folder from This PC in my Windows 10 PC. If you also want to do it, then follow these simple steps (explained above) and get rid of 3D Objects folder from This PC in your Windows 10 PC. Later, when you think you should add 3D Objects folder in This PC again, that can also be done easily, so there won’t be any trouble.