changedetection.io is a free open source website change monitor tool that you can use. Here you can either run it locally or host it on a server to monitor any number of websites for changes for free. It can monitor static as well as dynamic webpages and notify you on multiple channels. The installation process is simple and you can see the diff to compare the original text to the changed text.
All the website monitoring tools are generally paid, and free ones offer longer checking intervals. But with changedetection.io, you can host your personal website changes monitoring system. You can monitor unlimited websites and set checking interval as low as 1 minute. Each monitor that you create can have different settings and notification settings. And apart from websites, you can use it to monitor REST APIs as well.
To monitor a website, changedetection.io only needs a URL, tag name, and CSS selector. For notifications, there are multiple options, as the notification system is built using Apprise. You can opt to get notifications on mobile(via Amazon SNS), webhook, email, Telegram, Pushover, Slack, XMPP, IFTTT, Google Chat, Mailgun, and many others. You can opt to get notifications on multiple channels as well. See the Apprise documentation on its GitHub page to know more.
Main Features of changedetection.io:
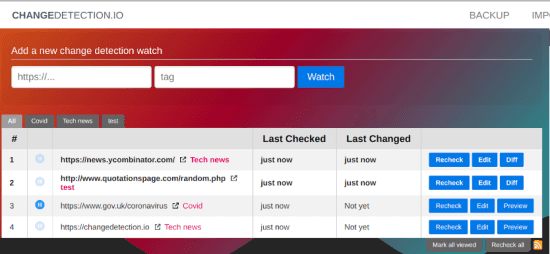
- Dashboard to See Stats: There is a main dashboard and shows important statistics about all the websites that you have added in the monitoring list. You can see the last check time, last change, and an option to force check a website.
- Multiple Fetch Methods: It supports 2 different methods to fetch the website content for comparison; via simple HTTP client or via web driver. The latter is useful to track changes on dynamic website such as Amazon, eBay, and others.
- Diff viewer: changedetection.io uses a powerful diff checker to show you the results. It shows what text has been added to the page and what is removed. Not only this, but you can also see word by word or character by character comparison.
- Regular Expression Support: In the watched text, if you want to monitor a specific pattern, then you can define that using regular expressions. And you can define regular expressions for individual monitor along with the CSS selector.
- Multiple Notification Platforms: changedetection.io supports all possible notification channels that you can think of. I have already mentioned above that it uses Apprise for notifications, so you will be able to configure notification for almost anything.
- API Monitoring: Apart from website content, you can configure to watch changes in API response. It is designed to do JSON comparison and you can set filters to watch exactly what you want to watch in nested JSON schema with the help of JSONPath rules.
- Backup & Restore: If you want to deploy multiple instances of changedetection.io, then you can have the same data across all of them. It can export all the data including all the details of the monitors that you can later import back easily.
Installing changedetetion.io:
The installation method is very simple for this website changes detection system. You can manually install it using Python package manager or pip. Or, you can simply go with Docker method, which is more suitable in my opinion. Both these methods can be used to install it locally or on a VPS.
If you want to host it on a PaaS platform, then it supports 1 click deployment for Heroku. Find the Heroku deployment button on its GitHub.
Start by cloning its GitHub repository. Make sure that you already all the tools required to launch it and they are: git, Docker, and docker-compose. Run the below command to clone its repo and cd into it.
git clone https://github.com/dgtlmoon/changedetection.io

cd changedetection.io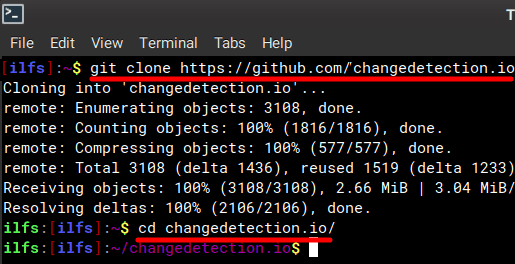
Now, open the docker-compose.yml file using a text editor. And uncomment the lines which prevent the installation of WebDriver+Chromium server. Just remove the “#” symbol and then simply save the changes to the file.

Now, open terminal in the current folder where the above edited file is present. Run the following command to download, install, and start the changedetection.io server.
sudo docker-compose up -d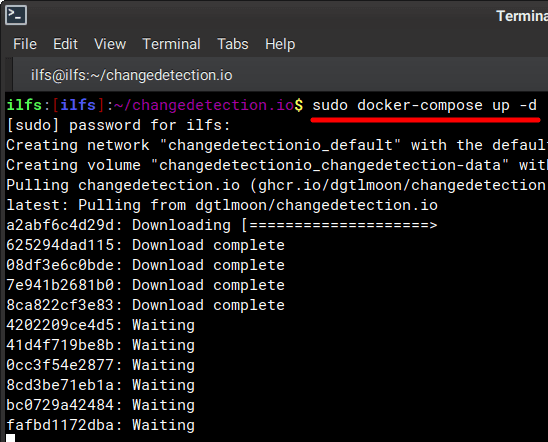
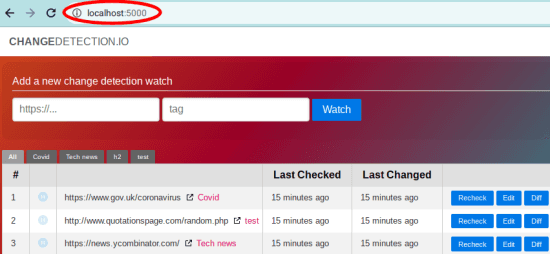
After it finishes, enter localhost:5000 into the browser and the main UI of this website monitoring system will show up. It has some demo websites loaded for monitoring already.
Now, at this point, you have successfully installed changedetection.io. You can now create custom website change detecting monitors for any site and specify different parameters. See the next section to add/configure new monitors.
How to use changedetection.io to monitor website for changes?
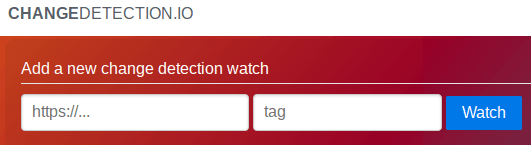
To add a monitor to the watch list, just enter the URL of the website you want to watch along with the tag name that you want to monitor.
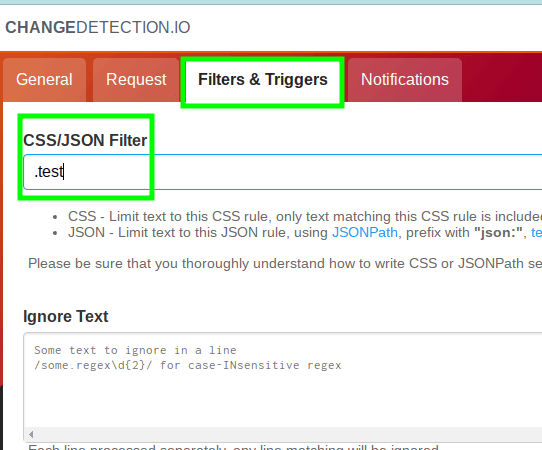
Since there can be multiple tags on the page you want to monitor, you have to refine your filter. You do that by specifying a CSS selector. For that, just edit the monitor and then go to the Filters & Triggers tab. Here, you enter the CSS selection by either adding a class name or an ID. In case you are monitoring API then you can specify JSON selector as well.
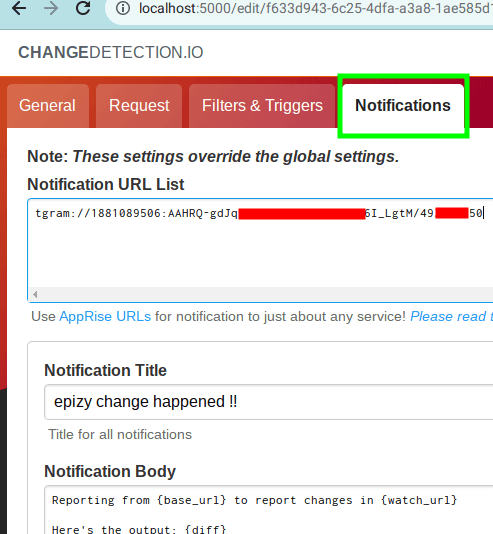
Now, move to the Notifications section to configure them. For notifications, it supports Apprise, so see the syntax for each type of notifications. There is even an option to define notification text using variables as well. For this post, I just uses Telegram to get notifications. The syntax for Telegram is very simple. Just create a bot using BotFather and then get the chat ID using Telegram Bot Raw. If you want to get notifications on multiple platforms, then you can configure that as well.
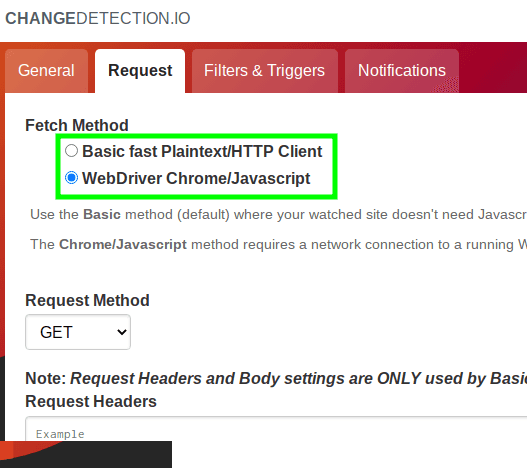
Next, you have to configure fetching method. By default, it uses an HTTP client to fetch webpages. But you can change that by letting it use the WebDriver instead. Simple HTTP client will fail on a lot of websites, so it is a better idea to choose WebDriver. You can specify this in the Request tab.
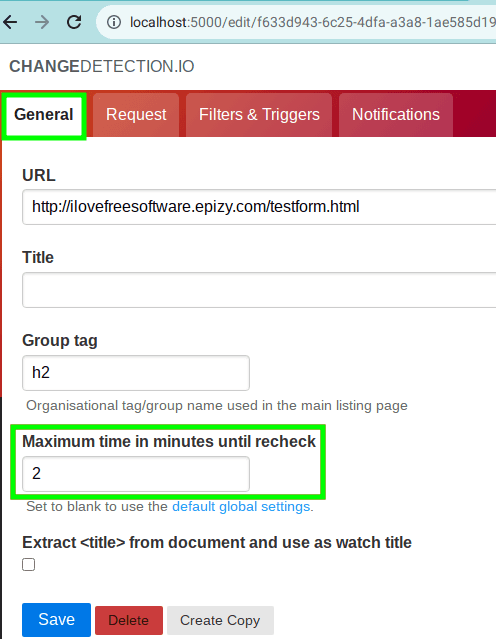
Finally, you specify the check interval in General tab and then save the changes. If you want to use a globally set time intervals for checking websites, then just leave it as blank. It will then use the interval defined in the changedetection.io settings.
Now, you let it monitor the webpages. If something changes then you will know that as it will send you a notification. Also, it will highlight the changed entry on the main UI.

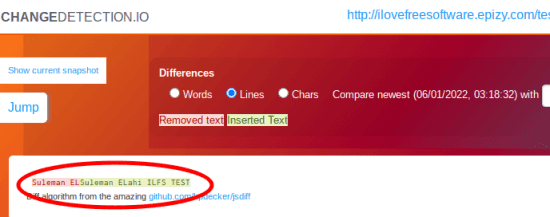
Click on the “Diff” button to see what changed on the website. In the Diff, you can also switch to different modes to analyze the changed text.
In this way, you can use this simple and powerful website monitoring system. You can just install it anywhere you like and use it in the way you want. Create and add as many monitors you want in the list, and it will keep watching those websites for you. In this post, I have explained how to use it to monitor a website, but the process is the same for APIs. Also, you can export the data in ZIP file and the option to do that is on the main interface.
Final thoughts:
If you are looking for a self-hosted website changes monitor, then you are at the right place. The one I have mentioned here, changedetection.io is the best one you can use for free. I liked the fact that it has multiple ways to monitor dynamic website and tons of notification channel support. Anyone can use it as installation process is super easy. Just go through the sections above to see the whole guide to set it up and use it.