This tutorial explains how to disable mouse cursor change in Windows 10. There are two built-in methods to prevent mouse pointer or cursor change in Windows 10: Registry Editor and LGPO (Local Group Policy Editor). Normally, we can access Mouse Properties and change default mouse cursor using scheme drop down menu (available in Pointers tab). There are different pointers available in built-in and 3rd party schemes. However, you can hide Pointers tab using any of these two methods. As a result, you won’t be able to change the mouse cursor by accessing Mouse Properties, because Pointers tab won’t visible there. You will be able to add beautiful mouse cursors using schemes but can’t use them, as Pointers tab will be hidden. However, this doesn’t mean that these are the permanent changes. You can anytime unhide Pointers tab and change mouse pointer in Windows 10.
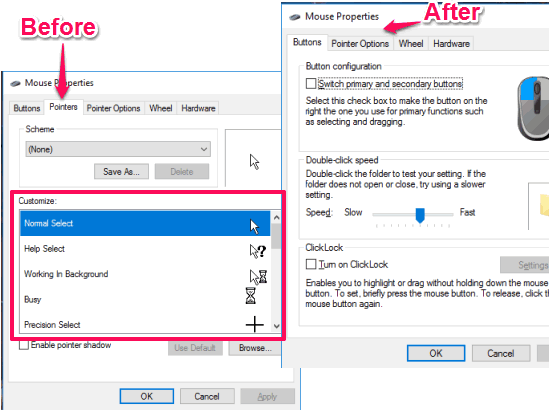
In the screenshot below, you can clearly see that earlier Pointers tab was visible where different mouse pointers are available to choose from. However, after applying the changes, Pointers tab is hidden to prevent changing the mouse cursor in Windows 10.
Let’s start with the first method.
Method 1: How To Disable Mouse Cursor Change In Windows 10 Using LGPO (Local Group Policy Editor)
If you are using Windows 10 Pro and other editions, then you can try this method as well as the second method covered in this tutorial. However, if you are running Windows 10 Home, then you can’t use this method because LGPO is not present. Still, the second method will be useful for Windows 10 Home users.
Step 1: Use the Search box and type group policy to open LGPO window.
Step 2: Access “Personalization” available in Local Group Policy window under Control Panel tab. Its location is: User Configuration → Administrative Template → Control Panel → Personalization.
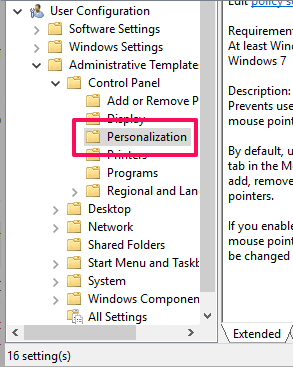
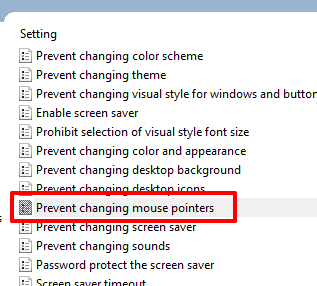
Step 3: You will find dozens of options on the right side. Find and double-click on the “Prevent changing mouse pointers” option.
Step 4: A big window will open. In that window, you will see three different options: Not Configured, Disabled, and Enabled. Select Enabled option and then use Apply and OK buttons.
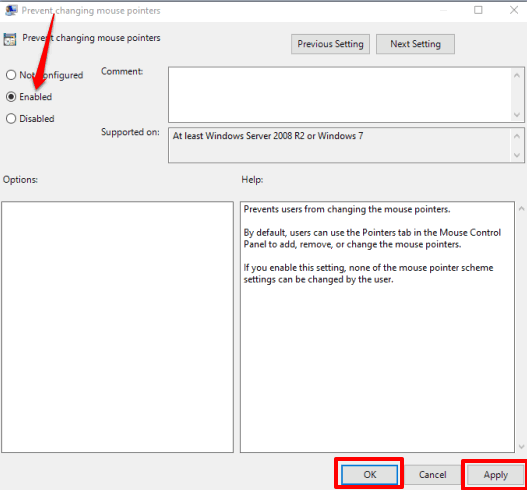
This confirms that you want to disable mouse cursor change in Windows 10 PC. You can open Mouse Properties and then you will see that Pointers tab is hidden.
Later, when you want to access pointer schemes to change mouse cursor, then you can select Not Configured option in Prevent changing mouse pointers window and save your changes.
Method 2: Prevent Changing Mouse Pointer In Windows 10 Using Registry Editor
This method is handy for all Windows 10 Home users as well as users running other editions of Windows 10.
Step 1: Open Registry Editor using Search box (type regedit) or Run Command (type regedit).
Step 2: Jump to the Windows key in Registry Editor. It is located at: HKEY_CURRENT_USER → SOFTWARE → Policies → Microsoft → Windows.
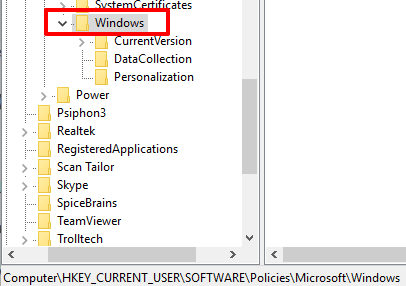
Step 3: You will find Personalization key under Windows key. If it is not available, then right-click on the Windows key → New → and then choose Key option. It will create new key. Rename it as “Personalization”.
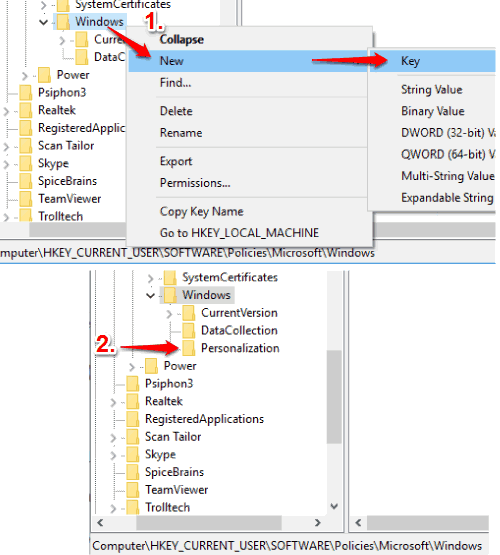
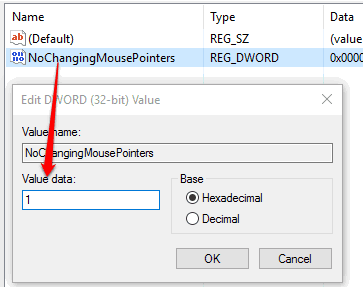
Step 4: Now create a DWORD value under Personalization key (by right-clicking on Personalization → New → DWORD (32-bit Value)). After that, rename that value with “NoChangingMousePointers“.

Step 5: It’s the final step. Double-click the NoChangingMousePointers value and add ‘1’ in its value data field.
Save changes and access Mouse Properties window. You will see that Pointers tab is not available.
When you need to change mouse cursor, you can simply delete Personalization key. It will bring the Pointers tab in Mouse Properties again.
Also learn How to Disable Theme Change and How To Set Animated GIF As Wallpaper In Windows 10?.
The Verdict:
So now you know two different tricks to disable mouse cursor change in Windows 10, you can try your preferred method. For me, Group Policy Editor is easier as I am using Windows 10 Pro version for the time being.